Soundproofing Your Boat

How to install soundproofing for quieter cruising

For most, boats are a way to escape the rat race of terrestrial life and an opportunity to enjoy time with family and friends on the water. Relaxing can be difficult, however, when you have to scream over engine or generator noise during conversations or while lying awake at night, listening to the melodious hum of an air conditioning unit. Installation of soundproofing can make a huge difference in onboard noise reduction. Here’s how to transform the hullabaloo of your boat into the peace and tranquility of a floating Zen garden.

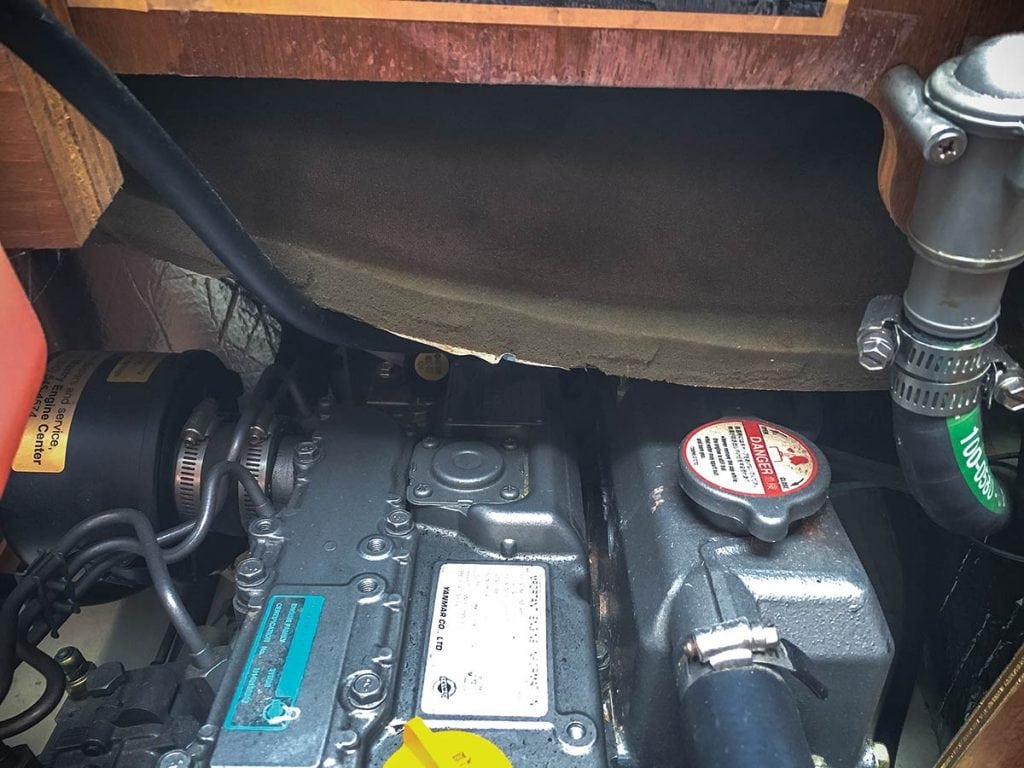
The best way to combat noise is by containing it at the source—within an engine compartment, for example. Installation of a good-quality foam soundproofing barrier can reduce engine noise by 10-35 decibels (about 65 percent). Soundproofing material is available in a wide variety of forms, from sprays and paints to foil-backed foam panels. Foam panels are a popular choice and one that’s very effective against airborne noise pollution.

Self-adhesive panels are easy to install (just peel and stick), but you have to plan and position them exactly where you want them the first try, as once they’re in place, you typically can’t reposition them without damaging the foam. Non-adhesive backed panels require spray or brush-on contact adhesives. Most allow a bit of last-minute repositioning, making them easier to work with in tight spaces. Regardless of the adhesives used, panels also require the use of mechanical fasteners (such as screws and fender washers) particularly for overhead horizontal installations. (To prevent gripping and tearing of the foam, wax the screws by running them into a candle prior to use.)

Soft sound shields, such as this one from GSi, provide both installation flexibility and significant noise reduction.

Soundproofing panels can be cut to shape with a box cutter or razor knife but a serrated knife blade will provide a cleaner cut of the foam material itself. Thin sheets of soundproofing material can also be cut with a pair of quality scissors. To ensure the best fit (and avoid cutting snafus), make cardboard templates first to check fit and for use as a cutting guide. Be sure to dry-fit everything prior to applying adhesives or peeling self-adhesive panels.

When planning your installation, remember that sound flows like water meaning you’ll want to use special seal or joining tape that’s provided by the manufacturer to prevent “leaks” at panel joints, etc.

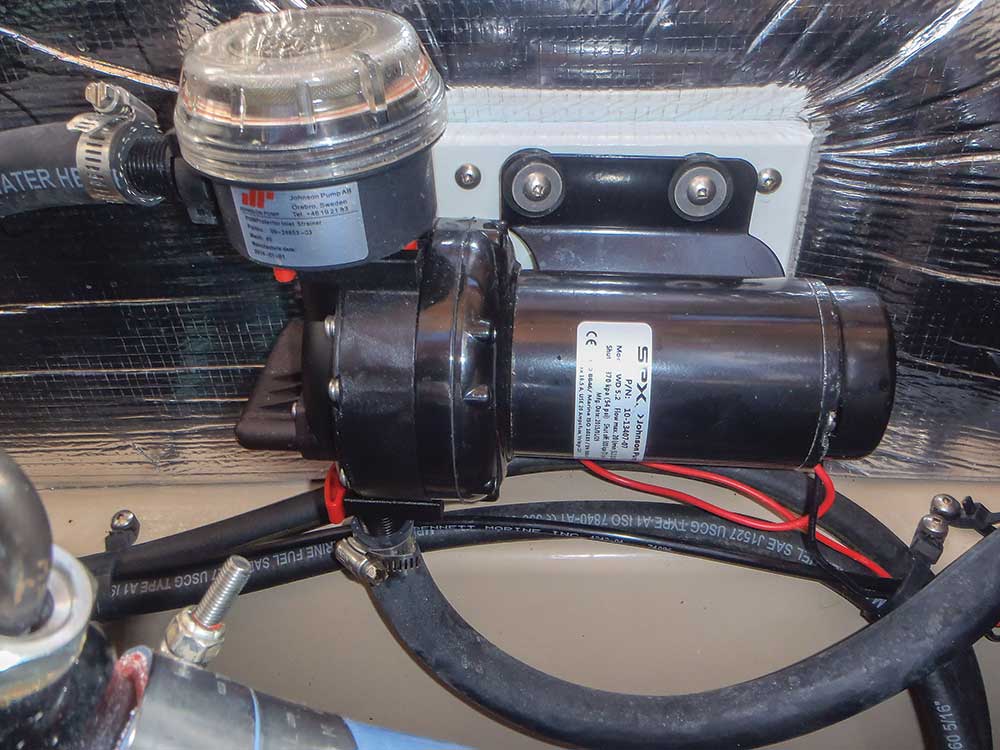
Cables and hoses penetrating the material should be sealed using tight-fitting rubber grommets, while any access hatches should close snugly with a good, tight seal. That being said, any soundproofing installation must provide adequate ventilation for the engine. Required vents and air holes can be quieted using air baffles.

It’s not realistic to expect all noise to be eliminated once soundproofing is installed, but when done correctly you should be able to carry on a conversation at normal volume levels and you’ll notice your cruising becomes much more serene. After all, who wants to yell when trying to relax? Namaste!

Installation tips:

• Read all instructions (soundproofing, adhesives, etc) before starting your project.

• Make templates to check fit prior to cutting panels. Be sure to allow for material thickness at corners.

• Ensure your installation provides adequate ventilation and keeps insulation material above bilge water levels. (Avoid exposure to any wet areas.)

• Provide a minimum clearance of six inches between soundproofing and engine or generator exhaust manifolds.

• Use sharp tools when cutting sound proofing in order to produce clean cuts and also to avoid tearing of reflective foil. The foil or silver facing side should face upward when cutting.

• Handle soundproofing material carefully and avoid folding the material back on itself, which can cause creasing.

• Seal all exposed edges with seam tape to prevent water or other contaminates (fumes, oil, etc.) from entering and degrading sound proofing material.

• Don’t rely on adhesives alone. Use fasteners where appropriate (all overhead and vertical surfaces) to ensure backup in the event of adhesive failure.

• Apply adhesive for and install one panel at a time. Install the top panel first, which lets adjacent vertical panels provide support to the outer edges of the top panel.

• Use seam tape to seal exposed joints and corners. Seam tape can also be used to provide chafe protection at wear points.

— By Frank Lanier, Southern Boating Magazine April 2017

Clean on Demand: Installing a Deck Washdown System

Add a deck washdown system for a squeaky clean boat.

As a marine surveyor I’ve often wondered why many boat manufacturers don’t include a deck washdown system as standard equipment. After all, the “stuff” a boat owner has to deal with—from fish blood to the fragrant evidence that Uncle Joe had one too many margaritas last night—is easier to remove sooner rather than later back at the dock, after it has dried to a concrete-like consistency. In addition, rinsing your anchor chain prior to storage not only reduces corrosion (particularly in the case of freshwater washdowns) but also keeps the un-hygienic smell of Davy Jones’ gym locker from permeating the entire boat. Installing a washdown system is easily within the ability of most any DIY’er. Here’s how to make it happen:

Water supply options
Start by planning out your entire installation (hose runs, pump location, power supply, etc.) before drilling holes. Consider the washdown system’s water source. Most are plumbed as a “raw water” system utilizing the water your boat is in. In the case of saltwater fed systems, this means you’ll still want to deal with the salty residue left behind once back at the dock (to avoid corrosion issues), but in my opinion, a salty boat is better than a nasty one any day.

A second option is tapping into the boat’s freshwater system. This will typically limit the amount of water you can use (based on tank size) but does have the advantage of reducing the effects of corrosion on metal components via freshwater washdowns.

A third option is plumbing your system to draw from both. This gives you an unlimited supply of saltwater to power off grime, plus the option of a final freshwater rinse with minimal drain on your potable water supply.

Freshwater washdown systems are plumbed into the freshwater system at some convenient point (possibly near the tank). Raw water systems require either a dedicated thru-hull or connection via a “T” fitting into an existing raw water system hose.

Using an existing thru-hull is the most common route, as most owners tend to shy away from cutting additional holes in their boats. It also has the added benefit of allowing you to complete the installation with the boat in the water by simply shutting the seacock of the raw water system you’re tapping into.

Choosing a pump
Pump selection (and adequate water flow) are the most crucial aspects of the system. Nothing is more frustrating than trying to power off anchor chain crud with a wimpy stream of water. The trick is finding a moderately priced pump that not only provides adequate pressure with minimal power draw but can also stand up to the marine environment.

A typical deck washdown pump’s output pressure ranges from 3-12 GPM (gallons per minute) with prices of $100 or less to over $1,000. Buying a deck washdown package (a kit that includes pump, deck fitting, deck hose, etc.) will often save money. Also, the pump’s warranty can vary from one to three years—the longer coverage period, the better, of course.

Washdown deck fitting

Installation considerations
When selecting a location for your washdown pump, choose an accessible area well above where bilge water accumulates. The pump should also be between the water supply and planned deck outlet, ideally as close as possible to its power source to simplify wiring runs. As pumps are more efficient at pushing water than pulling, the location should also be as close as possible to the supply thru-hull or freshwater tank.

Be sure the pump installation itself is in accordance with the manufacturer’s instructions and that it includes an intake strainer between the pump and water supply in order to prevent pump damage due to debris.

Pumps vary in their ability to self-prime or lift water vertically in order to start pumping. Some are rated at 8-9 feet, while others may only be able to overcome 2 feet of “head” when pumping. Make sure the location you’ve chosen doesn’t exceed the pump’s self-priming ability.

If installing a freshwater-only washdown system, don’t be tempted to simply cut into the system and use your existing freshwater pump. You can do it, but don’t expect too much from such an install. Pumps used in freshwater systems weren’t designed to move large amounts of water quickly and lack the pressure of a good washdown pump. When planning your install you’ll also need to figure out where to locate the deck outlet. Most folks simply mount it on the foredeck (close to the anchor) as cleaning ground tackle is often viewed as its primary job, however there’s no rule saying you have to put it there.

Regardless of where you decide to install the outlet, make sure you have enough space beneath the deck to accommodate the hose and associated fittings and that you won’t be drilling into anything unexpected (wiring or cables) while cutting the mounting hole. Seal the edges of the hole with thickened epoxy when cutting through cored decks (balsa, plywood, etc.) to prevent water intrusion into the core (and rot) later on. Bedding the fitting with a suitable marine caulking will help in this regard as well.

Installation of a pressurized washdown system is an excellent return for a relatively small investment of time and money. Cleanups after raising the anchor will be a cinch, and you’ll find so many other uses for the system—hosing off the dog, rinsing the dingy, giving the kids a bath—you’ll wonder how you ever got along without it.

— By Frank Lanier, Southern Boating Magazine November 2016

Keeping Up with the Watermakers

“Water, water, everywhere, and all the boards did shrink. Water, water, everywhere, nor any drop to drink.”

I can’t read those lines from the seafaring classic The Rime of the Ancient Mariner without thinking “Those guys sure could’ve used a watermaker!” But owning a watermaker is only half the equation. Like any onboard mechanical system, a reverse osmosis (RO) unit requires routine maintenance to ensure proper operation. While the manufacturer should be consulted regarding maintenance requirements for your particular make or model, here are a few requirements that will be common to most any unit and help ensure yours runs smoothly.

How they work

In a nutshell, a watermaker or RO system uses a high-pressure pump to push saltwater (supply water) against a semi-permeable membrane reversing osmotic flow. A portion of the supply water (roughly 10 percent) passes through the membrane’s microscopic pores and emerges as freshwater, which is then pumped to the ship’s water tanks. The remaining 90 percent—along with the salt and other solids left behind by the desalinated water—are flushed away by excess supply water, which flows past the membrane and is pumped overboard.

Pre-filters

A watermaker’s supply side (between the seawater pickup and the membrane) consists of a low-pressure pump, pre-filters and a high-pressure pump. Most systems use two pre-filters, typically a 20 or 30-micron filter, followed by a 5-micron filter. As oil can quickly damage an RO membrane, many systems also include a supply water oil separation filter.

Watermakers need an ample flow of water to operate, which means keeping the pre-filters clean. If they begin to clog, supply pressure (and output) begins to drop. Most watermaker units have a gauge to monitor supply pressure. Regular monitoring and replacement of these filters will not only increase freshwater output but is also better for the RO unit itself in the long run.

In addition to the pre-filters, most manufacturers recommend the installation of a sea strainer at the supply water intake thru-hull. It should be sized to filter out anything larger than 50 microns or so. The strainer itself should be cleaned regularly as part of your routine maintenance schedule.

Membrane maintenance

The heart of your RO system is the membrane. Membrane life expectancy for a well-maintained system is around five years but can be much longer in systems that are used regularly and scrupulously maintained. While operating your system in water that’s blue or at least somewhat clear looking will help reduce maintenance and increase membrane service life, just as important to longevity is how well the system is maintained while not in use.

Most modern watermakers come with (or have the option to add) a manual or automatic membrane flushing system. This allows you to draw freshwater from the vessel’s water tank (typically weekly) and pump it through the membrane, purging the system of saltwater. When flushing, make sure the water used does not contain chlorine, which can quickly ruin your membrane. Use “product” water (i.e. water produced by the watermaker) whenever possible. If using water from your vessel’s freshwater tanks, make sure it is chlorine free. Systems that will be out of service for extended periods of time (six months or longer) should be flushed with a biocide per the manufacturer’s recommendations.

Pumps

High-pressure pump

The high- and low-pressure pumps in your system also require routine maintenance. Some may require oil changes and seal replacement every 500 hours or so, but many newer units can go significantly longer between service intervals, sometimes as high as 8,000 hours. Others can be water cooled and require no oil changes. The first place to look is the owner’s manual, which should specify the required maintenance items and intervals for your particular system.

Finally, use these simple tips:

Do…

  • Keep the membrane wet. Allowing it to dry out will drastically reduce service life.
  • Use the system regularly, even daily, if possible. (Watermakers hate inactivity.)
  • Check the system routinely for leaks, corrosion, and other issues.
  • Flush the system with fresh water after each use.
  • Clean the pre-filters often, weekly if the system is used regularly.
  • Install a supply line oil separation filter.
  • Monitor the system daily while in use, and keep a log of output, water quality, etc.
  • Preserve the membrane with biocide solution for longtime storage.

Don’t…

  • Use the system in silty, oily or polluted water (harbors, for instance).
  • Operate the system with insufficient supply water flow.
  • Use chlorinated water to flush the system.
  • Let the RO membrane(s) dry out.
  • Clean the unit with harsh chemicals. Use soap and water or mild glass cleaners only.

— By Frank Lanier, Southern Boating Magazine January 2017

Quick, Get Back in the Boat!

Installing a boarding ladder? If you’re an avid cruiser, you’ll need one! Spend time at any yacht club tiki bar and you’re bound to hear the tale of a cruising couple, an impulsive mid-ocean swim, the inability to climb back on board, and the telltale fingernail marks found later on the transom of the unmanned vessel.

In an effort to keep you from becoming the fodder of such sea stories, here’s the scoop on choosing and installing a boarding ladder on your vessel so that you can safely enter and exit the water from the deck or swim platform. Boarding ladders also make it easier to board a dinghy and assist in retrieval of personnel in a crew overboard (COB) situation in calmer waters.

Boarding ladders should be constructed from non-corroding materials such as plastic, aluminum or stainless steel. Aluminum ladders weigh less and are cheaper, whereas stainless steel ladders are stronger and more durable. Boarding ladders can be fixed or portable and come in a variety of styles. However, for the purpose of this article, we’ll concentrate on three types:  Swim step ladders, transom ladders and removable ladders.

Swim step ladders
These are typically mounted to a power boat’s swim platform. However, installation of a swim platform ladder is an option for smaller vessels (those powered by outboards or I/O drives, for example) that typically don’t have space for a full transom platform. Due to their proximity to the water, both units normally require no more than three steps to meet the American Boat and Yacht Council (ABYC) requirement regarding extension into the water. When not in use the ladders can either fold up onto the swim platform itself or telescope out of the way underneath.

Transom ladders
These are hinged units typically found on sailboats. Many ladders are constructed so that they become an integral part of the stern railing or pushpit when raised and secured in place. When lowered, they provide an opening in the stern railing and a means of entering and exiting the water. Transom ladders designed as part of the stern pulpit are generally factory installations, but aftermarket units can often be easily installed depending on the vessel’s transom configuration.

Telescoping swim platform ladder.

Removable ladders
These units, as opposed to portable ladders, are attached using permanently mounted brackets. These brackets are typically bolted to the gunwales or deck of a vessel and utilize keyhole slots, cotter pins or some similar arrangement that allow them to be easily installed and removed when not in use. Some units are rigid one-piece units, while others are hinged so that they can be folded up rather than removed when not in use. Others still are telescoping or even accordion-style units, which can be adjusted to facilitate boarding a dinghy or fully extended for water entry or exit.

Mounting considerations
ABYC standards state that all boats must have a means of unassisted re-boarding that must be accessible to and deployable by a person in the water. ABYC also calls for each boarding ladder to be able to withstand a vertical downward static load of 400 pounds without permanent deformation in excess of 1/4 inch, and for the top surface of the lowest step to be at least 12 inches below the waterline with the boat in a static floating position. In general, ladders should be located at a spot that makes the vessel easy to board such as the side of a sailboat adjacent to the lifeline. If the ladders are mounted on the stern, they should be installed as far as practical from the propellers.

Installation tips
As with any project, the first step is to thoroughly read and understand the manufacturer’s instructions. Next, visualize the installation and do a “dry run” in order to identify and address potential problems beforehand. Does the location you’ve chosen for the ladder meet manufacturer and ABYC recommendations? Are the mounting hardware and backing plates sufficiently robust, and can they be reached on both sides for tightening?

Ladder installation on a swim platform is typically a straightforward affair. For installations that require drilling into the hull, always verify what’s on the other side before drilling in order to avoid collateral damage to equipment, wire runs or Aunt Martha’s picture. You’ll also want to ensure all mounting hardware is properly bedded with a suitable marine-grade sealant, and that when holes are drilled through any cored portions of the hull or deck, the exposed coring is properly sealed to prevent moisture entry.

Even when properly installed, some of the above ladders may fail to meet the ABYC requirement for easy deployment by a person in the water, particularly those that should be removed and stowed while underway. One possible solution is the installation of an emergency boarding ladder. These units, typically some form of rope ladder utilizing rigid steps, are collapsible, lightweight and can be easily installed on most boats. Most are stored in a canvas bag and deployed by a grab rope hanging just above the waterline.

Rope ladders are convenient emergency ladders due to their compactness and flexibility. However, they’re harder to climb than rigid units, making them less than ideal as primary boarding ladders. If installed, it’s always a good idea to test deployment and ease of use in calm waters before they’re actually needed. One trick that can make them easier to board is weighting the lowest rung of the ladder to ensure it fully extends when deployed. Finally, while many cruisers likely plan on using their boarding ladders during a COB recovery situation, preparation should include various scenarios such as recovery of an incapacitated victim. It’s crucial that COB and recovery drills are not only understood by all on board but also practiced on a regular basis. They should also include captain and crew role reversals, to ensure recovery can take place if the captain or crew is incapacitated.

— By Frank Lanier, Southern Boating Magazine December 2016

The Wondrous Windlass

Heavy-duty lifting is this marine powerhouse’s job.

Dropping anchor in a beautiful cove is often the goal of cruisers, who seek and set sail for stunning destinations only accessed by water. To aid anchor deployment and retrieval, most cruising vessels are equipped with a windlass, and power options include manual, electric or hydraulic. Installing a windlass can aid a cruiser for years to come.

The electrically powered windlass is the type most often used on cruisers. Vertical windlass designs have the electric motor and rope/chain gypsy (the chain wheel that the chain and rope roll up on) installed in a compartment just below deck on the bow, while horizontal designs have the entire lifting assembly mounted on the bow and covered for protection. An electric windlass allows the anchor line to pay out at a controlled speed as you deploy your anchor. When you’re ready to haul the anchor up, you hit the switch and the electric motor hauls in your chain and anchor.

Windlass technology does not change quickly, yet there have been advancements in metallurgic compounds and motor and gearbox designs. For example, Anchorlift uses AISI 316L-grade solid stainless steel for the production of all of its models and accessories. John Lynch, Anchorlift general manager, explains why. “The reason is durability and stability of the material. AISI 316L stainless steel is the best available, and we don’t use nylon, aluminum or plastic because we feel these reduce performance and compromise the durability of the windlass.”

Anchorlift Aquarius 2500 Series Windlass

Other leading windlass manufacturers include Lewmar, Maxwell Marine and Quick Nautical Equipment. Windlass selection is based on three criteria: vessel size, vessel weight and anchor size. “These all go into the science of selecting the appropriate windlass for the boat, because it’s not just the windlass that is needed,” Lynch explains. “You need to have the correct bow roller for the style anchor that is used, and the anchor design affects this as well as the position of the windlass, whether it is deck-mounted or thru-hull.”

Boat owners also need to utilize the correct rode kit, which is determined by the gypsy size in the windlass, how deep you normally anchor, the size of the anchor locker, and your scope ratio (the distance of rode compared with the depth you are in). In addition, whether the boat has a 12v or 24v power system is also a factor.

Lynch says their website was designed to take out the guesswork for customers. “We have an extensive amount of information, photos, drawings, diagrams, comparisons, and specifications available to view and download in order to help make the selection process very easy. Plus we have staff that is always available to answer calls regarding windlass and windlass accessories.”

Maintaining the windlass involves rinsing the windlass with fresh water after a day of use and polishing periodically to keep its shiny luster – especially stainless steel. Boat owners should ensure the unit is properly greased and that no corrosion starts to form on the surfaces of the unit. This includes the motor and gearbox of a vertical windlass that are located below deck, usually in the anchor locker.

“We recommend using an anti-corrosion spray (paraffin based) and spray the entire motor and gearbox thoroughly,” Lynch adds. “Boat owners should periodically check to see if any white powdery material (corrosion) is present. If so, remove it with a wire brush and apply more anti-corrosion spray. The anchor locker is a harsh environment and gets very wet when the rode (anchor rope and chain) whips around in there when the windlass is in use. This creates a very unfriendly environment for materials that can corrode.”

Regardless of the manufacturer and model installed, user error can still happen on the water. For example, a windlass should never be used to haul the seabed to the boat, or drag the boat to the anchor. This can cause damage to the windlass such as a bent shaft or damage to the vessel itself.

“The only way to avoid any mistakes is to follow the manufacturer’s recommended use of the product,” Lynch says. “If you have never used a windlass before, there are blogs, websites and, of course, your local marina staff that will help you decide which is right for you and how to properly use it. We also strongly suggest professional installation of the windlass and its accessories. Although they look easy to install, it can become quite involved and frustrating once you get into it.”

Anchorlift’s Anchor Turner Kit also helps boat owners avoid problems with twisting anchors when they’re retracted. It includes an anchor connector swivel and anchor turner, which helps the anchor park correctly in the bow roller rather than upside down.

INFORMATION:

anchorlift.com

lewmar.com

maxwellmarine.com

quicknauticalequipment.com  

— By Doug Thompson, Southern Boating Magazine November 2016

Top Ten Stories of 2016

A round-up of our most popular web stories in 2016.

From gadgets and gear to destinations and DIY, SB&Y covered a myriad topics in 2016. It was a historic year for the marine industry: think Cuba, changing marine regulations, new boats, burgeoning technologies, record-setting boat shows and so much more.

Boats were king for Southern Boating this year. But destinations and a handy guide to rescuing a submerged outboard weren’t far from the top. Readers flocked to our stories on Bimini as well as our storied round-ups. Take a look back at the year’s most popular stories and remember why they made you read on the first time.

Happy New Year, from us to you! May the year be filled with warm days on the water, cold drinks, and that Southern Way of Life.

(Use the arrows left and right to see the Top Ten Stories of 2016)

Bimini Weekend

This takes it back (throwback!) to an article published in the 2014 magazine. No matter how much time passes, Bimini never loses the allure of it’s blue waters, warm winds and unparalleled possibilities for exploration. One destination, two islands: no wonder the magic never wears off for our readers.
southernboating.com/bimini/

Grand Banks’ GB60

A short, sweet and simple review of this Grand Banks’ was immensely popular. This  65-foot cruiser has a wide beam and shallow draft– perfect for any cruising adventure! southernboating.com/grand-banks-gb60/

 Downeast Buyers Guide

The first of two round-ups to make it into the top ten. Our Downeast Buyers Guide featured 16 stunning “downeast” style boats. These classic beauties are definitely a must-see. southernboating.com/downeast-buyers-guide/

Bimini: where folklore meets luxury

Bimini part II. A mere 50 miles from Florida’s coast, this Bahamian Island is a unique blend of natural beauty, strange mystical tales, and new luxurious resorts. The lure and lore of Bimini clearly never disappoints!
southernboating.com/hilton-at-resorts-world-bimini/

Small Generators

Small but mighty! This was our most popular technical article in 2016. A true testament to the power of generators and a handy guide that was revisited (and revisited and revisited).
southernboating.com/small-generators/

Find Your Center (Console)

Round-up number two. Arguably the most popular boat model on the market right now, the center console style is taking boating by storm. Varying sizes, shapes and style make center consoles versatile and customizable. We’ve made it easy to find your center console with 28 different models. Find your center.
southernboating.com/find-your-center/

Marlow Mainship 37

The Marlow Mainship 37 is a speedy and seaworthy trawler. Innovation, classic lines, and a dash of David Marlow-esque influence make this trawler a can’t miss. A hit with readers then and now.
southernboating.com/marlow-mainship-37/

Dunked Outboard Rescue

Once in every boat owner’s life, it’s likely to happen. You dunk the outboards. But don’t fret– it can be saved. Readers flocked like seagulls to this DIY story about fixing a common mistake.
southernboating.com/dunked-outboard-rescue/

Swimsuit 2016

No surprises here. Consistently a cruiser favorite, our annual Swimsuit issue was a hit online too.
southernboating.com/swimsuit2016/

Hatteras 45 EX

Taking the top spot for 2016: The Hatteras 45 EX! The readers have spoken– Hatteras has created a fun, easy to operate, great handling boat. Cruise with the family, drop a fishing line with the guys or gals, or just lie at anchor with your favorite book/movie/sunset view, etc, etc. This boat delivers.
southernboating.com/hatteras-45-ex/

Is your boat’s navigational lighting up to code?

Proper navigational lighting is crucial for safe, legal boat operation at night or during times of reduced visibility. As a marine surveyor, many of the vessels I inspect fail to comply with mandated navigational lighting requirements. Many of these problems are maintenance or owner-induced issues such as burned-out bulbs, broken wires and lights blocked by equipment installations; however, an alarming number of violations are caused by improper manufacturer installation. It appears that some manufacturers either do not have a complete understanding of the navigation rules governing installations or they miss the bare minimum requirements at the expense of the end user. Regardless of whether the manufacturer or a previous owner causes installation problems, it’s the boat owner’s responsibility to ensure their boat complies with the rules.

All boats must have the required navigation lights while operating at night or during times of reduced or restricted visibility such as in fog or heavy rain. Vessels 16 feet in length or greater must have properly installed navigation lights and an anchor light that must be operational separate from the running lights.

Required navigation light configurations are based on factors such as vessel length, method of propulsion or any special activity it’s engaged in (trawling, towing, etc.). The type, arc and color of navigation lights allow cruisers to determine a vessel’s size, propulsion and whether it’s anchored or moving (and if so, its course). For example, if you look over the bow and see a red light followed by a white light you can assume another boat is crossing your path from starboard to port and that it has the right of way depending on distance. A single white light that’s visible 360 degrees indicates an anchored vessel.

The first step in determining if your vessel is compliant with lighting regulations is to consult a copy of USCG COMDTINST M16672.2D, aka the “Rules of the Road”. Purchase a copy or view it for free online at navcen.uscg.gov/pdf/navrules/navrules.pdf.

Once you’ve consulted the Rules of the Road and determined that your navigation lights meet the minimum requirements, the next step is a physical inspection to make sure they’re properly installed and operational. Start by turning on the running lights and then the anchor light, verifying in turn that each powers up and meets the visibility requirements mentioned in the Rules of the Road. Look for issues such as the placement of equipment (dinghies, antennas, etc.) that could block visibility, burned out bulbs and poor lighting installations. A good example of the latter would be a masthead light that effectively blinds you when operating the vessel from the upper helm or fly bridge.

Sailboat owners may find it easier to verify the operation of mast-mounted navigation and anchor lights at night from the dock when they’re more easily visible. Next, take a good look at the lights themselves. Are the lenses clear or have they become “frosted” due to UV damage? How bright are the lights? Dim lights can be caused by installation of the wrong type of bulb, a poor quality light fixture or corroded electrical contacts and switches.

Distance visibility—how far your navigational lights can be seen—is crucial and can easily be a case where meeting the letter of the law doesn’t necessarily mean the spirit of the law has been satisfied. I’ve seen installations designed to meet the minimal requirements under perfect conditions—clear weather, minimal wave action, level boat—but they fail miserably in less than ideal conditions, which are the very times you want to make sure you’re seen. Problems range from poor location of the navigation lights—flush mounted sidelights in the hull below the rub rail are a good example of this—to the lights themselves, which are often too small or simply poor quality to begin with.

Don’t be afraid to relocate factory-installed navigation lights to better comply with requirements or even replace them with brighter, more robust units. Light emitting diode (LED) fixtures have become a popular choice in recent years due to advantages such as longer life (up to 100,000 hours in some cases), less power consumption, sealed construction (eliminating corrosion), and non-susceptibility to damage from shock or vibration.

Do not, however, simply swap your incandescent navigation light bulbs with LED replacements. Navigation light fixtures are approved for use as a unit (i.e. bulb and fixture together), and simply swapping out the bulb of your current fixture does not mean the new combination will also comply with regulations. Once you’ve verified everything is in good working order, record the types of bulbs required for all navigation lights and ensure you have plenty of spares on board. Finally, be sure to include checking the operation of all navigation lights as part of you pre-departure checklist. It only takes a moment and you’ll be doing yourself and everyone else on the water a favor.

Buyer Beware
All boat owners love pretty lights, but it’s important to ensure decorative light installations can’t be mistaken for navigation lights or impair the visibility of properly placed navigation lights. Decorative lighting also should not interfere with your ability to maintain a proper lookout. Haphazard installation of additional lighting must be avoided or else violations may occur. For example, blue LED lights under water can appear to be flashing if wave action is present, giving the appearance of flashing blue lights that are only authorized for law enforcement vessels.

Some manufacturers offer less expensive navigation lights that fail to meet certification requirements, which make them a tempting choice for the uninformed buyer. Use of lights that do not provide the proper characteristics of regulation lighting such as chromaticity, luminous intensity or cut-off angles could result in fines or even cause an accident. Ensure each navigation light you purchase contains the following information on the light or its packaging:

• USCG Approval 33 CFR 183.810

• MEETS ABYC A-16 or equivalent

• TESTED BY (an approved laboratory)

• Name of the light manufacturer

• Model number

• Visibility of the light in nautical miles 

• Date on which the light was type-tested 

• Identification and specification of the bulb used in the compliance test  

— By Frank Lanier, Southern Boating Magazine October 2016

Bow Thruster Advantages

Adding a unit is easy, and provides confidence and safety when docking in challenging conditions.

Single-screw boats can be difficult to dock without aid in wind or when fighting current. Even experienced captains will relent for safety’s sake and ask for a helpful hand—someone on the dock who gets tossed a bow line and pulls the boat in. With a bow thruster, however, that helpful hand is a small propeller positioned forward on the boat and it applies side-to-side propulsion to get you safely docked.

If a boat doesn’t have a bow thruster, some boat owners are drilling tunnels through the bows of their boats. The tunnel is structurally engineered to accept the retrofit of a bow thruster, and when properly installed it adds strength to the vessel.

“Many people believe that drilling a 4-inch hole or larger in their boat will weaken the structure,” says Chris Deboy, Vestus America’s sales manager, a manufacturer of bow thrusters and other marine products. “The opposite is true, as long as the thruster tunnel is installed properly, using fiberglass, aluminum or steel, depending on the hull material. The installation can add strength to the bow of the vessel. This would include the proper lamination of the fiberglass tunnel or proper welding of the aluminum or steel tunnel.”

Lewmar bow thruster joystick

It’s estimated that half of all recreational boats from 30 to 65 feet have bow thrusters. Aftermarket installations are becoming common as people fix up their boats. To complete the work the boat must be hauled out for detailed fiberglass work as a tunnel housing is installed in the hull with the bow thruster impeller. The impeller is driven by an electric motor powered by its own battery. The cost to install a bow thruster on a 40-foot cruiser is approximately $8,000, and about 60 percent of that cost is for labor while the rest is for parts. Three companies have the majority of market share in the U.S.: Lewmar, Side-Power and Vetus.

Side-Power introduced its Proportional DC Thrusters in 2011 and won an NMMA Innovation Award that same year. “You can now operate a thruster relative to the conditions like a throttle providing smoother operation,” says Peter Nolet, IMTRA Corporation’s thruster product manager, the U.S. distributor for Side-Power. “The ‘hold’ feature is very popular. The SE170 is the most popular size for a 50-foot cruising boat and delivers 374 foot-pounds of thrust, and is used on models like the Fleming 55 and a Princess 56. With our full range of Side-Power Thrusters being available in On-Off or Proportional Control, we can meet any customer’s expectations.”

With the proper size electric motor for the bow thruster, the boat should hold its bow off the dock in a 20-knot wind. However, there’s a misconception surrounding the amount of time you can run an electric bow thruster.

“The common misconception is that you can only run the bow thruster for a few seconds,” says Nolet. “Side-Power Thrusters are designed to be run continuously in one direction for three minutes. When pulsing the On-Off thruster, you will get around six minutes of operation. We rarely hear about the motor’s thermal protection tripping, which is a testament to our purpose-built motors. If you have a Side-Power and are only getting a short run time, I would suggest you service the thruster.”

Vetus’ most popular model for a 50-foot cruising boat is the BOW12524D. “This unit is delivered with a single six-blade Delrin propeller which provides 308 foot-pounds of thrust,” says Deboy. “The single propeller allows greater flexibility for installation of the tunnel and thruster. The BOW12524D offers a standard run time of 2.5 minutes per hour and can be ordered as an extended run version, BOW1254DE, with 10 minutes of run time per hour for demanding applications.”

The percentage of new boats with factory installed bow thrusters has increased over the years with an additional increase in bow thrusters on boats under 30 feet. Bow thrusters give owners moving into larger boats the confidence to operate the vessels without worry.

“For 2017 we are offering a new range of retractable thrusters from 3-13 horsepower as well as improving our controller systems,” says Harcourt Schutz, general manager of Lewmar USA. “The new controllers will make dual thruster use easier and more intuitive. You will also see more emphasis on small boat systems.”

Lewmar’s 185TT bow thruster is a popular choice for 50-foot cruising boats. The 8-hp unit offers equal thrust in each direction without the complexity of dual-prop thruster. Its fully sealed lower unit doesn’t require an oil reservoir, which means there’s no maintenance of the lower leg. The propeller is a spline-driven, five-blade wheel for maximum efficiency. “Smaller boat owners are really seeing the benefits of having the addition of a thruster as standard equipment,” says Schutz. “This is creating a much higher level of comfort and confidence when docking, and that is often one of the most stressful parts of boating.”

INFORMATION:
imtra.com
lewmar.com
vetus.com

— By Doug Thompson, Southern Boating Magazine October 2016

Southern Boating’s Top Six Safety Tips

It doesn’t matter if you are a seasoned captain or a boating newbie—safety is paramount.

A prudent mariner knows that there are many safety rules involved in just a simple cruise on the water, let alone a long haul down to The Bahamas.

Whenever a trip on the water is planned—be it a day cruise on a kayak or an overnight fishing trip—you should have a float plan. A float plan is an itinerary of who, what, where, why, and when you plan to head out on the water. You can find a detailed example of a float plan from the US Coast Guard.

While you create your float plan please (please!) remember to practice common sense, follow our top six safety tips below, and remember the most important rule of all—HAVE FUN!


Can’t Upgrade?

Then update your existing audio.

Your boat’s stereo is older, it still sounds great, but there is no Bluetooth interface for your smart phone to stream to. The stereo’s auxiliary input is already used, or there isn’t one at all. You could replace your stereo, but this is often not as simple—or affordable—as it sounds. Many older boat stereos such as the Clarions were larger and replacing them takes more effort than many would realize. Since the footprint was larger than newer stereos, it now requires fabrication of a cover plate and handling associated cosmetic problems. The remote control in the dash may also need replacement and it may be difficult to pull wire. So how do you adapt your existing stereo to use new technologies?

There are many types of adapters and approaches that can breathe new technological life into your stereo. We’ll start with the stereo’s auxiliary input—on many boats it is already being used by another device such as the TV or a DVD player. In our first case we can have multiple devices share the stereo’s auxiliary input, but only one device can use it at a time. The easiest way to do this is by using audio cable splitters, which are inexpensive, available in almost any plug configuration and an easy way to share the input. The new input could be as basic as a 1/8″ headphone mini-jack that plugs into your smartphone or iPod, or use an audio switch box to select the source so that multiple audio inputs can share the port.

Other options for new audio sources include adding Bluetooth to your existing stereo that consists of FM modulators and FM transmitters. The differences between these two are that the FM transmitter sends a low power FM signal that will be heard by your stereo’s antenna, while the FM modulator is connected directly to the antenna.

To use the typical FM transmitter, select an unused FM frequency, set the device to transmit at that frequency, plug in your audio source, and presto. There is zero wiring to deal with, but a downside is that in most cases, you will need a 12VDC receptacle nearby to plug into—the closer the better. The range is limited, and about 20 feet is the maximum.

The FM modulator does a similar job but in a much different way. Unplug the stereo’s antenna wire and plug it into the modulator. Then plug the modulator’s antenna cable into the stereo. The modulator injects a strong FM signal directly into the antenna wire. The signal source is typically cleaner and much less prone to interference. The downsides are that it requires removing the stereo to install, it has to be wired to 12-volt power, and in most cases, the frequency options are fewer (2 to 8 max).

Given the choices between these two approaches, I favor the FM modulator over the FM transmitter. It requires physical installation, meaning the stereo will have to be extracted at least partially to install it, but the gear ends up being tucked away out of sight. Overall, the sound quality is better in most scenarios. Two good options to consider are the Scosche Universal FM modulator and Audiovox FM100A.

The world of Bluetooth comes in several similar adapter forms. There are FM transmitter versions, which have the same characteristics discussed earlier, and ones that require connection to your stereo’s auxiliary input either directly or through a FM modulator. A good Bluetooth option for boat owners is Wet Sounds Bluetooth volume control WW-BT-VC. This is a small, water-resistant controller suitable for both console and interior mounting. It requires 12VDC connection to ships power and has a 1/8″ mini-jack stereo output for connection to your stereo. It pauses (mutes), changes tracks and controls the sound volume all with one small knob. As with other audio sources you can use either a FM transmitter or modulator for input to your stereo if need be. It pairs quickly and has good wireless range.

As a final note, your stereo’s auxiliary input is designed to accept what’s called a “Line Level” audio signal, and in some cases, this can cause minor problems. The headphone jack on your smart phone or iPod is like a line level output on a small dose of steroids. You won’t hurt your stereo with it, but if the input volume is turned all of the way up you can overdrive the auxiliary input causing sound distortion. So the general rule of thumb is to have the headphone jack volume turned way down and to use the stereo to control the sound volume. In the case of the Wet Sounds Bluetooth volume control, if you’re using a FM modulator you may have to play a bit with the volume settings to find a good-sounding combination.

There are many options available to get more life out of your stereo, but shop carefully and take time to read the customer reviews about the products before you buy. Like many things in life, sometimes the least expensive approach to good tunes cost you the most in aggravation.

Southern Boating, April 2015 By Bill Bishop

Installing a Cockpit TV

It’s a beautiful Sunday afternoon in the anchorage and the big game is going to kick off in a few minutes. With this simple how-to guide, watch it on your new TV in the comfort of your cockpit instead of down in your dimly lit cabin.

1. Select a good mounting place. Although every boat’s cockpit is different, take a seat where you’re most comfortable and look around for a place with good visibility. Typical options are on a cabinet, wet bar, or on an arch or bulkhead. In this scenario we’re using an arch. Measure the selected mounting area and determine the maximum width and height for a TV, keeping in mind that the mount site will be the center of the television—most of today’s TVs are wider than they are high. Size does matter but be pragmatic about this. It may help to make a cardboard template of a TV to visualize the actual size.

2. Buy the TV. Once you have the maximum allowable dimensions, head to your favorite electronics store with a tape measure. First, find TVs that will fit, and then pick the brand and features you want. Your best option is a LED television since they are lightweight, thin and bright. If you plan to use an antenna or dockside cable, ensure the TV has a coax (Antenna In) connector. You may also want a built-in DVD player.

3. Buy a mount. Surfaces on a boat are rarely ever square or straight. In reality, most surfaces are curved and sometimes in a complex way—an arch might lean in and have a twist as it curves upward. The solution to arch and bulkhead mounting is to use a full-motion mount such as the Sanus VFS415 (shown). This is important since TVs that are fully retracted against the arch often look straight but when repositioned can appear twisted, and watching a TV when the top edge is running downhill is disconcerting. A full-motion mount solves all of these problems since it can be adjusted to all angles and any position that pleases the eye.

Once the area is selected to install the TV mount, you can begin to cut the necessary holes for the wiring.

4. Prepare to install. Most mounts attach with two bolts that are included in the package. Throw them out and replace with non-rusting stainless steel bolts. This now begs the point that you need to put nuts on them and you need access, which is gained by two methods. The best option is to place the mount in a location near an access point for wiring already installed, such as a speaker cutout. The second best option is to cut a hole and install a small Beckson plate to provide access. It is possible to use lag bolts, but the larger the TV the more problematic this becomes since your TV can bounce around when under way (see step 6). In either case be mindful of wiring inside when doing any cutting and drilling.

5. Access power and signal source. Power for most TVs will be 110VAC. In this installation power came from a spare AC breaker. Triplex AC wiring was pulled from the AC panel to the TVs location and a GFCI outlet was installed. (If there is any confusion about how to do this, hire a good technician instead. You don’t want to be a statistic with a damaged TV.) The TV’s signal source can come from many places such as the boat’s existing cable TV backbone, satellite TV receivers, and stand alone digital TV antennas. When using the coax backbone, digital on-air signals will be very good quality, and dockside cable TV will be adequate quality. If you’re using satellite TV, most are not high-definition systems. Your best option is to use a HDMI output from the receiver to feed the TV, and the next best resolution is the five-wire component TV connection. You will end up with a good quality signal about equal to 720p resolution.
You will want to place the power and signal source connections as close as practical to the TV. In many cases you can place them behind the TV to hide them but sometimes that’s not possible. In our installation, since this was an aluminum arch filled with wiring and tubing, the outlets were placed below the TV in the coaming. The HDMI cable connection will need to be wrapped with electrical tape on the back of the outlet to keep it from vibrating out. The wiring to the TV gets covered with split loom and neatly tied up and harnessed behind the set.

The TV has been mounted and connected.

6. Prepare TV for cruising. The TV should be restrained when not in use or during rough conditions. The best way to do this is with a couple of SS eyes and bungee cord. Your chartplotter is IP67 rated, but the TV isn’t rated IP anything so you it needs protection from the elements. The low cost approach is to use a good quality plastic garbage bag. It’s not attractive, but it’s functional. The better-looking option is a TV cover, which are available online starting at about $25. Also, an Allen wrench will most likely have come with your mount—do NOT lose it. You’ll need it to remove the TV for storage over cold winters or in adverse weather. Finally, kick back and enjoy that game!

Bill Bishop is a Florida based professional marine electronics installer and consultant. He writes extensively on the subject and publishes The Marine Installers Rant.

Southern Boating, February 2015, Bill Bishop

Ten Galley Upgrades.

Make mealtime prep a breeze with these 10 galley upgrades.

Those forced to toil at the often thankless task of fixing grub for the crew may feel more like a galley slave than galley gourmet, but it doesn’t have to be that way. Here’s a look at 10 easy upgrades that can make galley duty more enjoyable. For the HGTV dreamers with a knack as a handyman or woman, tackle this list yourself to save on cost. Or for those who prefer the peace of mind of professionalism, save yourself the headache by checking references for a good local contractor. For a simple spruce, freshen your galley with a new coat of paint and de-cluttering.

1. Improve your lighting. Nothing makes a galley seem more cramped than poor lighting. Replacing outdated incandescent lights with modern units featuring fluorescent or LED technology will not only improve available light but reduce energy consumption as well. Upgrading or installing additional lighting over the stove, sink and food prep areas will go a long way toward achieving galley nirvana. For night-vision-safe galley work, choose units that provide both white and red light options, such as those offered by Alpenglow. Painting or covering dark, less reflective galley surfaces with light-colored countertop materials can also improve your existing lighting.

2. Increase counter space. When it comes to food prep and serving, most galleys are notoriously short on counter space, doubly so when entertaining onboard guests. A quick, easy way to supplement existing workspace is to install a cutting board over the galley sink. Wood and synthetic cutting boards come in a wide variety of shapes and sizes, making it easy to find one that will fit your sink with minimal trimming. Another option is fitting a removable top over your stove burners for use when preparing cold foods.

3. Maximize storage. No matter how you slice it, you just can’t have too much galley storage. Take a moment to step back and look at your galley and surrounding areas as a whole, not only to visualize ways to better utilize existing space but also to ferret out hidden or unused areas to increase storage options. Pots and pans that are used less frequently might be stored under the stove, sink or even the galley floorboards. I installed several shelves in an underutilized hanging locker adjacent to the galley aboard my boat, converting it into an easily accessible storage locker for cans, dry goods and other foodstuffs.

4. Upgrade sink and faucet. Too many galleys feature a single, diminutive sink that’s unfit for food preparation, dish washing or pretty much any other galley-sink related task. Upgrading to a deep, full-sized single or double sink is fairly straightforward and will make a marked improvement on most any galley operation. Swap out that old dual control faucet with a single lever unit to make one-handed operation a breeze. Those with extendable, pull-out faucets provide even more flexibility.

5. Get some air. Nothing enhances the quality of galley life like plenty of cool, fresh air, particularly during the heat of summer. Good ventilation provides a multitude of benefits, from rapid removal of smoke and food odors generated while cooking to the elimination of minor carbon monoxide buildup and its negative effects on crew health (headaches, seasickness, etc). Even something as simple as installing an adjustable galley fan can make a huge difference in aiding ventilation.

6. Install a saltwater faucet. Fresh water is something most of us take for granted, especially in the U.S. where it’s readily available at most marinas for no extra charge when fueling or docking for the night. When cruising outside of the U.S. where water supplies are limited and costly, however, having a saltwater pump and faucet is not only handy but economical to boot. From rinsing potatoes to washing dishes, using clean salt water in the galley is an excellent way to stretch your fresh water supply. Manual hand pumps are popular and easy to install, but foot pumps have the added benefit of freeing up both hands during use.

7. Add a real trashcan. Nothing says fancy galley living like a fixed trashcan. Sure, that diminutive plastic can under the sink works, but the convenience and luxury of a built-in, kitchen-bag sized bin (possibly topped with a cutting board lid) has to be experienced to be truly appreciated.

8. Add a dish drying rack. A drying rack not only makes dish washing easier but also cuts down on wet towels. Look around and find one that fits into your sink, which provides both an easy way to dry dishes and store the rack when not in use.

9. Install a “Vacuum flask” (aka Thermos ®) holder. Thermos bottles rock! That’s why a holder or rack that keeps them secure and handy is just the ticket for those cold days or overnight passages. Just heat up water at the beginning of the trip and crewmembers will have hot water for tea, coffee, hot chocolate, or instant soups for hours to come.

10. Move up to a wall-mounted dispenser. Everyone loves the convenience of paper towels, but where do you put them where they’re out of the way yet easy to grab when needed? Same thing with tin foil and cling-wrap—they’re always clogging up your drawers or impossible to find when needed. Multiple wall-mounted dispensers keep each of these in easy reach and are compact to boot—just perfect for that bare spot on the galley bulkhead!

Captain Lincoln F. Sternn has operated and maintained vessels ranging from dive boats to passenger ferries in the Atlantic, Caribbean, and South Pacific.

Green Maintenance Tips

While a certain famous frog (the one with a swine fetish) once opined, “It’s not easy being green,” today’s boat owner has more options than ever to be as green as they want. Most everyone is on board with the basics when it comes to keeping our oceans clean, but what about those potential environmental problems that arise simply as a result of properly maintaining your vessel? In efforts to help you enjoy boating without damaging the environment, these three common maintenance items and tips still take good care of Mother Earth.

The job: Battery Replacement
Lead and sulfuric acid—the primary components of a typical marine battery—can contaminate water, soil, and even the air if not handled, maintained and disposed of properly. Under the right conditions, they can also be a fire or explosion hazard. Sulfuric acid is caustic, while lead poses a serious health risk to both terrestrial and aquatic life.

Keeping it green:
1.  Old batteries can’t simply be disposed of like nontoxic solid waste; they have to be recycled. Most retailers charge you a battery core fee if buying a new battery without a trade-in, which not only offers a convenient way to dispose of that old battery but saves you money as well.

2.  Replace cracked or leaking batteries immediately. Never try to drain the case of a leaking battery. Simply place the battery upright in a sturdy, acid-resistant, leak-proof container such as a sealable 5-gallon plastic bucket, and transport to a recycling center.

[photomosaic size=”medium” ids=”7086,7085,7082,7081,7080″ orderby=”rand”]

The job: Changing Engine Fluids
Fluids such as oil and antifreeze may be your engine’s life-blood, but just like the acidblood of those critters from the Alien movies, they’re extremely toxic to marine life. Even more insidiously, engine fluids labeled as “environmentally friendly” are anything but when it comes time to dispose of them—even nontoxic antifreeze can become so contaminated with lead or fuel after use that it has to be managed as hazardous waste. Waste fluids generated during fall decommissioning, spring preps, or routine maintenance can easily find their way into the environment if not properly managed and disposed of. The same is true of leaking or poorly maintained engines or generators, which can introduce oil, fuel, transmission fluid, and other contaminants into the water, either directly or indirectly via leaks into the bilge.

Keeping it green
1.  Use green alternatives where possible. Go with less toxic propylene glycol based antifreeze (usually pink or orange) over those that use ethylene glycol (greenish-yellow) whenever possible.

2.  Use drip pans and funnels during oil changes and transferring antifreeze, to minimize spills and drips.

3.  Keep a supply of oil-absorbent rags handy for quick spill cleanups. Even small spills of oil or fuel can contaminate a large volume of water.

4.  Contain and dispose of waste fluids properly. Your marina likely has disposal or recycling programs available, but there are other options as well. Automotive parts stores typically maintain a waste oil recycling station, while many household hazardous waste programs will take old, unwanted gasoline or gas/oil blends. Waste gas is typically not considered hazardous waste if it is recycled or burned as fuel, which means another possible option for stale gas is to “recondition” it by treating and mixing it with a larger ratio of fresh gas for use in less critical equipment (lawn tractors, mowers, etc.).

5.  Store waste fluids separately until they can be properly disposed of. Mixing fluids can make recycling impossible and create a veritable Hell’s Broth that’s even more toxic and difficult to dispose of.

6.  Maintain your engine and its systems. Inspect fuel lines, cooling system hoses and such for cracked or deteriorated hoses, leaking connectors, chafe points, etc. Correct leaks and other problems immediately.

The job: Bottom Painting
The toxicity of bottom paint should come as no surprise. Its job after all, is to kill aquatic critters and plants. Traditional antifouling paints contain elemental copper, cuprous oxide (a copper compound) or possibly old-school-style tinoxide compounds (tributyl tinoxide), all of which kill organisms in efforts to keep your boat bottom free from growth. Prepping your hull for reapplication of bottom paint can also generate deadly waste products (sanding dust, paint chips, etc.) that can find their way into the water if you’re not careful. Not only are these toxic to marine life, they can also be absorbed by edible fish and shellfish and then passed on to humans.

Keeping it green
1.  Rather than following a scorched earth approach, use low-toxicity bottom paints – those containing the minimum amount of copper needed to get the job done. Go one step better and give some of the greener, non-toxic alternatives a try.

2.  Haul your boat at a yard or marina that utilizes a closed-loop system, where runoff is collected in a settlement tank and filtered before being recycled.

3.  For boats that are rack stored and thus not continuously in the water, consider alternatives to antifouling paints, such as bottom wax or non-metallic epoxies.

4.  When prepping or removing old bottom paint in preparation for painting, use dust-collecting vacuum sanders or environmentally friendly chemical strippers such as Franmar Soy Strip Marine Coating Remover. Use tarps and sheeting to contain paint chips, droppings and spilled materials. Weight the bottom edges of tarps and plastic sheeting to keep them in place, and when working in windy conditions, use tarps to form a windbreak to prevent flakes and residue from blowing off the drop sheet.

5.  Sweep or vacuum paint chips up immediately after scraping or sanding; never use an air or water hose.

6.  Avoid in-water hull cleaning if possible, but when conducted, use soft sponges to clean marine growth from the hull and stainless steel pads or brushes only on unpainted equipment (props, shafts, etc.).

By Frank Lanier, Southern Boating Magazine September 2014

MagicEzy Mega Fusion

MagicEzy Mega Fusion makes repairs to plastic or aluminum surfaces on your boat, prime them first to maximize adhesion and ensure a flawless, like-new finish with Mega Fusion from MagicEzy. There’s no fiberglass prep work needed with Hairline Fix and 9 Second Chip Fix, which prevents delamination and strengthens weakened or cracked fiberglass. All three products are water-soluble, environmentally friendly and available in 11 colors. MSRP $24.99/tube; magicezy.com

Dock Blocks Modular Docking Systems

Dock Blocks Modular Docking Systems by Pier Plas are used to build docks, bridges, swimming platforms, fishing cages, and more. Size and shape are unlimited. Conquer your project with as many blocks as you need. Each Dock Block is made of durable, high-density polyethylene and molded with a grooved, slip-free surface. The proprietary connection system provides strength and stability for an even, gapless walking platform. Light colors keep bare feet cool in hot sun with no splinters! Do-it-yourself construction and maintenance is quick and easy, and Dock Blocks can also be easily removed in the event of a heavy storm. Lifetime warranty. MSRP varies; dock-blocks.com


[photomosaic type=”rectangular” ids=”5370,5371,5372,5373″ orderby=”rand”]

Exit mobile version