Hey, There! Subscribe to Our Daily Newsletter

Get exclusive recipes, ingredients lists, and amazing fitness food tips everyday in your inbox.


You have subscribed successfully!

Some error occured

Please fill all the required * fields.

What To Look For When You Need A Boat Yard

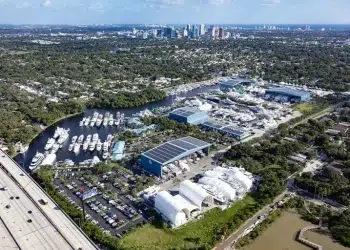
Yard Work

What to look for in a yard when it’s time to do some serious work on the boat.

Boat owners are always tinkering on their vessels, but when the job requires some time in the yard for a more comprehensive repair, there are a few things to consider before using their facilities. Proximity to home is a big one because the chances of living aboard during the project is nil, so depending on the scope of the project, ask a few questions to make sure the yard is right for you. 

Can I Work on the Boat Myself or Hire My Own Contractors?

Many yards allow owners and/or crew to work on their boats, but some don’t, especially when it comes to bottom paint. Insurance and liability are primary concerns as is supporting the yard’s contractors and service providers, but another, believe it or not, is keeping the area clean.

“Boat owners and crews are allowed to work on their own boats while here at our facility,” says Tate Lawrence, general manager of Safe Harbor Jarrett Bay in Beaufort, North Carolina. “Owners are welcome to use outside contractors as long as they have the insurance required by our facility and pay a daily contractor fee. We do not allow spray painting to be performed or removal of anti-fouling paint by anyone but our staff. We have flexible hours and have electricity and water available for each boat we haul.”

The same is true at Safe Harbor Lauderdale Marine Center (LMC). Boat owners are allowed to work on their vessels in the yard, depending on what the work is, but all bottom painting in the yard must be completed by one of its on-site tenants that are authorized to paint bottoms. The yard reaffirms, “Painting by air sprayers, scaffolding, welding, and tank cleaning must all be completed by authorized contractors that meet special requirements.”

At smaller yards, there may not be room for do-it-yourself owners beyond what the yard can accommodate with its own boat repairs and refits. The facility at GB Marine Group in Stuart, Florida, is two acres; whereas, Jarrett Bay is 175 acres. 

“Owners may not work on their boats in our yard,” says Joel Butler, marketing director for GB Marine Group. “Work can be done by their contractors for a fee and proof of insurance, but most work is performed by our in-house technicians.”

Saunders Marine Center in Orange Beach and Saunders Yachtworks along the Gulf Intracoastal Waterway (GICW) in Gulf Shores, Alabama, don’t allow owners to work on their boats in the “traditional” do-it-yourself sense, but they do make exceptions depending on the project. Like the other yards, no painting or below waterline service or repairs are allowed by anyone other than Saunders staff or a pre-approved subcontractor. “Our customers are allowed to use their own subcontractors, depending on the services requested,” says John Fitzgerald, president and CEO. “However, the subcontractor must be pre-approved by Saunders, insured, and be in good standing with our company.”

Do You Have the Services I Need?

Most yards are full-service in that they offer a wide range of repair and refit services with skilled technicians on-site. This is convenient for owners and technicians because the shop is right there equipped with machining tools as well as parts. It’s also good to know if the yard has certified mechanics and technicians that can work on your boat’s engine, electronic, and mechanical systems. 

“At Safe Harbor Lauderdale Marine Center, we have on-site contractors who perform most every shipyard trade, including but not limited to, shaft alignment, vibration analysis, class certified welding, custom stainless steel manufacturing, carpentry and cabinetry, canvas work, class certified hull plating, and project management,” says the yard.

Over at Saunders’ yards, Fitzgerald notes, “We have highly skilled, factory-certified technicians for all areas of refit, repair, and yard work. This includes diesel and outboard engines, driveline and running gear, Seakeeper and other vessel systems, and marine crafts (paint, fiberglass, and carpentry). We have workshops with specialized tooling for each department. Both locations have fully enclosed buildings for paint and other projects needing weather protection.”

Speaking of parts, having a supply on property helps keep work moving. Yes, there are the specialty items that have to be ordered from the manufacturer, but as an example, Jarrett Bay stocks more than $1 million in inventory from zincs to fighting chairs. GB Marine Group carries basic parts and gear, but because of its location in boating-rich Stuart, items are sourced and delivered quickly through its network of suppliers. 

What are the Costs?

You probably have a general idea of what the parts cost, but don’t forget labor and yard services. They all add up quickly. Yards typically have price sheets for the services they provide, and contractors will have their own fee schedules, so it’s crucial to get estimates before any work is done. Some will quote a job as a fixed rate while others will add up time and material. Check to see what’s included, such as haul-out, the yard space, power, etc.  

“The fee structure is calculated based on the work specifications and is agreed upon before work begins,” says Fitzgerald at Saunders. “We provide turn-key quotes for certain services, such as standard bottom jobs based on the size of the boat. Other projects are billed using separate charges for all operations performed. This typically takes the form of a quoted project or one that is billed based on the actual time and materials it took to complete the project.”

LMC has fee structures for dockage and laydays based on the length of the vessel, and there is a separate charge for covered sheds. Utilities, such as power, are billed separately dependent upon requirements. 

Just as Important

There are some benefits that just might help you choose the yard for your repair or refit. 

Dock space is one if you don’t have to haul the boat, and most allow work to be done there. Water and power are usually available and some, such as Saunders Yachtworks and LMC, allow the owner or crew to live aboard while services are being performed. At LMC, the boat has to be 65 feet or longer. 

“We have 10 fixed slips and in excess of 1,000 feet of alongside and floating docks available,” says Lawrence at Jarrett Bay. “We offer water and power up to 100 amps.

Security is also a factor considering the boat’s value. All the yards included in this feature have on-site manned security along with cameras. Gate codes are also used at some locations.

Hurricane preparedness is always a concern. Every yard has procedures set in place for major storms based on intensity. LMC has an extensive detailed hurricane plan in place where actions start seven days in advance of landfall. Saunders also includes hurricane haul-out plans for its locations with prepaid customers, and Jarrett Bay works with any boat on its site to help find a place and secure it at the facility.

“Our yard is not a hurricane storage facility,” says Butler about GB Marine Group’s Stuart yard. “However, it is located in a very protected section of the St. Lucie River. Boats may stay in the yard during a named storm.”

Looking for more articles on Haul Out and Maintenance Check Out Our DIY Section  

Amenities are Always a Plus 

The quality of work done at the yard is most important, but there are amenities at most yards or in the area that can make it easier for you to decide to use the facility. A lot has to do with the size of the boat, if crew are involved, or if the distance from home is far enough that you’d need to stay a few days. GB Marine Group is currently developing accommodations for captains and clients. The Stuart yard is conveniently located near Interstate 95 and the Florida Turnpike minutes to downtown Stuart and 35 minutes north of the Palm Beach Airport. There is easy access to both the Atlantic and Gulf coasts of Florida, not to mention the array of restaurants, activities, and beaches in the Stuart area. 

“Both Saunders yard locations are close to a variety of restaurants, golf courses, shopping, accommodations, and most importantly, our world-famous sugar-sand beaches,” says Fitzgerald. “Gulf Shores and Orange Beach have quickly become two of the most popular vacation destinations on the Gulf Coast.”

Jarrett Bay offers an owner’s and crew lounge, courtesy car, and ship store. Diesel, gas, and showers are available. “We are five miles from Beaufort, North Carolina, that has a variety of very good restaurants, shopping, and hotels available.”

LMC has a full-service gym, monthly crew events, concierge, high-speed Wi-Fi, the YOT café and kitchen on-site, as well as food trucks.

One final thought: Find out about the yard’s reputation. What happens to the kind smiles after you’ve signed on the dotted line? Ask fellow boaters or non-employee contractors working in the yard their thoughts about the operations, how the management treats their employees, and the yard’s association with the local community. Get recommendations about other yards in the area and their experiences with them for comparison. You’ll feel more comfortable knowing that the yard you chose is reputable, considerate, and professional.

Stay informed with the latest from Southern Boating

-by Jeremy Peters

Five Ways to Cut Down on Amp Usage


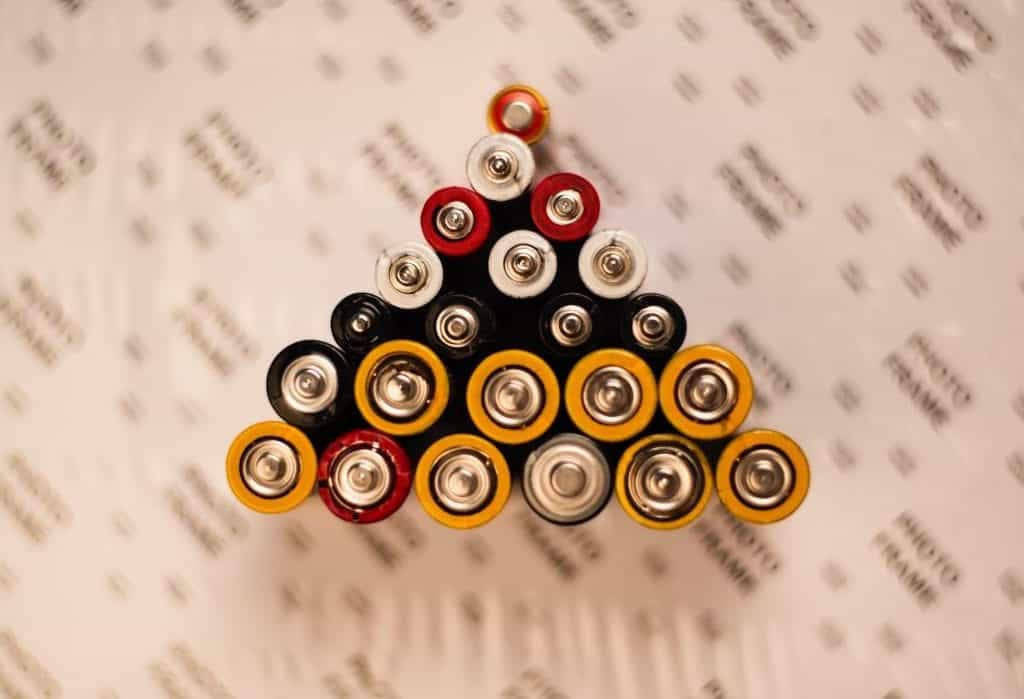
Five ways to cut down on amp usage

Most modern marine equipment has evolved to require much less power. When you’re in the boatyard this spring, do more with less and cut down on amp usage.

Radar

Arguably, you use radar under way when your engines are running, so who really cares how much power it’s using?

On the other hand, if your electronics suite is due for an upgrade, consider a more efficient unit. In standby mode, radar doesn’t draw much, but when it’s transmitting, the power needs are quite high. Consider one of the new units like the Simrad Halo that comes with either open or closed array antennas. This solid-state, pulse compression radar delivers a mix of close-in and long-range detection and excellent target definition with low clutter.

It has five modes to help process a variety of targets and a range from 48 to 72 nautical miles. The Halo is available for both 24- and 12-volt applications and an added bonus is its ultra-low electromagnetic and radiation emissions.
That means you can put one on the flybridge with you and not worry too much about scrambling your brain when the radar is running.

Climate Control

Air conditioners create the greatest energy loads aboard, and chances are the older your system, the more power it takes. New units from companies like Dometic are smaller,
self-contained and quieter with vibration-isolation mounts. Their high-efficiency rotary and scroll blowers use fewer amps and notably reduce fatiguing sound. Italian company Termodinamica (TMD) offers 24-volt DC units that don’t even need a genset. Made with titanium heat exchangers, the TMD units touts a power consumption rate that’s 50 percent lower than other comparably sized units on the market. Many air conditioners today also have an ECO mode where they ramp down if they are running off of batteries, via an inverter, and the battery voltage starts to fall. Adding window shades and tinted glass will also relieve the pressure on air conditioners and may even help refresh your interior design.

Refrigeration

The fridge also is a major power hog. Refrigerator efficiency has to do with the type
of unit (air, water or keel-cooled) and the quality of insulation around the box.
Frigoboat has highly efficient fridges in both 12- and 24-volt applications with refrigerator, freezer or combo solutions.

Their unique keel-cooled system is reliable, efficient and quiet with no pump or fan to create noise, and it doesn’t need winterizing. Check the age and condition of your insulation, too, or just tear out the old stuff and install some stainless steel drawers that will also upgrade the boat’s aesthetics.

Isotherm offers plug-and-play solutions with their cabinet refrigerators powered by 12/24-volt Danfoss compressors. These units feature extra thick, but still compact, insulation so the boxes stay cold with less power. They even have stand-alone, plug-in coolers for use on deck so you can keep your beverages nearby and not have to open the galley refrigerator as much.

These Travel Boxes also have ECO modes to slow the compressor once the food and drinks are already chilled.

Lighting

Most new boats now come standard with interior and exterior LED lighting, but if your vessel is of an older vintage, it would be worth swapping out your deck, salon and galley lights for new ones that draw less power. Imtra offers a variety of fixtures to help you upgrade the look of your interior including courtesy lights that create an impressive ambiance. As design trends move from direct to indirect lighting, options migrate from
down and spotlights to strip and rope lighting hidden behind valences and under furniture.

Evolved whites in LED options are now available, so it’s not hard to create a warm glow.
Efficient lights include navigation or running lights like those by Attwood, Perko, LopoLight, and Aqua Signal. You’ll save a few amps with an LED anchor light that you forget to turn off.

Finally, don’t forget those power-hogging heat generators below the waterline.  Underwater lights are known as large consumers of power. New developments in optical design, thermal management, and marinized electrical components have created lights that are brighter and use less power.

Lumishore’s thru-hull and surface mount, full-color cycling lights can replace older lights and provide better color while they use less power, and they can even be paired with
sound to “dance” to music. That’s worth the price of admission alone.

Battery Efficiency

Finally, efficiency comes down to the size, quality, and type of your battery bank. Charging with a genset is more efficient than charging with the engines and alternators, but a good battery bank is also important to your onboard power equation. The better the efficiency of a battery, the higher its charge acceptance rate, which is the amount of energy that can be pumped into a battery in a given period. Wet cells are about 60 percent efficient, gel cells 75 percent and AGMs 85 percent.

AGMs, especially any of the thin plate, pure lead (TPPL) variants, also have the highest charge acceptance rate, so they will optimize system performance. How you charge is also important. Charging cool batteries quickly is most efficient. For banks that are especially depleted, it may be best to charge with engines and the genset simultaneously. As batteries heat up during charging, it takes longer to get that last percent of charge pushed in despite the genset running just as hard as in the beginning.

These are just a few ideas on how you can save power and thereby burn less fuel and shrink your carbon footprint. Some of these are bigger projects, while others are a matter of just upgrading aging equipment. Chances are that some of these systems will pay for themselves down the road in operation costs, fuel and wear and tear on your engines or genset.

By Zuzana Prochazka, Southern Boating March 2019

Return to the Haul Out Guide

Boats and Thru-hull Holes

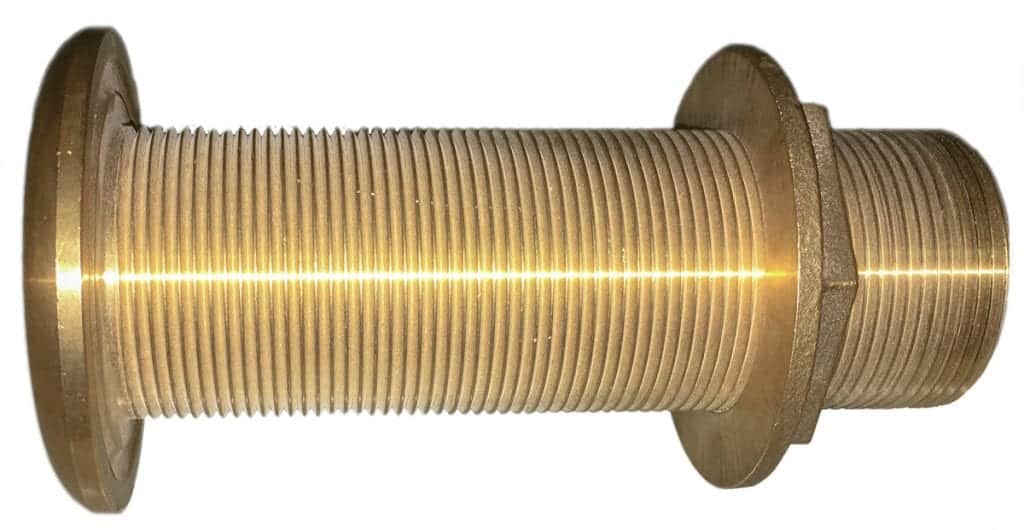
When you have to install thru-hull holes, do it right the first time.

Most any boat maintenance guru worth his Veda will advise you to avoid adding additional
thru-hull holes if at all possible. Tapping into an existing discharge or intake thru-hull is often recommended but may not always be an option. While drilling a hole in your boat’s hull is not ideal, the actual process to install a new thru-hull is pretty straightforward.

Let’s walk through a hypothetical installation of an air conditioning system that requires two new thru-hulls, one that’s below the waterline intake and the other above the waterline discharge.

Preparation

American Boat & Yacht Council (ABYC) standards call for the installation of a seacock on thru-hulls located below the vessel’s maximum heeled waterline. For the purpose of this
article, we’ll say the discharge thru-hull does not require a seacock; however, the raw water intake thru-hull (located below the waterline) does.

The discharge thru-hull for our example will be bronze. The seacock will be a typical flanged bronze unit with a compatible bronze thru-hull, although Marelon polymer seacocks and thru-hulls would be another option. Just keep in mind that the seacock and thru-hull must always be of the same material.

When planning the installation, choose a location that provides good access to the thru-hull. For our intake thru-hull, verify that the seacock can be accessed quickly in the event of an emergency and that the handle can be fully operated (i.e., no frames, bulkheads, etc., that block the throw of the handle).

In addition, avoid locating the thru-hull in front of a depth transducer or knot log, both of which could be affected by the turbulence a thru-hull generates.  Once you’ve identified a suitable location, mark the center of the thru-hull and drill a small pilot hole from inside the vessel. This gives you one last chance to check the location on the outside of the hull to verify all is well prior to cutting the hole.

Hole saw time

Select a hole saw the same diameter or slightly larger than your thru-hull, one with a pilot drill bit, which prevents the hole saw from walking when drilling. Using the small location hole you drilled as a guide, start drilling from the outside of the hull and be sure to keep the drill perpendicular to the hull surface. Drill until the pilot bit of the hole saw penetrates the hull, then move inside and finish drilling the hole. Smooth any rough edges of the hole with sandpaper.

For a cored hull, excavate the coring around the hole to a depth that encompasses an area at least as large as the thru-hull or seacock flange. Then fill the void with thickened
epoxy and allow it to cure before proceeding. This epoxy compression ring provides a solid base for the thru-hull and prevents water from entering the core.

Backing plates

A backing plate provides additional support to the hull and a flat mounting surface for the thru-hull nut or seacock flange should there be any hull curvature. A fiberglass backing plate glassed into the hull is the ultimate solution, however, marine-grade plywood is commonly used and perfectly acceptable.

Backing plates should be two to three inches larger in diameter than the thru-hull nut or seacock flange. Cut a circular backing plate from ¾-inch marine plywood, then drill
a hole in the center with the hole saw used to drill the thru-hull hole in the hull. Use a sander or wood rasp to shape the backing plate as needed to match the curvature of the hull. Once fitted, mark the backing plate so you can properly orient it later.

Test run

Always dry fit the thru-hull/seacock prior to final installation. Remove the backing nut and insert the discharge thru-hull from the outside. On the inside, fit the backing plate over it,
then install and snug up the flange nut. The intake thru-hull will screw directly into the seacock. Remove the thru-hull nut, insert the thru-hull into the hull, fit the backing plate, thread the seacock onto the thru-hull, and tighten until snug.

For bronze thru-hulls, a special tool called a step wrench is used to grip the ears inside the unit and hold it securely during tightening. A wedge of plywood inserted in the thru-hull also works well in a pinch.

WHEN IS A SEACOCK NOT A SEACOCK?

Many builders utilize inline valves attached directly to the thru-hull. However, there are a number of problems associated with this approach. To start with, in-line valves use NPT (National Pipe Taper) threads, which are not compatible with the NPS (National Pipe Straight) used in most thru-hull fittings (unless the thru-hull fitting is machined with “combination thread”).

Installing an in-line valve onto an NPS thru-hull fitting creates a mismatch of threads resulting in a weaker, less waterproof joint (due to less thread engagement). As it has no mounting flange, an in-line valve can turn or loosen from the thru-hull fitting due to vibration or through normal use. Finally, unlike proper seacocks, in-line valves are not fitted with grease nipples, bonding wire tabs or drains, each of which can create potential maintenance and winterization issues.

Once inserted into the seacock and moderately tightened, there should be a sufficient length of thru-hull inside the seacock but not enough that the thru-hull bottoms out.

If the thru-hull is too long, cut it to length. If the thru-hull is too short, use thinner plywood (½ inch, for example) to construct the backing plate. Most flanged seacocks have three mounting holes to prevent the seacock from turning once installed. There are two acceptable methods to secure the seacock. The first is to drill holes through the backing plate and hull (using the flange as a guide), then install bolts through the hull and secure everything together.

The second is to screw the seacock flange to the backing plate only. This is the option we’ll go with for our example. Regardless of the method chosen, ensure the mounting bolts or screws are of the same material as the seacock. Either stainless steel or bronze is acceptable when mounting nylon seacocks.

Installation

Once the dry fit is complete, disassemble everything and seal both backing plates with three to four coats of epoxy and allow to dry. You’ll need a second set of hands to hold the thru-hull in place during installation and while tightening. Apply a generous amount of marine-grade sealant (polyurethane or polysulfide) to the thru-hulls mushroom
flange, then insert it into the hull.

On the inside, apply sealant to the hull (around the inserted thru-hull) and hull side of the backing plate. Slide the backing plate over the thru-hull, orient as required and press down, bedding it to the hull.

For our discharge thru-hull, the next step is to add a thick bead of sealant to the top of the backing plate hole around the thru-hull, install the thru-hull nut and tighten snugly. You should see a ring of sealant ooze from beneath the thru-hull nut. For the intake thru-hull, apply sealant to the seacock’s flange (again, enough to see “squeeze out” all around once tightened), and then thread the seacock onto the thru-hull and tighten.

Once the seacock is properly positioned and tightened, use the flange as a template to drill the mounting holes into the backing plate. Be sure to drill into the backing plate only,
not into the hull (use a drill stop or piece of tape attached to the bit to prevent this). Clean the mounting holes of debris, add sealant to the holes and threads of the mounting screws, then install.

Once the installation is finished, fit the seacock with an appropriately sized tailpiece/hose barb (using thread sealant) and attach the cooling system intake hose to it. Attach the air
conditioning discharge hose to the hose barb of the overboard thru-hull, and it’s pa’u hana!

By Frank Lanier, Southern Boating March 2019

Return to the Haul Out Guide

Dock Maintenance

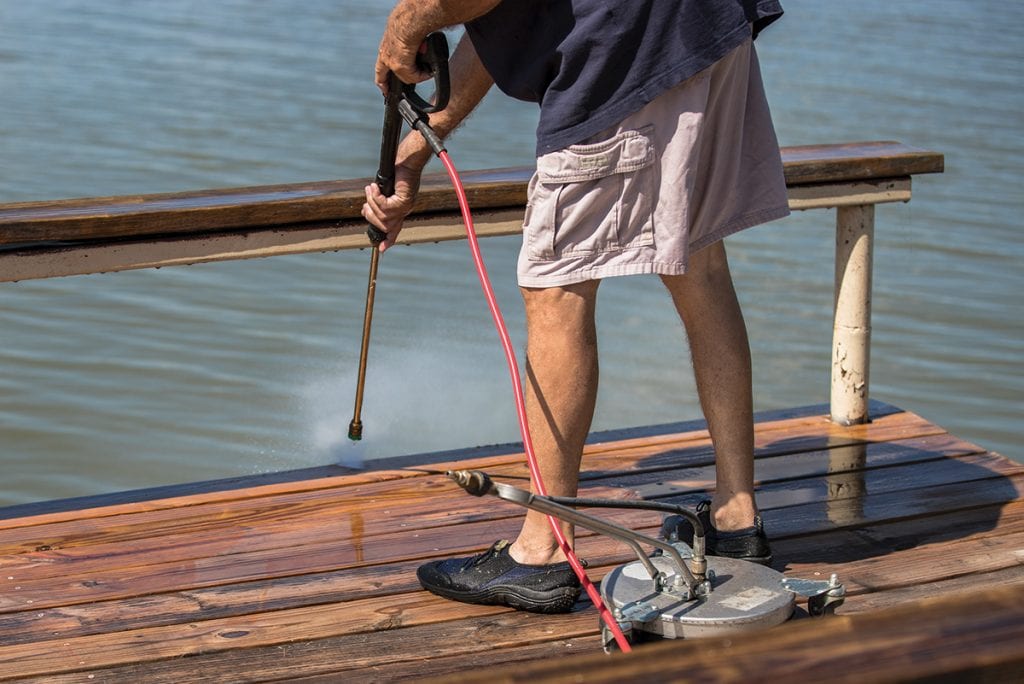
Dock Maintenance

Regular dock maintenance will keep it safe for your boat and guests.

It wouldn’t be wrong to say every boat owner has at least an ounce of pride in their vessel no matter its condition, with most taking great strides to make sure it’s cared for
and in good shape. No one wants to miss the opportunity to get out on the water when the time is right. In addition to keeping the boat up to snuff, the same goes for its home port: the dock.

If you’re lucky enough to own your own dock or even if you rent one, it’s important to maintain the structure and add features that protect both the boat and those who
walk on it.

Inspect it

Safety should always be at the forefront. Each time you walk the dock, look at it with an eye for imperfection. Look for nails or screws backing out of wood planks and for loose and rotting boards. You don’t want the kids or guests to trip and fall or catch splinters in their feet.

Is there anything missing? Take a look at the structure both above and below the waterline. Are fasteners, bolts, nuts, and cross beams solid? When you jerk the dock, does it feel like the pilings are loose? Are lashing straps tight around the floating platform? If you think “I should fix that,” then don’t wait. Plan to do it as soon as possible.

Keep it clean

Besides keeping your dock clear of debris, toys and loose gear, clean it. A stiff scrub brush with biodegradable soap or environmentally safe cleaning solutions like baking soda paste are usually effective, but a pressure washer makes the job easier. Remember that using a pressure washer can “burn” the wood if the spray nozzle is too close. Afterward, the wood will be softer and splinters will appear, so take a sander to the boards and smooth out the rough spots. Also, take time to sand out any rust spots on steel parts or supports.

Don’t forget to remove growth as well. Barnacles and other creatures, as well as plants, cause damage that can’t be seen until they’re removed. A putty knife usually does the trick, but scrub the area with an abrasive pad after removal to make sure.

Fix it

Don’t wait to make repairs. Murphy’s Law will find its way, and covering the dock with carpet or such only hides what will continue to get worse and cost more later. If there are damaged areas in a wood dock, use marine putty or wood filler to repair holes or splits. Replace screws or nails if they’re backing out, and if they are, evaluate if the board needs to be replaced. It doesn’t matter how much the dock is used; hardware will loosen and rust with weather, so regular dock maintenance is important. Lubricate moving pieces such as chains, and replace rusted parts when necessary.

Seal it

Wood docks, in particular, are vulnerable to the marine environment through moisture, sun and changing temperatures, so use only treated lumber. Once the dock is cleaned, repaired and sanded, apply a waterproof sealant that is environmentally friendly. There are sealants available that are low volatile organic compounds (VOC), but check local regulations before applying. If you remove the dock during the winter, allow the sealant to completely dry before installation.

Dress it up

Now that the dock is clean, safe and secure, trim the dock with a few accessories. Protect the boat from accidental bumps by attaching dock bumpers and rub rails. The areas that cause the most damage are the corners, and bumpers come in a variety of configurations and lengths as well as materials. They mount in a number of ways from along the
sides, corners, flush with the top, around pilings, and more.

Another safety feature is to add lights. “Docks and seawalls can be precarious and dangerous areas, and any additional lighting is beneficial for accident prevention,” says
Mick McDonald of Lumitec. “Lighting adds an additional level of security to your property to help protect expensive investments.” Lights also add ambiance to your dock and property and attract marine life to watch on a warm summer evening.

Chances are, your dock is used for a variety of activities as well as a place to store gear. If you inspect it regularly and keep it solid, clean and safe, it’ll be the perfect home for your boat and a great place to hang out for many seasons to come.

By Steve Davis, Southern Boating March 2019

Return to the Haul Out Guide

How Do Watermakers Work?


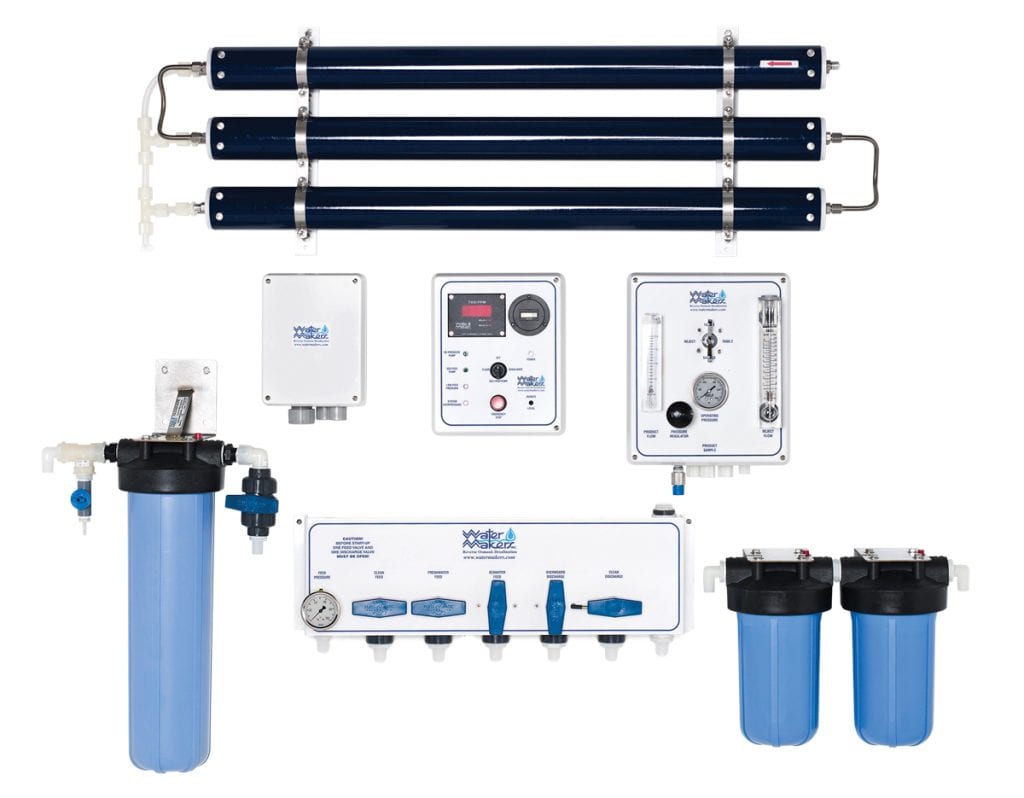
How Do Watermakers Work?

While once the domain of larger yachts, today’s well-engineered and dependable watermakers have trickled down in both size and affordability.

Now that you have decided to purchase your new boat or contemplated an overdue retrofit, you just need to identify what you can and cannot do without.

Easier said than done. Practicality is not the province of a boat owner (a reason you initially partook in the lifestyle). However, should you find yourself taking long weekends away from your home dock or cruising in search of new horizons, you may want to think about installing a watermaker. But before we dive into several systems from a variety of manufacturers, let’s take a look at how they work.

Under Pressure

If you still remember some of your high school science facts, you might manage to dredge up something about semipermeable membranes and the process of reverse osmosis. The former is a structure allowing certain molecules—for our discussion, water particles—to pass through but not others. The latter is the actual procedure.

To boil things down then, watermakers take in salt water and, under pressure of about +/-800 psi, force it through a semi-permeable membrane. The result on the other side is the fresh water molecules. Everything else (contaminants) is held back. The impurities are then pumped overboard, and a new measure of salt water is introduced.  In the end, about 10 percent of the original amount is retained. This last fact will be important to help you select the right unit to fit your needs in terms of how much water you actually require.

“As you operate a watermaker while underway or dockside and, depending on the kind of water you are running in, you may have to adjust the pressure your particular unit is operating at,” says Greg Newman, the East Coast, Caribbean, and South America sales manager for Parker Hannifin, Sea Recovery’s parent company. “This prevents you from overflowing your system.” In other words, it avoids making more water than you need and putting unwanted stress on the system.

Dialed In

Consider an automated unit to prevent unnecessary trips to the engine room.  In fact, a remote touchscreen control panel is definitely the way to go. “You can start it up from this panel and monitor all the functions and even use your iPhone if you have our system connected to the network,” says Dometic’s Ben Koppenhoefer. “Every machine we make can be mounted in a frame-style design and bolted together. Additionally, we can take it apart for remote mounting. This is especially helpful for any new boat options list where the vessel presents limited space. This especially holds true for boat owners who are considering retrofitting as well.”

As the heart of any of these systems are its membranes, and as most manufacturers agree that the pressure limit should be around 850 psi, the flow rate limit comes into
play. “It’s important to know the rate of your particular unit. For example, if you are running your watermaker at 1gpm and you hit your threshold before the 850-psi mark, there is no need to ramp things up as this will put unwanted stress on the membrane,” explains Koppenhoefer. “It all depends on the kind of water you are in, and there is a big difference between brackish and saltwater areas.”

 Power Up

The majority of watermakers will require an AC generator for power. With the wide variety, size, and output available, you’ll find a unit for your needs. Maintenance involves two basic actions: changing the oil in the high-pressure pump, usually after 500 hours, and the freshwater flush filter at four-month intervals.

The membranes have longevity—5 to 10 years is expected— but for a complete regimen,  follow manufacturer recommendations. “With our units and during general operation, for example, we have auto alarms for dirty pre- and regular filters that will turn the unit off and indicate it’s time for a change,” says Newman. “The system will also divert any dirty water on startup to discharge and keep only the freshest for use aboard.” To keep the membrane from fouling, your system must have an automatic back-flushing mode that will take care of this on a weekly basis.

Today, watermakers are high-tech, sophisticated, safe, and simple. Most are NMEA 2000 compatible, have a touchscreen interface displays or remote controls.  With the wide the selection available, it is just a matter of choosing the right one for your needs.

By Ken Kreisler, Southern Boating March 2019

Return to the Haul Out Guide

Synthetic Teak

New synthetic teak decking keeps feet cooler.

The beauty of real teak wood on boat decks is undeniable, but look-alike decking made of synthetic teak substances has become a popular trend for many reasons.

Those reasons include its affordability, low maintenance, nonskid appeal, uniform appearance, and soft feel underfoot.

The downside has been its tendency to absorb heat, which makes the product uncomfortable for bare feet in southern boating locales that have continuous sun exposure (e.g. Florida). Technological improvements have enabled today’s product offerings to be cooler underfoot. They also to benefit greatly from the type of materials used, manufacturing processes, color options, and ease of installation.

Some DIYers may have the skills and patience to tackle installing new synthetic teak decking themselves. But an annual haul-out is the ideal time to add new decking to your boatyard’s project list.

If your boat is overdue for new decking, take a look at some of the hottest, cool-comfort synthetic teak decking offerings on the market.

Flexiteek

This company has offered synthetic teak boat decking material since 2000. Flexiteek is the OEM supplier for many boat builders and has distributors in 38 countries. The company’s newest advancement is Flexiteek 2G, which was in development for two years and is the
manufacturer’s “Next Generation of Decking” for its lighter weight and ability to cool 30 percent faster than traditional composite decking. Flexiteek comes in eight wood colors with black, white or gray caulking.
flexiteek.com 

Isiteek is made for DIY install on small areas.
isiteek.com

PlasDECK

PlasTEAK, Inc. introduced its synthetic boat decking PlasDECK in 2005. Its been popular ever since. With 25 colors and custom variations, the new PlasDECK Eco Series utilizes leftover scraps from manufacturing that are recycled for the bottom layer and makes the product even more affordable as well as eco-friendly.

PlasDECK Eco Series has an identical look and feel of the standard PlasDECK boat decking, but the family-owned, Made-in-America company passes on the manufacturing cost savings directly to the customer. Product cost is further reduced by offering it in large sheet form. This is advantageous for resurfacing large deck spaces like houseboats, pontoons or boats with large decks.

PlasDECK Eco Series won the Innovation Award at the 2018 Miami Boat Show. PlasDECK CoolTEAK remains cooler than other PVC decking materials, which makes it ideal for swim platforms. CoolTEAK is currently only available in premade mats from templates and is not for DIY applications.
plasdeck.com

Dek-king

Dek-king 2G is the company’s next-generation premium synthetic teak decking that’s 30 percent cooler underfoot and 32 percent lighter than previous 1G product offerings. Dek-king’s lifelike graining that differs between planks replicates natural wood to provide a finish that’s nearly indistinguishable from real teak.

Wilks is the British family-owned manufacturer and supplier of Dek-King synthetic teak decking. Flexiteek International announced in a press release earlier this year that an agreement has been reached to acquire Wilks, and the merger is planned to finalize later this year. Flexiteek plans to retain the Wilks manufacturing premises in Essex, northeast of London, England, along with all employees, combining the skillset of both companies to serve the international marine market.

The acquisition will facilitate the supply of synthetic teak and fendering to a list of OEM clients that include Royal Huisman, Hanse Group, Jeanneau Beneteau Group, Princess
Yachts, Gulf Craft, Sunseeker International, and X-Yachts.
dek-king.com

By L.N. Evans, Southern Boating March 2019

Return to the Haul Out Guide

Replace Your Enclosures

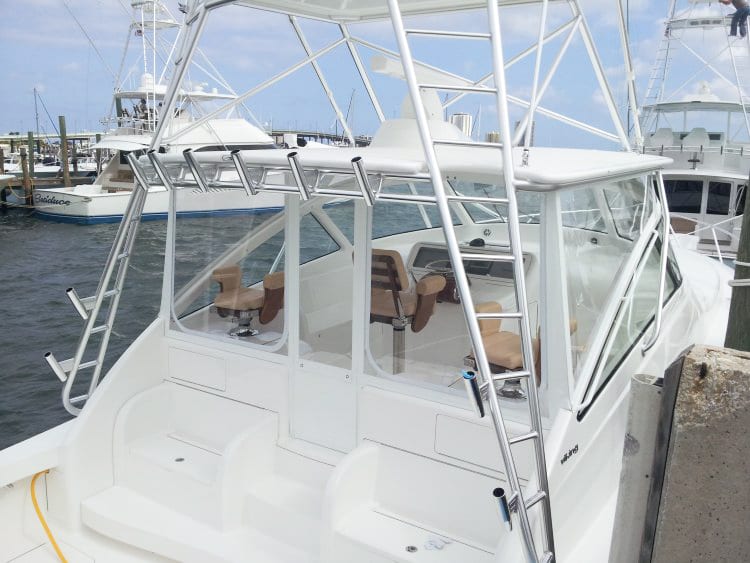
Replace Your Enclosures

Blurry or worn view? It may be time to replace your enclosures.

While under way, if you confuse a scratch on your boat’s enclosure with a buoy in the channel, then it’s time to repair or replace your acrylic, vinyl or another type of clear marine enclosure. The scheduled down period during haul-out or any time when convenient at a marine service yard gives the professional the time to do it right. Today, the choices of clear enclosures are myriad and include products made of acrylic, polycarbonate and vinyl.

As a material’s primer, acrylic enclosures are semirigid and include brands like EZ2CY. Polycarbonates fall under brands such as Makrolon, and clear vinyl includes CrystalClear, Regalite and Strataglass. Each has its own distinct attributes and applications.

Acrylic

In the sub-tropics like The Bahamas and South Florida, boats must endure high humidity and temperature swings, and that’s where acrylic works the best. Acrylic does not fade or yellow over time, and you can also buff out scratches. “EZ2CY is 80-gauge acrylic and it doesn’t roll, but is made to lift up,” explains Andy Flack, project manager for Canvas Designers in Riviera Beach. “The panels pin to the roof or the bridge when you don’t need them. Because of the thickness, it can withstand a lot more air pressure when under way and holds in the cool air if you use an air conditioner.”

For boats already equipped with EZ2CY enclosures, the refurbishing and buffing process during haul-out is simple. “Once at the yard, do an inspection and if it’s scratched, have
the yard take it out and send it to your EZ2CY dealer,” Flack recommends. “The dealer will have it buffed and polished, then hang it or store it and bring it back to the boat looking like new. Then it can be re-installed so it’s perfect when the boat comes out of the yard.”

Vinyl

Many boat owners need enclosures that can be rolled up out of the way, and that’s where clear vinyl works well. Clear uncoated vinyl is pliable so it’s easy to roll up, but users
must take care because it is easily scratched. Strataglass incorporates the scratch-resistant coating VueShield that helps reduce scratches. Uncoated vinyl is less expensive than coated vinyl, and both products must be handled carefully so they don’t become wrinkled or creased. In addition, vinyl will become yellow or hazy over time.

Polycarbonate

Polycarbonate enclosures like Makrolon are semirigid, so they can’t be rolled up and must be pinned or unzipped and removed. Scratch-resistant coatings are used to protect the surface. Polycarbonate can be expensive; however, it offers excellent visibility.  Polycarbonates are popular in northern climes and Great Lakes areas where the sun and
temperatures are not as extreme as in tropical climes. Because it’s a petroleum-based product, polycarbonate can yellow in tropical weather.

Maintenance

Once the new enclosures are in place, proper maintenance can help them last a long time. In the saltwater environment, the primary goal is to displace the saltwater by not using harsh chemicals. Soapy water is the strongest solution you should use because many cleaners use ammonia or alcohol, which will break down acrylic and cause it to haze and crack. Once that happens, you can’t buff it or sand it out. “Have a separate set of cleaning tools that don’t get used anywhere else on the boat,” Flack instructs. “You don’t want to pick up any dirt or debris on your cleaning tools that could harm the glass.”

Fasteners

How the enclosures are fixed to the boat is another choice that boat owners must make. Haul-out is also the time to service the zippers, Velcro and fabric borders on your enclosures. Fasteners such as slides, snaps and zippers are used with acrylic or vinyl products from companies like Sunbrella and Herculite.

Canvas Designers uses Stamoid, a dimensionally stable vinyl from Serge Ferrari. “We then connect the glass to the boat using a track-to-track application,” says Flack. “There
is a track in the hard top of the boat, and there is a track on the coaming of the flybridge. We sew a bolt rope on the top, and the panel on the bottom zips closed.”

Timing

How often you need to replace your enclosures depends on how often you use your boat. “Some people own boats that are 25 years old that don’t have 1,200 hours on them,” Flack says. “Some of the sportfishing boats are two years old and have 3,000 hours on them; they run them all over the world.”

Sportfishing boats that compete in international tournaments often experience a worn or broken enclosure in a foreign port, and that’s where it can get tricky when trying to repair or replace the panel. The ability to have a replacement shipped to your location is something to consider when purchasing enclosures. Computer-aided design (CAD)  software can store the measurements of your boat’s enclosures for just such a situation.

“If we put an enclosure on a 72 Viking here in Riviera Beach, it is also stored in CAD,” says Flack. “Then if they are down in the Dominican Republic or Puerto Rico and they absolutely tear a panel up, we can make that panel from a computer file. We can ship that panel down to them and be 100 percent confident that it will zip onto the boat.”

By Doug Thompson, Southern Boating March 2019

Return to the Haul Out Guide

Lose Onboard Weight

Once your boat is back in the water, don’t undo the good your yard has done by carrying around unnecessary weight in your storage compartments. Do some spring cleaning, empty out the closets and compartments, and get lose onboard weight.

Here’s the skinny on tips to help both your wallet and boat performance. Remember the slogan: Lighter boat = fatter wallet.

What’s the big deal over a few extra pounds? Your body can’t function at peak efficiency when lugging around a keg instead of six-pack abs, and your boat is no different. While the effects of excess weight are bad enough for full displacement hulls, the negative effects are even worse for faster boats with lighter, planing hulls. Boats are designed to perform their best with a specific payload in mind. An overweight boat rides low on her lines. This increases the wetted surface of the hull which, in turn, increases friction between the hull and water and reduces speed and fuel efficiency.

Lose the weight(s)!


Lighten your load.
If it’s time to put your boat on a diet, start to lose onboard weight by going through all cabinets, lockers and storage compartments to see what items you really need on board. The goal here is to ditch the excess weight while maintaining acceptable levels of equipment to maintain safety and comfort. Be realistic, and consider your near future boating plans when reviewing items to keep or purge. There’s no better place to start your boat diet than in the galley. Sure you’ve got enough pots, pans, and gadgets to cook a seven-course meal, but how often have you actually done so? The same thing goes for all those extra cooking supplies, canned goods and that bulk purchase 10-pound bag of sugar that was on sale. Will you actually use them anytime soon?

Books and boats just go together, but rather than maintaining a complete library on board, how about only bringing the ones you’ll need for one trip and keep the rest ashore? Better yet, download them to your iPad or Kindle to save even more weight.

Items that may seem inconsequential weight-wise can add up before you know it. Do you really need two dozen towels, three changes of bed linens, five blankets, and all those throw pillows? Go through your hanging lockers and see what clothes have actually been worn in the past year, and ask yourself if you really need five sun hats.

Next up, take a hard look at your engine and boat spares as well as maintenance items. You’ll want to make sure you have the prudent and proper amount of spares and tools on board, but unless you’re going on an extended cruise, remove those “just in case” duplicates or stock, such as extra oil, spare hardware, and rarely used tools; they can add up to significant weight savings. The same is true for routine maintenance items and cleaning supplies (paints, varnishes, shop vacs, and the like), which would be better stored in a dock box or at home until necessary.

Tanks for the idea.
Another great place to realize some huge onboard weight savings is your vessel’s tankage. You always want to have enough fuel on board, but if you’re doing shorter trips, why take on a full tank of fuel and lug around the extra weight? Buy only as much fuel as needed plus a bit of reserve, and avoid the temptation to burn extra fuel because you have a full tank. It may mean more trips to the fuel dock, but you’ll save money in the long run.

Employ a similar mindset when it comes to your water tanks. A gallon of water weighs more than eight pounds, so why drag around a full tank when you’re only going on a day trip? As any good plumber will tell you, “it ain’t just water that rolls downhill,” so what about that full holding tank? Pumping it after every trip will reduce both weight and unwanted smells.

Coolers and live wells present another opportunity. Why use 100 lbs. of ice if 50 lbs. will do, or why bring a case of sodas if you only drink four or five per trip? Keeping your live well empty unless you actually have bait seems like a no-brainer, but you’d be amazed by what some boat owners unthinkingly do out of sheer habit.

Balance what’s left.
Once you’ve removed all of that excess onboard weight, distribute the remaining gear to best balance the boat. This not only improves the ride but also saves fuel by allowing non-displacement boats to get up on a plane more quickly. Don’t be afraid to ask passengers to shift around to accomplish this, and, if installed, learn how to properly use trim tabs for maximum planing efficiency.

Keep the mindset.
Like any diet, once the weight is off, it’s easy to backslide and start packing it on again, especially when looking at all that empty storage space. Keep that rebound onboard weight gain in check by paying attention to all the stuff that tries to find its way back on board. It’s also a good idea to clean out your storage lockers at the beginning of each season to get rid of stuff you really don’t need. Keep the weight off, and both your boat and your wallet will thank you.

Ditch the parachute.
While not a weight reduction issue, boats with planing hulls can also improve their fuel economy by lowering their Bimini top while running. That big, shady top may be horizontal while at the dock, but it will be angled and act like a huge parachute while underway. Dropping it when running fast on longer trips and then raising it once you reach your destination will significantly improve your boat’s fuel efficiency.

By Frank Lanier, Southern Boating March 2018

 See more from the Annual Haul Out Guide

Pump or Dump? Navigating Discharge Onboard

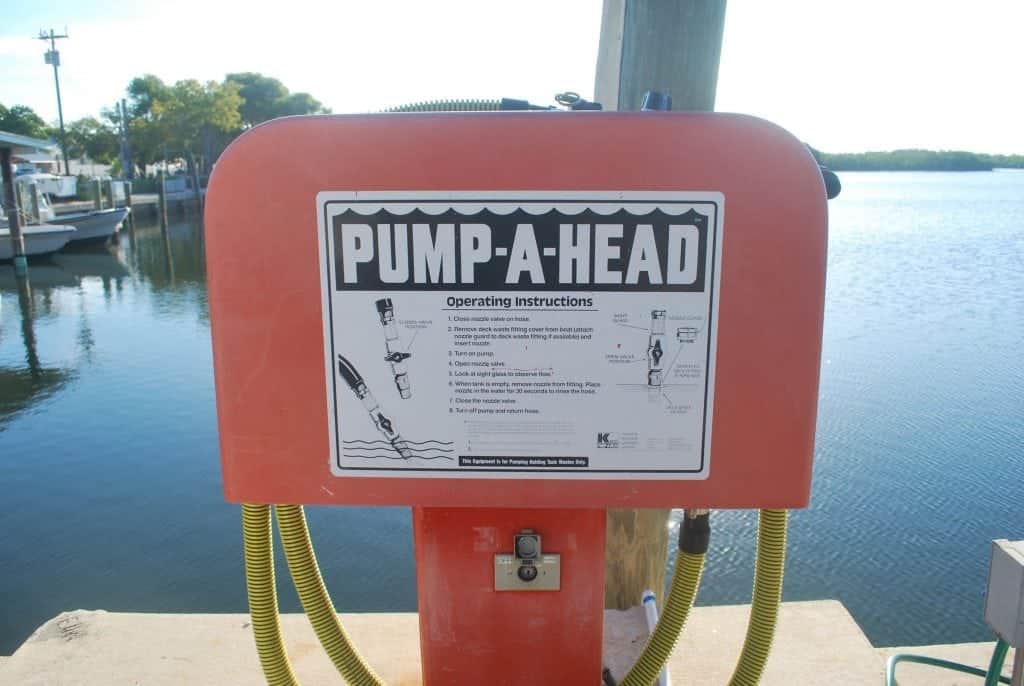
There are overboard pumpout restrictions.  Most boaters know this. But many don’t think much about what your boat can discharge into the water, be it gray, black or from the bilge.

Perhaps your annual visit to the boatyard could include the filtration or treatment of one or more of these to keep our oceans and waterways safe and clean from boat discharge.

First, let’s look at gray water, which comes from the galley and shower sump. Unlike commercial vessels, recreational boats aren’t monitored or regulated for gray water discharge. That means you dump soap, shampoo, conditioner, lotion, dish detergent, shaving cream, grease, toothpaste, and phosphates into the water. Although boaters don’t need to deal with it, there are solutions to address the issue.

For example, a Wavebrite filter cleans gray water prior to discharge without the need for a gray-water holding tank. Install a filter, intelligent flow manifold, and pump between a boat’s supply drains and the overboard skin fitting. If your boatyard works with large or commercial vessels, they’ll be able to guide you on the choice of solutions.

Oil, gasoline, and lubricants can collect in the bilge of any size boat. These materials then mix with water and discharge overboard through the bilge pump, and that makes for a
toxic environment. The best solution is to keep your engine well tuned, check fuel lines and hoses regularly for leaks and drips and use an oil-absorbent pad below machinery. To go one step further, you can install an oil/water separator into the bilge discharge line. If you have a large boat, ask your yard for guidance on systems from makers such as Ingersoll Rand or Skimoil.

EPA Input

Finally, there’s the issue of black water or sewage disposal. According to the U.S. Environmental Protection Agency (EPA), the law on the discharge of black water reads “All boats operating in U.S. waters with permanently installed toilets are required by federal law to have on board a Marine Sanitation Device (MSD) that either hold human waste until it can be transferred ashore, or reduces the coliform count to such low levels that discharged sewage poses no public health hazard.” Recreational vessels 65 feet and smaller may use a Type I, II or III MSD. Type I and II are “flow-through” systems that utilize a holding tank for a chemical or biological-based treatment prior to discharge, and Type III utilizes a holding tank or similar device that only allows for pump-out.

Of course, living with holding tanks can be a stinky affair that marine companies have tackled in different ways. One approach is to pump air into the tank to promote the
growth of aerobic bacteria that consumes the odor-producing anaerobic bacteria. Groco’s SweetTank uses a three-watt pump that injects air into the bottom of the holding tank to lower odor. While this method doesn’t treat the sewage for discharge, it does make it easier to live with.

Raritan addressed the problem with their Electro Scan, a U.S.C.G.-approved Type I MSD
that uses electrodes to convert saltwater into a bactericide. Without the use of chemicals, the treated water meets EPA standards for overboard discharge. The 12-volt system has a convenient touchpad interface, is plumbed to one or two heads, and used with electric or manual toilets.

No matter what kind, discharge water is not fun to work with, and the solutions may not be readily available at the chandlery. That’s where your boatyard comes in. The yard will know other alternatives and can take on the plumbing dirty work. Now, you don’t have to worry about what your boat is slyly shedding into our waters.

By Susan Walker, Southern Boating March 2018

 See more from the Annual Haul Out Guide

The Best Types of Fire Suppression Systems

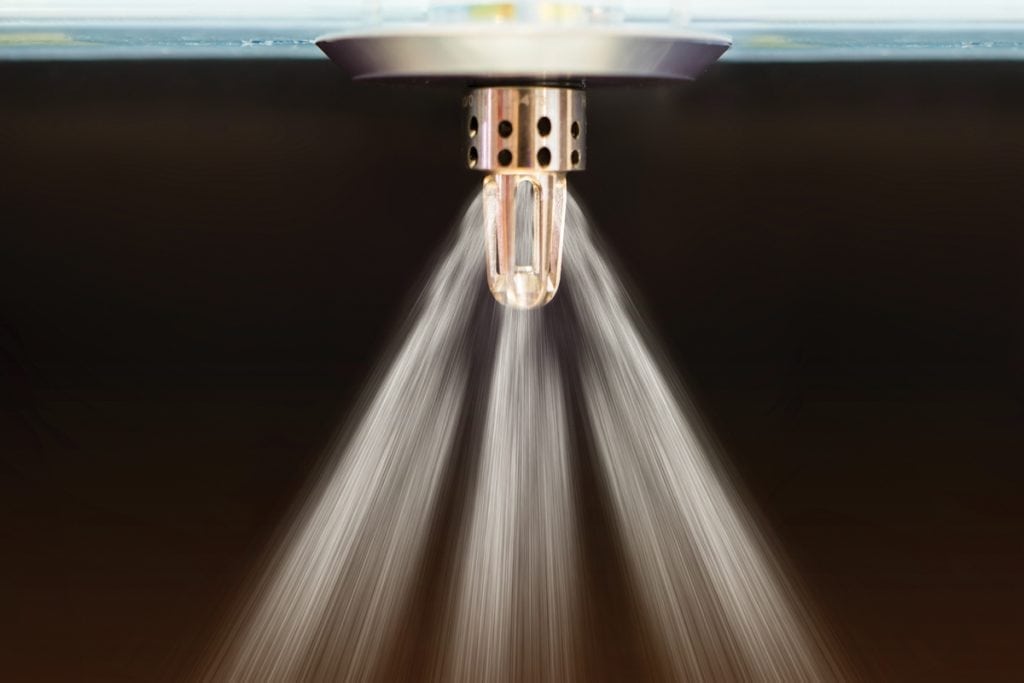
The Best Types of Fire Suppression Systems

Other than “Man overboard!” hearing “Fire!” may be the most frightening sound aboard a vessel. So what is the best type of fire suppression system for your boat? And how do they work?

Approximately 90 percent of onboard fires start in the engine room and more than half occur because of electrical wiring issues. A fixed fire suppression system that triggers automatically is your best bet to fight a blaze early when there’s still a good chance of keeping it contained.

Today’s top fire suppression systems use the combination of a fire-suppression system in the engine room and smoke detectors in the enclosed cabins.

Fireboy-Xintex, Sea-Fire, and Kidde are well-known makers of automatic fire suppression equipment for recreational boating and although some are DIY, more complex iterations are best left to boatyards that are savvy in the installation and servicing of these products. Here are five things to know about pre- or custom-engineered fire suppression systems.

1. Determine the space and measure the area you are trying to protect.

Size your system appropriately by measuring total cubic feet. For example, Fireboy systems are available to protect engine rooms and machinery spaces from 25 cubic feet to 17,300 cubic feet. “Pre-engineered systems are available for up to 4,000 cubic feet and should be installed exactly per the manual instructions,” says Keith Larson, vice president of sales and marketing for Fireboy-Xintex. Many extinguisher systems are designed to automatically discharge in 10 seconds whenever the space ambient temperature reaches 175 degrees Fahrenheit, but it’s important to install a manual override, as well.

2. Decide on the suppression agent.

Let’s look at the different kinds of boat fires. Boats carry fuel, batteries, propane, alcohol, wood, plastic, and fabric. When these materials burn, a specific type of chemical agent
fire extinguisher is required to suppress the fire.

These are the three most common classes of fire aboard recreational boats in the 15-to-60-foot range:

Class A

Class A (ordinary combustibles) fires are paper, plastic and fiber fires, including cabinets, berths and hatch covers, and synthetic materials such as cushion vinyl, foam and fabric covers and bedding.

“It’s also important to have your passengers aware of what to do if a boat fire does occur,” explains Keith Larson, vice president of sales and marketing for Fireboy-Xintex, a leading marine fire-suppression equipment manufacturer. “A paper, fuel or electrical fire can burn so fast that the boat is gone and your passengers are in danger. What’s more, poisonous smoke can cause people to panic and lead to health problems.”

Class B

Class B (flammable gases/liquids) fires are diesel, gasoline and propane fires and can
quickly ignite the rest of the boat. Shut off the source of the fuel, if possible.

Class C

Class C (electrical equipment) fires are electrical and can start other classes of fires. Attempt to shut down the electricity first, if safe.

For the engine room, it’s best to choose an extinguishing agent that is effective for surface fires of all three types.

The Coast Guard mandates that all boats have a B-I or B-II classification portable fire extinguisher on board. Mount the extinguishers in an accessible position.  Remember, a  B-I or B-II portable won’t put out a Class A or Class C fire. Upgrade to an ABC classification fire extinguisher; it’s not a huge expense. Fighting a boat fire with a portable extinguisher is a risky endeavor, especially because most fires start in the engine room.

3. Determine the best location for installation.

A fixed automatic fire-suppression system in the engine room and smoke detectors in the living spaces are essential. To determine what you need, measure the square footage of the engine room. If you can’t do it yourself, hire a fire protection professional to measure your space.

Most agent storage tanks can be mounted horizontally or vertically, which is good because space comes at a premium in most engine rooms and also inside the protected space and/or remotely through fixed piping and nozzles.

“Sea-Fire provides design guides for vessel owners which allow them to easily identify the size and type of fire system necessary to protect their vessel’s engine compartment,” says Steve Ellis, Jr., marketing director for Sea-Fire Marine, another leading manufacturer. “Specifying a fixed fire suppression system can be as simple as taking a few measurements. Providing the volume of the engine compartment is all that is necessary to specify a vessel with a fixed fire suppression system.”

4. Determine the necessary peripherals and legal issues.

If the system discharges under way, shut down the engine, generator and bilge blower to stop the motors from sucking in additional oxygen. Larson points out that the U.S.C.G. requires an engine shutdown module and a system status display at the helm. Also, install the manufacturer-supplied bracket to meet U.S.C.G. standards, and don’t forget about required carbon monoxide and smoke detectors.

5. Cost

“For a 50-foot boat, expect a cost of $2,500-3,000,” says Larson. That will depend on the access to the engine room and the complexity of the system. But when you put the cost up against the loss of your boat, or worse, it becomes a small price to pay for peace of mind.

Pre-engineered systems protect spaces up to a specific volume. If an owner can provide the length, width, and height of their engine compartment, an off-the-shelf system can be found at West Marine or through other boat supply stores. A 300-square-foot engine room can be set up for about $1,500, while a 750-square foot space costs around $2,900. An engine shutdown system for diesel-powered boats is an additional cost, but worth it.

Wiring is necessary for both automatic and manual (cable) activation and is usually the most time-consuming part of the job. Don’t install the units near intake vents. That’s where drawn-in air can fuel the fire or cool the system’s temperature-sensitive trigger, potentially causing a delay in discharge. Make sure the system is readily accessible and includes ongoing maintenance, including periodic inspections and testing.

If you’ve ever seen the result of an onboard fire, it’s a terrifying sight. Put a thorough inspection of an existing fire suppression system or the installation of a new one at the top of your list.

How it Works

Fireboy-Xintex and Sea-Fire use clean agents, such as HFC-227ea and 3M Novec 1230. Rated for B and C fires, neither leave a residue after discharge, are environmentally responsible, and safe to human exposure. 3M Novec 1230 offers almost no global warming potential but is slightly more expensive than HFC-227ea. Boat owners should consider using the Novec 1230 because there are no known adverse effects on the environment from the agent, and it’s one the industry is embracing.

After the clean agent releases, wait 15 minutes for the fire to die completely. Then you can open the hatch, allow time for the affected area to clear the air and find out where the fire started.

By Zuzana Prochazka & Doug Thompson Southern Boating

 See more from the Annual Haul Out Guide

Onboard Storage Solutions for Your Boat

Get creative with these onboard storage solutions for your boat.

Storage space is at a premium on a boat, and your annual haul out is an ideal time to add new storage solutions or customize existing areas. If your boat’s interior seating is
well past its lifespan, consider utilizing hinged seat cushions that lift up for customized storage areas beneath. Just be careful not to fill up your newfound storage with items you
don’t really need. (See the article in this section, “Lose the Weight” ) The first step is to evaluate your storage needs based on how you typically use your boat. Avid anglers, for example, may want customized storage for their rods, reels, lures, assorted tackle, and anything else they prefer to store aboard rather than carting it to and from the car each fishing trip.

Go shallow

If all you need is a few inches of height for items like fishing rods, consider a pull-out drawer at the base of your settee or under the dining area, which offers large width and depth. Another shallow-height option is in a stateroom with stacked bunks. Ask your yard to raise the upper bunk several inches and add hydraulic lift supports and hinges to easily access a 3 to 4-inch-high storage space underneath.

Small but useful

With a little ingenuity, even the smallest areas can be used to store items that would otherwise be cluttering the common areas. Using store-bought supplies (3M Command plastic hooks, small suction cups, Velcro, see-through plastic organizers, etc.) consider how best to use these underutilized spaces:

  • Under center console seat (strap mesh pouches to hold sunscreen)
  • Plastic organizer on the inside of cupboard doors for chargers and cords
  • On the walls and from the ceiling
In plain sight

Sometimes, additional storage solutions for your boat are right under your nose! Or under the table. If your dining table or salon side tables are free-standing, swap out the solid base or legs for a custom hollow base that has drawers or shelves to store glassware, liquor or wine; you’re limited only by your imagination. If your boat has steps that haven’t been designed to utilize as storage space, doing so may only require a simple modification. Ask your yard to determine if this is an option.

Pack light!

When you invite non-boating guests for a day or weekend, consider the size of your boat and available room to store their bags and gear. Make sure you inform them of all the items they should not bring.

By L.N. Evans, Southern Boating Magazine March 2018

 See more from the Annual Haul Out Guide

Exit mobile version