


Save Your Dunked Outboard
How to save your outboard motor if it goes underwater
Once in every boat owner’s life, it’s likely to happen. A Titanic tragedy it is not; someone just forgot to replace the drain plug, and your boat lies submerged at the ramp. Fear not. A dunked outboard can happen, but you need to act fast!
Saving your outboard—whether it’s a two or four stroke—from a watery death in fresh or salt water isn’t as hard as most people think. But fast action is crucial regardless of salinity. Once a waterlogged motor comes into contact with air, corrosive rusting begins.
Portable outboards of 25 horsepower and smaller are the most likely engines to go under. Marine mechanics call it “the classic late Saturday afternoon emergency save,” but how it gets to that point is up to fate. For example, while carrying a 9.9-hp outboard you stub a toe at the dock, and you and the motor hit the lake bottom. Or, you fail to tighten down the thumbscrews on the clamps, and normal vibrations loosen the connections to the boat until it is bath time. Most outboards of 60 horsepower and larger are bolted to the transom. Unless the entire boat actually sinks you probably won’t dunk a large engine. Regardless, the techniques used to save an engine work for all sizes.
Step One: Pickling your submerged engine
If the engine goes into saltwater, the first step is to raise the engine and get it right back into the water. No kidding! A freshwater bath (called pickling) is one way to begin flushing all the salt water and debris out of the engine. Some marine mechanics fill the entire engine with oil or diesel fuel. The goal is to displace the salt water and keep the exposed metal parts from air exposure. “Your number one enemy is air, so if you are not prepared to work on it immediately, sink it in fresh water,” says John Wilkinson, a priority representative at the Yamaha Marine Service call center. “Once you are ready and have two or three hours set aside to work on it, start with a garden hose and spray the entire engine, and drain the carburetor or vapor separator on a fuel-injected engine.”
Step Two: Break the dunked outboard down
Next, without delay, pull the spark plugs, drain the cylinders and spray an entire can of quality fogging oil (such as Lear Chemical Corrosion Block) throughout, rotating the crankshaft to save the cylinders. Add a fresh set of spark plugs, change the oil and filter on a four-stroke, then add gas and get the engine started. On a two-stroke engine, run a rich gas-oil mix used during break-in, which will add more lubrication. The richer mix will also likely foul your spark plugs, but you’re out to save the motor, not preserve spark plugs. Run the motor for an extended period, two hours or more if you can. The idea is to get the engine warm enough to bake out any water.
Step Three: Avoid Corrosion
Now you can start working on the other parts of the engine. “One crucial thing is to take the starter motor apart and clean it up,” says David Greenwood, planning manager for Suzuki and a long-time outboard motor expert. “That starter motor is going to start corroding in no time, so you need to clean and grease all electrical connections. Anything that shouldn’t be underwater at any given time needs to be addressed, including the main wiring harness. Eventually, that will probably need to be replaced.”
Step 4: Oil it up
On a four-stroke engine, change the oil two to three times through the procedure. On a two-stroke, run double oil for the first 10 hours. “In most cases, you’ll have a qualified marine technician doing this within 24 hours,” Wilkinson notes. But how about the person that’s deep in The Bahamas? “If his outboard goes under, the first thing is to rinse it with as much fresh water as possible, then fill it up with oil so nothing is exposed, wrap it up in trash bags and stow it in the bilge so it can be worked on. Any oil, even cooking oil, is better than no oil at all; you just don’t want dry steel parts that are open to rust.”
Best Practices
Obviously, it’s best not to dunk your outboard. Most small outboards are attached with two clamps and two thumbscrews. A good tip involves running a wire or cable from the ear of one thumbscrew to the ear of the other, through a hole—either provided or drilled. Connect the cable with a small lock, and you’ve got something that prevents the thumbscrews from unthreading and also works as a theft deterrent. The thumbscrews will only twist so far before the cable stops them. Or, you can drill a hole through the engine bracket and the transom and drop a bolt through.
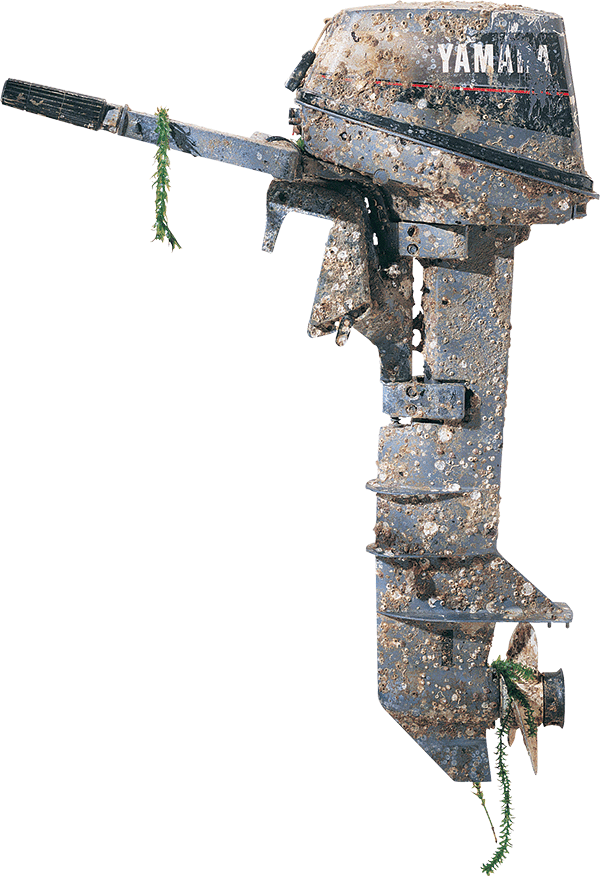
Outboards can survive saltwater immersion for an amazingly long time. For example, a Yamaha 8-hp outboard sunk along with a sailboat in August of 1992 when Hurricane Andrew ripped through Florida. The sailboat was salvaged, along with an 8-hp motor. Using the same steps described above, the small engine started after just three pulls and was nicknamed “Old Crusty.”
The lesson is that no matter how bad it looks, it’s at least worth a try to save a dunked outboard. Most likely, you will succeed.
By Doug Thompson Southern Boating December 2013