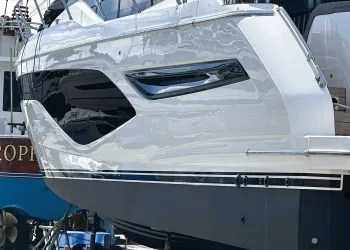
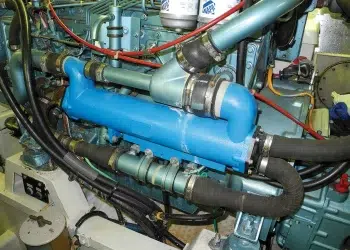
Inboard Cooling System Maintenance: Practical Tips for Performance And Longevity

Inboard Cooling System Maintenance Must-Knows

Flush your inboard system. 

In an earlier issue, we discussed the need to flush outboard motors (to clean out the raw water and mineral deposits that remain in the engine block water jacket). This type of cooling is known as open-loop cooling. Inboard engines usually have antifreeze in the engine block; this is termed closed-loop cooling. An inboard engine still has raw-water cooling concerns but not usually in the engine block. So how do you flush your inboard cooling system? Inboard cooling system maintenance starts with understanding the system itself.

Most inboard engines are marinized automotive or industrial engines that use antifreeze in the engine block water jacket. Just like your car, that antifreeze needs to be cooled. But this time, cooling occurs via a raw-water-cooled heat exchanger. 

A marinized engine will use a tube in shell heat exchanger to cool the antifreeze with raw water running through the tubes and antifreeze circulating in the shell around the tubes. Think of a water-cooled tubular radiator. The easiest way to determine if your engine is closed-loop cooling is to search for a radiator cap that will contain the antifreeze coolant. 

Raw-water Heat Exchangers

There are other hot items in addition to your engine block that need to be cooled, and they do NOT use antifreeze. Some of these include oil and fuel coolers, transmission, and hot air coolers after the turbocharger. These are usually cooled with a raw-water heat exchanger. So maintenance is important to prolong the life of your engine’s cooling system. 

Sea life can corrode and foul the tubing bundle inside the heat exchanger, restricting water flow and cooling efficiency. All these coolers (aka heat exchangers) usually are made of cupronickel, a copper alloy that also needs periodic cleansing to clear out contaminants, sea life, and salt crystals. Worst-case scenario is the tubing welds (brazing) may have pinhole leaks and allow raw water to enter the loop it is cooling.

A DIY boat owner project may be something to consider, but there are a few steps. Close the seacock—one per engine—before you remove the end cap or raw-water hoses from the different heat exchangers. A simple visual inspection can help you decide the next step. Our photos include evidence of extreme marine growth. If you see crusty critters reducing the internal diameter of the tubing, then you have work to do. 

Fouled heat exchanger with plugged cooling tubes

Subscribe For Regular DIY Articles

DIY Inboard Cooling System Maintenance: Step-by-Step Guide

First Time Jitters? Ask For Help

If you are not comfortable doing this DIY project for the first time by yourself, consider hiring a mechanic that agrees to have you watch or help. But here are the basics:

A rodding out may be the first step to improve cooling efficiency. Purchase an aluminum or brass welding rod from a hardware store. You can easily push the rod in one end and out the other to scrape out the growth. Be sure to use a soft metal rod and be gentle with the force required to push out the debris. Your next step may be to use a flushing chemical.

The best practice is to remove the heat exchangers and send them out to a marine radiator shop. The technicians will acid boil, clean, pressure test, paint, and return the exchangers for you to reinstall. Then you can start your scheduled preventive maintenance flushing schedule based on a certified clean heat exchanger system. 

Heat exchanger tubes in shell design

To Flush or Not to Flush 

If you’d like to do this yourself, reassemble the heat exchangers using new gaskets and hose clamps where needed. To flush this, you need a simple bucket of a marine growth chemical remover such as Barnacle Buster. The cleaner can be recirculated through the engine heat exchanger system by using a small bilge pump in a bucket. Be sure that the engine sea cock is still closed, disconnect the raw-water pump discharge outlet, and connect the cleaner solution to that hose. Disconnect the last hose in the system and allow the fluid discharge to return to the bucket to be recirculated through the system. How much product or how long depends on the fouling of your engine’s heat exchangers and exposure to elements of raw water.

Keep a service log dating the pencil zinc inspections in the heat exchanger. The pencil zinc will help protect the tubing bundle. Not all heat exchangers have pencil zincs, but the bigger engines should have them on the antifreeze heat exchanger and, possibly, the transmission and turbo after-cooler heat exchanger.

Inboard Cooling System Maintenance Expert Tip: Eye Spy…Every Time

Visual inspection every time you check engine fluids offers a simple troubleshooting of raw-water leakage. Notice if the antifreeze is overflowing from the radiator cap. When your crankcase oil has turned a chocolate milk color, raw water has leaked in. If your transmission fluid looks like a strawberry milkshake, water got in there, too. Finally, when the engine stops or will not start because there is water on top of the piston, a catastrophic failure known as hydro lock has occurred. Hydro lock is the most severe and may bend the piston connecting rod, crankshaft, or blow out the side of the engine block. 

Hydrocked piston and bent connecting rod

Preventive inboard cooling system maintenance will make your life easier. Remember, owner visual inspections create the best results for your closed-loop cooling system—every time. 

-by Capt. Chris Caldwell

The Truth About Hertz: Understanding Shore Power Safety Internationally

The Truth About Hertz

Foreign shore power and safety

It’s easy to take shore power safety for granted—almost every dock has it. Plug in, flip the breaker and your battery charger, and AC-powered appliances are up and running. What happens, however, if you head to a region where shore power isn’t quite the same as it is at home?

Shore Power 101

In North America and some other parts of the world, the most common shore power scenarios are 120 volts AC (alternating current) at 30 amps and 60 Hz (more on that in a moment), often referred to as “single phase” or 120/240 volts AC at 50 amps and 60 Hz, known as “split phase.” In some marinas, especially those in areas with older infrastructure, split phase power might be 120/208 volts AC. You might also encounter 120 volts AC at 50 amps single phase, but that’s not very typical. Outlets aboard vessels, like those in homes, are normally 120 volts, while larger appliances, such as air conditioners and ovens, often operate on 240 volts AC.

The amperage determines how much work can be done by a shore power service. Smaller vessels, up to about 40 feet, with lower power needs, are usually equipped with one or two 120 volt, 30-amp cords. Larger vessels are more power hungry, and thus, they typically utilize one or two 120/240 volt, 50-amp cords.

Shore power frequency, the 60 Hz (which stands for Hertz, sometimes called cycles) part, is the standard in North America. Among other things, frequency determines the speed at which AC-powered motors, fans, and compressors turn. 

Shore cord ends are unique to each configuration, making it impossible to plug into the wrong power source.

Foreign shore power, that which you might encounter in most other parts of the world, including some Caribbean islands, typically consists of 230 volts AC, 16 or 32 amps, and 50 cycles. Smaller vessels generally utilize 16-amp service, while larger vessels utilize 32-amp power supplies, and their dock pedestal outlets and cord ends are also unique to their power supplies and not interchangeable with North American cord arrangements. 

The two systems described above are often abbreviated  and referred to by boatbuilders and industry professionals as “60 Hz” and “50 Hz,” respectively.

Understanding the Basics of Shore Power: A Global Perspective

If your vessel is equipped with any of the previously mentioned North American 60 Hz shore power arrangements, can you simply use an adapter to plug your cord into a foreign 50 Hz pedestal using a cord end adapter? In short, with some exceptions which I’ll explain, the answer is no. The voltage and frequency are incompatible.

If your vessel is equipped with a shore power transformer, and one that’s designed to operate on 60 Hz or 50 Hz (not all are dual frequency), it may be possible to plug a 60 Hz vessel into 50 Hz service simply using a cord end adapter. However, transformers only convert voltage and not frequency, so any frequency-sensitive equipment aboard the vessel might not work or work improperly, or it might be damaged.

Equipment that includes a motor or compressor, designed to operate on 60 Hz, will run slower, and often hotter, when powered by 50 Hz, which will likely shorten its life. Frequency-sensitive gear includes most galley appliances, washers and dryers, and many, but not all, air conditioning systems (some are designed to run on 50 Hz or 60 Hz). Gear that’s not frequency sensitive includes water heaters and most electronic equipment like TVs, computers, phones, most lights, tablet chargers, etc.

One solution involves using a frequency converter, which converts both voltage and frequency, allowing you to plug into almost any shore power source. It provides power that is appropriate for your vessel and its systems. These are bulky, heavy, expensive, and they generate substantial heat, but they do offer a simple means of plugging in essentially anywhere.

Another alternative involves using a battery charger that operates on 50 Hz or 60 Hz and has a wide voltage input range (these are now common) and an inverter. With this arrangement, when your 60 Hz vessel arrives in a 50 Hz port, you plug in using a shore cord adapter and energize only the battery charger, which supplies power to the battery bank and the inverter, which, in turn, supplies 60 Hz power to your vessel’s electrical consumers.

Only the size of the inverter, charger, and shore power capacity limits how much gear can be operated, and even if shore power is limited, the battery bank can act as a buffer during periods of higher demand. This approach should include specific switch gear that prevents you from inadvertently energizing the entire vessel with 50 Hz power, directing it instead only to the battery charger.   

Shore Power Safety

Regardless of whether you are operating in a 50 Hz or 60 Hz environment, shore power can be dangerous and even deadly, both for those aboard the vessel and in the water. First and foremost, under no circumstances should anyone swim around vessels or docks that are energized with shore power. Current leaking into the water can lead to a phenomenon known as Electric Shock Drowning (ESD).

Outlets located in the galley, head, machinery spaces, and on deck must be of the Ground Fault Circuit Interrupter (GFCI) variety. With a few exceptions, and for compliance with standards established by the American Boat and Yacht Council (ABYC), the primary shore power inlet aboard every vessel built after 2008 should be protected by an Equipment Leakage Circuit Interrupter (ELCI), which essentially operates like a GFCI for the entire vessel. Adoption of the ELCI standard has been driven mainly as a means of preventing in-water electrocution and ESD. The ELCI trips at a higher threshold, 30 milliamps, than the GFCI, which trips at 5 milliamps. Therefore, it is technically deemed a protector of equipment rather than people; however, in practice, it has saved countless lives. 

Finally, if you have any doubt about the safety of your vessel’s electrical system and wish to have it inspected, or if you are contemplating a foray into 50 Hz waters which will necessitate modifications to your shore power safety, you should only rely on the services of an ABYC-certified electrician.

-by Steve D’Antonio

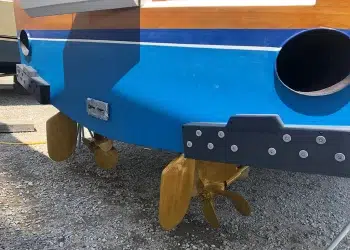
The Humphree Stabilizer System: A Complete Installation Guide

How to install the Humphree stabilizer system

A Hatteras motoryacht refit is always a good learning experience. Meeting with a new boat owner in a local boatyard doesn’t disappoint. This new owner has done his homework and has a list of to-do items to prepare his boat for long-range cruising. You may have heard of trim tabs and may also understand the concept of stabilizers to smooth the ride. He is combining the two with the installation of a Humphree All Speed Fin Stabilizer system and trim tab-like interceptors. Easy enough, right? But before you jump in with both feet, let’s take a peek at the prep and planning.

Preparing the Hull for Humphree System Installation: Step-by-Step Guide

Among the many updates, the hull has been glass bead blasted to remove all the years of built-up anti-fouling paint. The owner will apply a barrier coat of primer and new anti-fouling paint when the boat is ready to splash—after the Humphree stabilizer system installation. 

The original trim tab planes have been removed from the curved transom. But removing the tabs isn’t enough. Hatteras originally built the boat with a recessed flat indentation at the bottom of the curved transom to attach the traditional straight trim tab hinges for the planes. This area is not large enough to add the new interceptors so the indentation must be filled in and flattened out.

Because the boat has been blasted down to bare fiberglass, the installer could seal the recessed areas and build it up to match the transom contour. Once that has been completed, the area then needs to be built up again to a flat surface to attach the Humphree Interceptor mounting plate. Note: This must be perfectly flat for the soon-to-be-attached interceptor unit to extend and retract the blades. Any curves or imperfect area could bind or warp the interceptor blades.

Interceptor Functionality: How the System Works

The interceptor function is powered by a servo motor mounted inside the lazarette and directly connected through the hull to the interceptor. It is powered by 12- or 24-volt DC current. Fortunately, it is waterproof to resist moisture caused by wet dock lines and fenders usually stored in the same area. Because of the large size of this 70-foot Hatteras and the two exhaust tubes venting at the transom, the design includes a total of four interceptors. Smaller boats may be fine with two.

The system is simple—all the electrical connections are plug and play. Wiring runs to the helm for the operator control panel. These interceptor devices offer trim ability and are expected to reduce vessel roll at speed. They are called interceptors because their blades or fins extend downward and intercept the water flow beneath the boat providing lift and trim control.

The interceptor includes a ride control device that is the brain of the system. When connected to the GPS and the rudder angle indicator for speed and steering input, you can enjoy automatic trim and roll control. The interceptors will also adjust for steering port or starboard at high speeds. You can intervene manually and correct a list caused by wind or wave action or a boat with too much weight on one side.

Comparing Humphree’s Fin Stabilizers with Traditional Trim Tabs: What to Know

Bonus! When guests swim behind the boat, there is no worry that they might kick the tabs as they may have on other systems that always protrude. And you will not have to be concerned about your big fish cutting the line like on a traditional trim tab.

Another factor to consider is these are made of a composite material and do not require anode (zinc) protection as the aluminum tabs do. Yes, you can prime the composite body and apply anti-fouling paint to keep the housing clean, but here is a really big feature: They can be programmed to fully extend and retract to self-clean any sea life like barnacles or tube coral trying to grow on the blades.

All Speed Fins: Adding Efficiency to Your Humphree Stabilizer System

The second part of this Humphree system is adding 24-volt fin stabilizers which rotate 360 degrees and must be custom-trimmed to clear the hull structures and keel. Why 360 degrees? When anchored in slight current or wave action, the fins rotate and swim the boat away from the anchor rode. This keeps the rode snug, anchor set, and the boat stable. 

This model is powered electrically, not hydraulically. An electric system is self-cooled via the underwater flange plate. This design eliminates the need for a hydraulic reservoir, Power Take Off pump on the propulsion engine, and a remote heat exchanger to cool the hot hydraulic oil. No more hydraulic hoses to maintain.

This is the time to analyze your power sources. Consider how you will use the boat, the size of the fins, vessel speed, and if you plan to use the Zero Speed Stabilization for anchoring. All these factors consume power so more thought must go into the installation. Many boaters install additional 24-volt battery banks and recharge them from the alternator on the propulsion engine or via a standard 24-volt battery charger while plugged into shore power or operating the onboard generator.

The sensing device learns the movement of the boat with an inclinometer and accelerometer so the system will become proactive in reducing roll in the boat. This also has plug and play wiring to the helm station and connections to the GPS for speed input. Wi-Fi and Bluetooth technology is included so an authorized dealer can access your system remotely for any updates or troubleshooting. 

Because the system knows the speed, it will power center the fins when idle for docking or anchoring. This prevents the fins from rotating freely when maneuvering the boat.

If at anchor, set the anchor feature. If you have a system failure, you can open the servo cover and use the special tool to center and then lock the fin in a forward-facing position. This keeps the fins stable and provides some help in reducing vessel roll.

Almost Ready to Splash

Before you paint the hull, remember that the fins are a composite material and can be trimmed to fit your hull shape. Be sure to use an epoxy resin to coat the open edge of the trimmed fin. 

The fins can be primed and painted with anti-fouling paint, but beware. Do not use an anti-fouling paint on the hull fin flange. Remember, this flange is metal and is used to cool the servo motor. If an anti-fouling paint containing metal is used on this flange, there is concern of electrolysis. Consider using the same coating on this flange that you would use on your running gear. 

Now you can cruise in comfort because of this innovative stabilization system. Anchor in crystal-clear waters overnight. The only rock and roll will be coming from your earbuds. 

-by Chris Caldwell

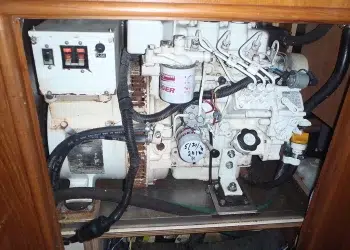
Generator Overhaul: Do You Need To Repair Or Replace?

Power Struggle: Looking At A Generator Overhaul

Should you repair or say goodbye to your old generator?

Your old, unreliable generator has failed yet again, dashing plans for that long-planned family cruise. It’s not the first time the generator has done you wrong, and a day of reckoning in the form of a complete overhaul is long overdue, but is repair or replacement the better option? Here’s a look at what to seriously consider when deciding whether to overhaul or upgrade your old Edsel of a generator. 

Generator Overhaul Factors to Consider: Repair or Upgrade?

In general, if facing major engine or electrical repairs to a generator more than five years old, replacement should at least be considered. Depending on the extent of the repairs, you may find that the cost of replacement versus repairs is not that far apart. Here are some other factors that can effectively reduce this gap even further.

Parts and Service Availability

Locating parts for an older, outdated generator can be an ordeal. The same is true finding someone with the knowledge to install them, as well as work on your generator in the future. 

Old School Vs Cutting-edge Technology

Replacing an old generator lets you enjoy the latest technology, from greener footprints and improved fuel efficiency to less vibration and quieter operation. These benefits will typically be delivered in a smaller, lighter package than your existing generator, one providing easier access for maintenance, such as having all service points located on one side. 

“Compared to five years ago, diesel generators are cleaner,” says Northern Lights spokesman Scott Putnicki. “Being a U.S. manufacturer, we use the EPA as our emissions compass which keeps us steps ahead of all other global emissions regulations.” 

In addition to the green side of things, one of the most visible benefits offered by a new generator is the use of digital remote-control panels. Simple on/off switches have gone the way of mustache wax as manufacturers hop on the digital panel express.

“One of the greatest advantages of the modern, electronic generator set over the traditional generator set is digital technology,” says Robert Westerbeke of Westerbeke Corporation. “This technology has enabled standardized methods of communication such as NMEA 2000 to be developed. NMEA 2000 technology allows ‘electronic’ (digital) generators and other products that are NMEA 2000-certified to communicate across the same network. Westerbeke Corporation was the first manufacturer to offer marine diesel generators with NMEA 2000 certification.”

Digital technology means more information is available to the owner/operator of today’s generators. Ease of installation coupled with the plethora of information provided by these modern panels (precise monitoring information, error codes to assist with troubleshooting, etc.) are two instant benefits.

Other Vessel Upgrades

If your plans include installation of new, power-hungry equipment (another air-conditioning unit, gyrostabilizer, etc.) your existing generator may not be able to meet the additional power requirements. If you decide to replace your generator, always consult the manufacturer or an authorized representative as part of the selection process to determine which model best suits your current (and future) power needs. A generator that’s too small will constantly labor to meet demands, leading to poor performance and a shorter service life. Conversely, installing a generator that’s too large (the bigger is better syndrome) will lead to “underloading” problems, such as carbon buildup in the engine, incomplete fuel combustion, and overall inefficient operation. How long you plan on keeping the boat, as well as your intentions (such as extended cruising), are also things to consider. 

The Bottom Line: Repair or Buy a New Generator – Making the Right Decision

While important, the decision to repair or replace extends beyond simply comparing the price of installing a new generator with the cost to repair your current unit. After all, if you do a complete rebuild on a 10-year-old generator, at the end of the day, you still have a 10-year-old unit—without the warranty that comes with a brand-new one.  

-by Frank Lanier

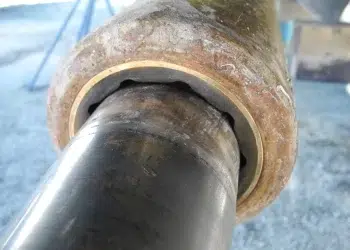
Cutlass Bearing Maintenance: The Easy and Comprehensive Guide You Need

Check Your Cutlass Bearing

Maintenance is essential to keep the propeller running smoothly.

When you hear the word cutlass, it may bring visions of a swashbuckler clanging swords on the high seas. A less glamorous but essential part of your boat’s running gear, the cutlass bearing is tucked away around the propeller shaft, rarely seen, and not often maintained. Neglecting boat maintenance can lead to unwanted problems. That’s why prioritizing your cutlass bearing maintenance is crucial.

Why You Should Care About Your Boat’s Cutlass Bearing

The cutlass bearing is an internal rubber sleeve pressed into the strut supporting the propeller shaft. Depending on your boat design, you may have one, two, or three struts per shaft. This is determined by the size of the propeller and the length of the shaft. These additional struts help keep the shaft straight and true, and every strut must be protected with a cutlass bearing.

That’s a lot of words, but do you care about the cutlass bearing yet? This nautical cutlass is usually made of a bronze or synthetic outer shell surrounding an inner rubber-like sleeve with grooves inside. The linear grooves are a part of the lubricating and cooling design. These grooves allow water flow around the spinning shaft. This prevents the fast-rotating propeller shaft from overheating and scoring the stainless steel shaft itself.

When you attend a marine survey before purchasing your boat, pay attention to what the surveyor looks for. Once the boat is hauled, the surveyor will squat, seeming to bench-press the propeller and shaft. They will attempt to lift the prop, sometimes even grabbing the rudder to wiggle it. If the boat is larger with a heavier propeller and shaft, the surveyor may use a different technique to learn the same information. You may see them grab a wooden block and a long board to serve as a lever. Either method will determine if the cutlass bearing has significant wear.

How it Should Work

The engine and reduction gear sitting on four or six engine mounts comprises the vessel drive train. This drive train is connected to the propeller shaft with a shaft coupling like a pipe flange. The shaft runs out from the engine room to the bottom of the boat through a shaft seal. This shaft seal may be the traditional style designed to have a slight drip to irrigate the seal or it may be a modern dripless design which relies on a stream of engine cooling water to irrigate and cool.

The propeller shaft then travels out through the bottom of the boat to the propeller. But before the shaft meets the propeller, it is supported by one or more struts. These are the rigid supports to keep the shaft aligned with the engine and transmission. They need to have a cutlass bearing to protect the shaft from metal-to-metal abrasion. A vented rubber insert provides this protection. 

The simplest way to determine the condition of the cutlass bearing is to use the surveyor’s bench press method described earlier. Or, to be more precise, use a measuring device to check both the top and bottom gap in the annular fitting. Most boaters have their bottom painted every season or two at most, and this is a convenient time to inspect the cutlass bearing for wear. It would be difficult for a diver to check this because he would not have any lift ability when swimming.

DIY or Call in the Professionals?

You’re seeing signs of wear and tear and feel a replacement is on the horizon. This is where cutlass bearing maintenance knowledge will serve you well.  A lot of websites show how you can make a threaded puller similar to a pulley puller. Contrary to popular belief, you may not be able to learn everything from the Internet. I believe by the time you buy the parts, tools, and equipment attempting to do it yourself, it is best to just hire the boatyard to do the job properly and safely. 

First, they must remove the propeller and then set the hydraulic porta power unit in place on the shaft. This allows them to be properly positioned to hydraulically press out the cutlass bearing. Next, there are set screws holding the cutlass bearing in the strut. These screws must be removed before pressing out the old bearing. Now the new bearing must be pressed back into the strut. This is a very tight fit so the hydraulic porta power will be appreciated. I have seen some boatyards set the new bearing in a freezer for a while to help shrink the outer diameter to press back into the strut easier. I do not know if that helps, but I have seen it done.

Another key concern when installing the new cutlass bearing is understanding the space or distance between the end of the cutlass bearing and the propeller hub or a line cutter device. There must be enough space for water to flow through the bearing to cool the shaft. If there is not enough space, the bearing may overheat and wear out sooner than anticipated. This spacing may be best left to the professionals as well.

Tips for Ensuring Your Cutlass Bearing Lasts Longer

What can you expect of the life span of your new cutlass bearing? Assume 10 years or longer depending on usage variables, such as a misaligned propeller shaft, high-speed rotations, or use in sandy, abrasive water. And, of course, if you run aground and bend the strut, shaft, or propeller, then all bets are off. These can add to a vibration and prematurely wear the rubber insert of the cutlass bearing.

The best practice with cutlass bearing maintenance is to ask the professionals to inspect it every time you haul out. Save your DIY skills for another day—or watch and learn for the next time you want to check your cutlass bearing.

-by Chris Caldwell

A Reliable Watermaker: Your Guide To Fresh And Clean Water

Watermaker Woes

Ensuring Freshness: The Art of Watermaker Maintenance

Most water-making equipment on boats today use the reverse osmosis (RO) technique for converting sea water into drinking water. These RO watermaker systems remove solids, bacteria, and most viruses, and the water produced is often better quality than from a city water supply. 

Today’s yachts will often have a washer and dryer on board, and with freshwater toilets, showering, doing the dishes, and cleaning the boat, large amounts of freshwater are consumed. A good rule of thumb for water consumption is 20 gallons per day per person. A reliable watermaker that can produce 20-30 gallons per hour will more than handle the requirements of two to four people on board. While most systems start out as dependable, neglect or improper use of the equipment can soon make them problematic. 

Two factors can severely limit or destroy a watermaker’s ability to produce ample quantities of clean drinking water:

  • exceeding the maximum operating pressure range, and
  • lack of proper flushing after every water-making cycle.

There are a few other aspects of operating the water-making equipment that will improve the life of the system, but these two are paramount.

Watermaker Maintenance: Your Key to Reliable Fresh Water

Operating Pressure

Most systems are designed to operate at 800 psi back pressure. Excessive pressure, even for a few seconds, can cause issues. While most membranes can handle a bit more than 800 psi, the O-rings in the end caps and the hydraulic seal on the membrane are pushed to their design limits when exceeded.  

If the hydraulic seal on the membrane leaks-by or fails, the system won’t be able to build pressure, so water production volume can be affected, or in some cases, if the failure is substantial, it will not produce any water. Reducing the pressure will usually allow the hydraulic seal to hold it, but every time that method doesn’t work, a little damage is done which can be an issue down the road. Although failure of the hydraulic seal will limit the amount of water produced, the water will not be bad because of it.

However, if the O-rings in the membrane housing end caps leak-by or fail, the system WILL produce water that has excessive dissolved solids. When those O-rings leak or fail, raw water is allowed to enter the freshwater side of the system and into the freshwater tank. The entire tank can be contaminated in a matter of minutes.

We have seen O-ring leak-by cause a Total Dissolved Solids (TDS) reading to jump from 190 ppm (parts per million) to 840 ppm within a few seconds (the EPA suggests not to consume water with TDS above 500 ppm). There are typically two O-rings in each end cap, so the redundancy should protect the system, but excessive pressure can damage them. Failed O-rings will also impede the system’s ability to come up to operating pressure. Those little O-rings are all that stand between you and bad water. 

Excessive pressure spikes, on the other hand, can rupture or damage the interior of the membrane, which will then allow raw water to enter the freshwater side of the system. Although this is rare, repetitive pressure spikes can cause a rupture. After you have set the pressure, it’s a good idea to monitor it because pressure can have momentum in some systems. We have seen pressure continually increase as the high-pressure pump comes up to operating temperature, so we recommend an initial setting between 725 psi and 750 psi as a safeguard. 

The Importance of Flushing

Remember, raw water contains bacteria and possibly viruses in addition to salts and minerals. These are all normally removed by the RO process. If the water from your watermaker tastes salty or is discolored, raw water, including bacteria, is likely getting to your tank. At the end of the water-making cycle, when the pumps stop, whatever raw water is remaining in the membranes, tubing, pipes, and pumps still houses those contaminants.

In addition, the membrane is a structure with lots of little crevices where bacteria can hide. If the equipment is not flushed out, those leftover bacteria and viruses can grow, which can limit your system’s ability to produce water and possibly get through the membrane into your water system. Flushing after each water making cycle will push most of those contaminants out thus protecting your system.

Dispelling Watermaker Rumors

Some folks believe that making water every couple of days negates the need to flush. We don’t subscribe to that thought process and believe that the continual buildup of contaminates will lead to a shortened membrane life. Typical systems will need 4-8 gallons of freshwater to properly flush the entire system.

Watermakers are an expensive investment. Caring for that investment will make sure the system performs as it should. Your health depends on safe, clean water.

-by Glenn Adams, GCA Automated Watermakers

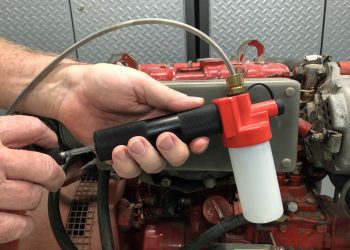
You Need to Know The Importance Of Boat Engine Oil Analysis

Understanding the Need for Boat Engine Oil Analysis

Do a fluid analysis on your engine to extend its service life. 

A fluid analysis, such as a boat engine oil analysis, aboard your boat includes liquids such as oil, transmission fluid, and antifreeze (otherwise known as coolant). This examination is a quick method of gauging the health of your engine and your transmission. Performing a fluid analysis may help extend the life of your machinery.

It is very much like the lab work your medical doctors ask you to do. They can check and trend any health concerns by knowing what is in your blood sample and prescribe a remedy. The fluid analysis of your boat engine and transmission can also track and identify any concerns that you want your mechanic to address. Just send it into a lab for analysis and a report.

Whether it is marine, automotive, aircraft, or industrial mechanical engines, the analysis company uses a spectrometer to inspect the fluids. It discovers anything in the fluid such as contaminants, wear metals, and fluid breakdown. With this information, you can plan your next step or preventive measures.

Why Get an Analysis?

Before we get too technical, think about when you should learn more about the results of fluid analysis. Your first opportunity is during the boat-buying survey and sea trial process. How do you know the health of the propulsion engines and generator systems? Hire an engine surveyor to accompany the hull surveyor as a part of your initial findings.

The engine surveyor will urge you to consider a fluid analysis in addition to examining the external equipment supporting the engine. This is a good test, but it can be better if the seller has copies of former fluid analysis. Then you can track and trend the history and health of the engine.

If you currently own a boat, consider taking fluid samples prior to changing the oil. This
will help you determine the health of your engine and later, when you sell the boat, you have a record of the engine’s fluid history for the next owner.

How to Perform a Boat Engine Oil Analysis: A DIY Guide

You can hire a mechanic to change your oil and pull samples or you can do it yourself. Either way, you should keep the sample reports in your vessel’s maintenance logbook. Assuming you want to change the oil yourself, simply follow the procedure below. Of course, read the instructions from the lab you are using.

Equipment needed in your oil sample tool kit:

⊲ Sanitary tubing per each engine sample

⊲ Manual suction pump

⊲ Sanitary collection bottle per each engine sample

⊲ Label for each collection container

⊲ Approved mailing package, one per each sample

⊲ Drip tray

⊲ Absorbent pads.

The manual suction pump can be reused with each collection. We advise against using an oil change system to collect samples as cross contamination may occur due to fluid remaining in the hoses. The oil does not come in contact with the manual pump if collection is done properly. It is best to keep the collection bottle in an upright position. After collection is complete, clean the end of the tube before removing it from the manual pump. This prevents unintentionally mixing this sample with future samples. It is recommended to start with a clean, never used tubing and collection bottle. This also prevents cross contamination with other sample collections.

Easy as 1-2-3

Prepare to take an oil sample by running the engine at a fast idle for 10-15 minutes. This will warm the oil and transmission fluid so it’s easier to pump to collect the sample. This also circulates the sediment that may have settled in the bottom of the oil pan.

While warming the engine, assemble your equipment. Connect the manual pump to the tubing and connect the collection bottle to the pump. Take care not to contaminate the tubing or collection bottle prior to gathering your fluid samples. Consider prelabeling each container with the equipment make, model, and serial number for main engine, transmission, and generator. Don’t forget to indicate port and starboard for twin engine and transmission.

Caution: The engine will be hot.

Pull the dipstick out and set it aside. Then slide the sanitary tubing into the dipstick tube. Be sure you have the correctly labeled sample bottle.

⊲ Extract the fluid sample from the engine into the bottle using the manual pump. Remember to keep the bottle upright. For proper sample size, read your lab’s instructions.

⊲ Unscrew the sample bottle from the pump and cap it to seal your fluid.

⊲ Check your label.

⊲ Wipe the tubing clean and remove from pump.

⊲ Place the labeled bottle in the lab-provided container. Include all completed forms for your marine fluid analysis.

⊲ Place the container in the lab-provided pre-paid shipping envelope.

⊲ Repeat for each engine/transmission/coolant sample.

And the Survey Says…

Now wait for the diagnosis to arrive via email. If your lab only provides the results but not an explanation, call your surveyor or mechanic. Hopefully, they can offer an explanation before it is too late to save the engine from self-destruction. Or if you are planning to purchase this boat, you may think again.

-by Capt. Chris Caldwell

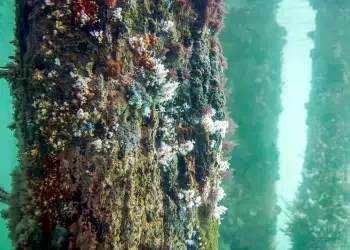
Effortless Dock Maintenance: Expert Tips For A Well-Maintained Waterfront

You regularly clean and maintain your boat, but keeping your dock in good condition requires the same level of inspection and repair. Unfortunately, dock maintenance often goes overlooked until there’s a problem. When the pilings and cross bracings are neglected, excessive marine growth, physical impact, and marine borer infestation can cause thousands of dollars in damage. A dock inspection, cleaning, and bottom survey can identify issues early and protect your investment. 

Routine and Post-Event Inspections

A routine inspection should be conducted annually to record the condition of pilings, stringers, and hardware. By forming a baseline, deterioration can be monitored and maintenance can be performed in a timely manner. Post-event inspections are done to assess the integrity of the dock after any damaging event, such as a hurricane or boat collision. While it is recommended to hire certified commercial divers to inspect and maintain your dock, it is possible to handle an inspection on your own. 

What to Look for During Dock Maintenance: Hidden Damage

Pilings can look like new from the surface, but below, marine growth can hide severe damage from view. It’s necessary to remove the growth in order to properly inspect for any damage. You can use the claw of a hammer, spade shovel, or a heavy-duty taping knife to remove oysters and barnacles. Also check the pilings for washout at the mudline, especially in areas that have strong currents.   

This next step in dock maintenance is crucial. With the pilings and bracings clean, look for damage to hardware and signs of marine borer activity (tiny holes from burrowing invertebrates). Hardware should be checked for tightness, corrosion, and to ensure that there are no missing or protruding fasteners. Every structural connection is also a prime location to observe for marine borer activity. When you look for damage, it’s best to know the enemy. 

Shipworms are mollusks that attack from the intertidal zone to the mudline and are undeterred by pressure-treated wood. Though their burrows are the size of a pinhole, there can be significant damage to the structure before there are outward signs of a shipworm infestation.

Pholads can penetrate the toughest of wood, stone, and shell. While pholads don’t consume the wood as food, they do make a permanent residence out the tunnels they bore into your pilings, stringers, and even your concrete seawall. Their entrance hole is usually a quarter-inch in diameter, growing in width as they burrow deeper.

Gribbles and pill bugs are isopods that can cause pilings to have a honeycomb appearance or hourglass shape late in the infestation. The initial burrow of a pill bug is around a quarter-inch in diameter while the gribble’s entry burrow is barely perceptible. Both commonly attack the intertidal zone. 

The termites of the sea are unforgiving, but proactive measures can be taken if you catch an infestation early.

With the pilings and bracings clean, look for damage to hardware and signs of marine borer activity (tiny holes from burrowing invertebrates). Hardware should be checked for tightness, corrosion, and to ensure that there are no missing or protruding fasteners. Every structural connection is also a prime location to observe for marine borer activity. When you look for damage, it’s best to know the enemy. 

Shipworms are mollusks that attack from the intertidal zone to the mudline and are undeterred by pressure-treated wood. Though their burrows are the size of a pinhole, there can be significant damage to the structure before there are outward signs of a shipworm infestation.

Piling Wrap and Encasements

Depending on the level of damage, there are a couple of alternatives to full piling replacement: piling wrap and encasement. For pilings with minimal borer activity, wrapping the piling with vinyl will kill off the existing infestation and prevent further attack. 

Wrap is an inexpensive way to protect timber pilings but still requires light maintenance. Boat impacts and debris can puncture the wrap, and over time, barnacles can grow along the seams, allowing marine borers inside. Growth can easily be scraped off with a taping knife and should be done annually. Pay attention not to gouge the wrap while cleaning it. 

Pilings with extensive marine borer damage can potentially be salvaged with concrete jacketing. This process involves encasing the piling with PVC that extends from above
the high tide line to below the mudline and filling the form with concrete.  

If replacement is necessary, new timber pilings should be wrapped with vinyl after being driven to prevent the wrap from being damaged during the pile-driving process. Composite pilings are also an alternative to timber piles. Typically made from vinyl or fiberglass, they are filled with concrete once installed and are a low-maintenance and cost-effective alternative to standard timber pilings.  

With the dock assessed below the waterline, it’s worth taking a moment to look at your seawall or bulkhead. 

Seawalls and Bulkheads During Dock Maintenance

Seawalls and bulkheads are intended to prevent erosion, flooding, and damage to your property. At low tide, look for signs of cracking, corrosion, or sinkholes. Weepholes should be cleaned annually; these relief openings can become clogged with debris and marine growth, keeping them from flowing freely. 

Above the Waterline

Many people overlook this part of dock maintenance inspections. When you look above the waterline, search for signs of distress in load-bearing areas and deterioration of hardware and condition of connections. Inspect decking for sagging, rotted or loose planks, and signs of fungal rot on the tops of surfaces or areas that remain wet.

“Fuzzy Wood” vs. Fungal Decay

Salt damage is often confused with fungal decay. Saltwater penetrates the wood and moves up the grain through the xylem cells in a process called wicking. Over time, salt residue expands and damages the wood, causing it to appear fuzzy. If you see signs of wicking, be sure to inspect the hardware closely for corrosion. While unsightly, salt damage isn’t cause for immediate alarm. Paints and other wood coatings can prevent or slow the process.  

Fungal rot, however, can lead to structural failure. Brown-rot decay darkens the wood, cracks run across the grain, and it’s brittle to the touch; whereas, white-rot decay appears bleached, maintains its shape, and feels spongy. Fungicides can be used to treat or prevent decay. 

Now that the dock and seawall are clean and protected, it’s time to find out what else is down there.

Bottom Surveys/Debris Removal

Summer is on the way, and no one wants to miss an opportunity to enjoy the water. But how much do you know about the underwater hazards around your dock? The sea bottom can change due to harsh weather, tides, and currents. 

Whether you are swimming off your dock or taking your boat out for the day, marine debris can be a major safety hazard. Submerged pilings, tree limbs, rip rap, and other heavy litter all pose a serious threat. This hidden debris can create injuries from jumping or diving off docks. Even small things like fishing tackle or rope can cause swimmers to get entangled under the water or foul a propeller. Depending on water depth, it may be best to hire certified divers to identify and remove debris from around your dock. Bottom surveys are recommended every five years or after a major storm.

Dock Maintenance Timetable

The American Society of Civil Engineers recommends routine inspections every five years for concrete, wrapped wood, composite materials, and protected steel and every four years for unprotected timber and steel. This interval is for structures already in good condition.

Inspections should be more frequent based on deterioration, anticipated use, and potential damage from storms or vessel impacts. Annual cleanings, however, can extend the service life of your dock by identifying potential issues, increasing “curb appeal,” and saving money in the long run. 

-By Stacy Stepanovich

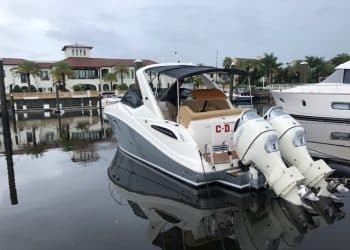
Powerful Shift: Sterndrive to Outboard Conversions Surge!

Swapping a Sterndrive for an Outboard

Older boats are getting a new life as outboard repowers soar. 

When the sterndrive engine, aka inboard/outboard (I/O), gave out on Kevin Peterson’s Chaparral, he was faced with either buying a new boat or replacing the I/O engine. Neither option was appealing, but Peterson didn’t want to spend the summer in Florida without a boat. Some may not know a Sterndrive to Outboard conversion may be their answer, but here was Peterson’s experience.

“Finding a mechanic willing to work on an older (sterndrive) was getting harder and harder,” says Peterson. “I had no problem finding shops in the St. Petersburg area that serviced outboards, so I took that as a sign.”

After shopping for new and used boats, Peterson decided to stick with his decade-old runabout after a friend told him to repower with an outboard. Peterson spent nearly $23,000 on the outboard conversion, but the improved performance, additional cockpit room, and five-year outboard warranty has been priceless.

Cost Effective

As the price for new and used boats continues to climb, more boaters are opting for the repower market because of the substantial savings. Outboard sales have grown for nine straight years, and 2020 was the highest in two decades which came at the expense of the inboard market, according to the National Marine Manufacturers Association.  

“The I/O stuff has become very rare from the low volume, and the prices have gone up sharply,” says Adib Mastry, a propulsion engineer with Mastry Engine Center in Clearwater, Florida. “Even if they were going to repower that boat with another sterndrive, it’s still economically better to go to an outboard.”

With 13 Suzuki Repower Centers around Florida, Mastry has done its share of converting sterndrives to outboards. Mastry points out that the best candidates for repowers are hulls built after 2004 because of the higher quality.

“You’re not having to replace a fuel tank, and the boats have fiberglass floors, not wood floors that were just carpeted or glassed over,” he says.

John Tomlinson, an owner in TNT Custom Marine, a full-service, high-performance shop in Miami, takes a more cautious approach about converting a sterndrive to outboard. Tomlinson says his shop has only done a few repowers over the years because it can be too time and labor intensive. His biggest concern is the fuel tanks, especially when a boat hits the 20-year mark.

“If water gets down in the foam, and its saltwater, it could have sat down there for years and years,” he says. “You’ve got to change the fuel tanks on one of those boats, so the console comes out, the floor gets cut out, and they’re big, big jobs.”

The shop should inspect the stringers and transom for signs of rot, fixing any problems before starting the repower. Surprisingly, most retrofits don’t require fiberglass work to fill the holes on the transom. Mastry provides a bracket that not only seals the former outdrive’s cut through the transom, but also provides a place for the outboard’s rigging to run. Aluminum supports are bolted from the new bracket on the transom to the old motor mounts for more strength.

The engine compartment is typically turned into stowage, but some customers will enlarge the cockpit. In that case, Mastry has contracts with companies that do the interior work. The repower work usually includes the new outboard, rigging for the throttle and shifter, and updating the gauges and electronics.

Value

When it comes to changing the sterndrive for an outboard, it’s not always an even horsepower swap. Boaters can go with a lower horsepower because of the weight savings compared to a sterndrive. Mastry recently repowered a Formula runabout that had twin MerCruiser 350 MAG MPI engines with a pair of 300-hp Suzuki outboards. The boat reportedly picked up 7 mph on the top end and more than doubled the fuel economy to 2.2 miles per gallon.

The sterndrive engine still has value whether it’s running or not, so don’t let the marine shop take the engine off your hands for free.

“In a lot of cases, the (sterndrive) engines actually bring pretty good money as a trade-in,” says Mastry. “We’ll always give the owners something for their engine and drive, no matter what condition they’re in, because of the lack of new ones around and our ability to sell them.”

Mastry explains that a repower takes about two to three weeks and consumers can expect to spend about $20,000 for a typical 200-hp conversion.

Tomlinson says Mercury is backlogged a year or longer for their higher-horsepower outboards, so boaters should plan far ahead. He suggested going for a ride in a boat that’s been converted and doing your research to make the best repower decision.

“Be open-minded that fiberglass lasts a long, long time, and don’t be afraid of an older boat,” he says. “The quality has improved so much that it’s worth doing this.”

Tomlinson says an owner has to decide if it’s worth the cost, especially if the boat needs significant transom or stringer work. “What I tell people is if you’re going to keep it, it’s worth it because you can’t replace it for that,” he says. “But if you’re not going to keep it and dump all this money into it and sell it in two years, you aren’t going to get (the money) back. Everyone’s a little different, but when (a boat) gets that old, you have to look beyond just putting a set of engines on it.”

Peterson is glad he repowered his Chaparral with an outboard but admits he missed the rumble of the sterndrive engine. “When it was a sterndrive, people would ask me how old the boat was,” he says. “Now people ask if it’s a new boat just because of the outboard. It’s interesting how people’s perceptions can change.”

-by Gregg Mansfield

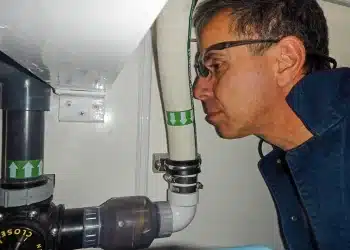
The Sanitation System Sniff Test: Powerful Odor-Free Tips

The Sniff Test

Sanitation system plumbing can be made both leak- and odor-free.

As the client and I hunkered down in his vessel’s forward bilge area adjacent to the holding tank, I detected the faint yet dreaded eau de blackwater, or sanitation system odor. I looked at him and raised my eyebrows. He said his sense of smell wasn’t great, and he’d been convincing himself it was his (and his wife’s) imagination. I assured him it wasn’t. While I’ve become accustomed to this scenario during my three-decade-long marine industry career, it’s not one I accept. I’m a firm believer that if a vessel smells like effluent, even if it’s in engineering spaces, something is wrong. It’s always fixable, albeit with time and money.

Effluent, blackwater, waste, whatever you wish to call it, stored in a holding tank or plumbing, has an odor that is typically so pungent, a few drops can permeate an entire vessel. In other words, it doesn’t take much to become an issue, and in many cases, it doesn’t even require an actual liquid leak—permeation of hoses can lead to the very same effect. I’ve witnessed several brokerage sales go south as a result, so even if it isn’t a problem for you, it’s likely to be a problem for a potential buyer, for whom dryer sheets, air fresheners, or boxes of baking soda tucked away in bilges is always a dead giveaway.

If you are facing an effluent odor issue, start with a plumbing tune-up; wear gloves and eye protection. Inspect every hose run, look for any signs of mold or growth (I’ve actually encountered what looked like mushrooms growing on waste hose), run your gloved finger under every pipe to hose connection, at tanks, valves, anywhere there is a union; any liquid or crustiness, no matter how small, is too much.  While it’s difficult to avoid on the average vessel, dips or traps in hoses, where effluent can stand, is best avoided as this can lead to permeation. 

Next, check the tension of every hose clamp. Ideally, they should all be doubled and in good condition, free of corrosion or cracks. If your holding tank utilizes a hose connection at the bottom rather than a pickup from the top, that is often a source of trouble, as the hose is, by design, always submerged in effluent—something most hose manufacturers tell users to avoid. While better tank designs restrict all fittings to the top of the tank, this problem can be dealt with by converting the section of hose that would be submerged to PVC pipe. In fact, the more PVC pipe (as opposed to hose) that’s used the better, especially where dips and traps are unavoidable.

Finally, once you’ve confirmed there are no leaks, carry out a permeation test. Start by thoroughly rinsing a clean cotton rag in very hot water to remove all remnants of detergent, surfactants, or perfume. Once clean, wet it again with hot water and then wrap it around a hose in an area where the odor is noticeable, leaving it there for three or four minutes. Then, remove the rag and immediately place it in a plastic Ziploc bag. Walk off the vessel and up wind, then open the bag and stick your nose right into it and sniff. If it smells “blackwateresque,” you have a permeation issue and are ready for new hoses. Repeat the test in a few different locations, especially areas that may trap liquid.

Prevention is the Best Medicine for your Sanitation System

Even after you’ve found and resolved the source of a sanitation system, its eradication can be equally as daunting. Upholstery, carpet, bedding, and other soft goods can become permeated, in some cases permanently. Preventing odors is, therefore, always the preferred approach. Start with a good design, engineering a system that minimizes traps, and one whose holding tank relies on top penetrations alone. Ideal holding tank materials include linear polyethylene and fiberglass. The former should be a minimum of 3/8-inches thick to better resist permeation. While costly to custom-build, fiberglass is the most durable and permeation-proof. It should be built using vinylester or epoxy resin and clamped rather than cast in place plumbing fittings.

As noted previously, PVC pipe offers significant advantages over hose, in that it neither permeates nor wears out. It must be well-supported to prevent stress-induced fracture. The selection of sanitation hose can take on a near-religious fervor equal to that of anchors, however, at the very least, the hose that is selected should include a minimum five-year and ideally 10-year permeation warranty. Keep in mind, most PVC-based sanitation hoses warn against the use of “solvents and chemicals,” which could include winterizing anti-freeze. “Rubber” or EPDM-based hoses carry no such prohibition; I’m partial to them.

Finally, holding tanks stink because they represent an oxygen-poor environment, where anerobic bacteria, the kind that smell, thrive. It stands to reason, therefore, that introducing oxygen into the tank will at least reduce the pungency of the odor within, and that, in turn, will make odors that escape less noticeable. Air introduction can be either passive or active. Passive ventilation involves plumbing oversized vents (up to 1.5 inch for larger tanks) to opposite sides of the tank and opposite sides of the vessel thereby creating cross ventilation. I know of at least one active holding tank ventilation system; it’s a low-power, low-volume pump (similar to one that would be used in an aquarium) that bubbles air into the effluent continuously.

Keeping your sanitation system working well and smelling sweet starts with a good design and materials and ends with routine inspections and upkeep. 

-by Steve D’Antonio

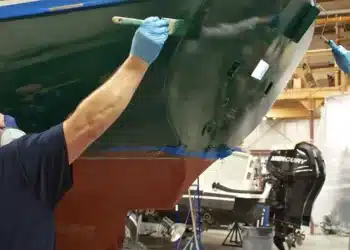
Choosing The Right Paint For A New Coat On Your Boat

Use The Right Paint For A Shiny New Coat

Choose the right topside paint based on its qualities and ease of use.

A fresh coat of topside paint on your boat usually garners admiration from others for that shiny, clean look, but beyond the aesthetic value, the protection against UV light, moisture, salt, and scuffs from crew and gear is way more important.

Topside paint is just what it describes, on the top, above the waterline, including hull sides, the deck, and interiors. There are numerous paint manufacturers that have a variety of marine coatings for every part of a boat from the base coat to the top coat and from primers to paints, varnishes, and stains. Each coating is formulated for a different purpose to provide longevity to the material covered, such as metals, fabrics, wood, plastics, and more. They are durable, flexible (to expand and contract), and maintain color and finish. All paint formulas differ by manufacturer to some extent, and each suggests using their brand for fillers, primers, and additives, but the key is to use chemically compatible products.  

Different Types

There are three types of topside paint: one-part polyurethane, two-part polyurethane, and alkyd enamel. West Marine, who has its own paint brand as well as those from Pettit and AzkoNobel (Interlux and Epifanes), explains that alkyd enamel is an oil-based paint that is easy to use because it doesn’t require as much effort (only need a brush) as polyurethanes. It is a good choice for wood as it’s compatible with the wood’s natural oils. 

The most popular is one-part polyurethane, especially with DIYers because even when used with a brush or roller, its appearance looks like a professional did it. 

“Simplicity is one of the best things about one-part polyurethane,” says Dan Gendreau, TotalBoat’s marketing director. TotalBoat paints can be purchased directly from TotalBoat, Jamestown Distributors, and Amazon. “It’s easier to work with as there’s no measuring or mixing of components and no induction times. With a brush and a roller, you can get a gorgeous, long-lasting finish.” However, it’s not as durable as two-part polyurethane, which is the hardest, strongest, and highest gloss paint available. 

Karl Anderson of Karl’s Boat Shop in Cape Cod, Massachusetts, noted in an article for DIYers that he primarily uses two-part products applied with a spray gun, and commented that they provide a hard, shiny finish that will last for years. However, because they’re sensitive to exact mix ratios and require special equipment as well as perfect conditions, they are difficult for the novice to get good results. He recommends using one-part products that are designed to be applied by the roll-and-tip method, i.e., roll on and smooth with a brush.

Gendreau points out that if you’re painting over previous topside paint and don’t know what type it is, then it’s best to use a one-part polyurethane. “This is because one-part polyurethanes are compatible with other one-part polyurethanes or two-part polyurethanes when applied on top,” he says. “But when applying two-part polyurethane on top of a one-part polyurethane, the solvents in the two-part paint are likely to damage the underlying one-part finish.”

How Much to Use

As for how much paint you’ll need, TotalBoat provided this chart as a reference, but it always depends on how heavily it’s applied and if you use two coats. This is for the hull topside only.

Once you’ve decided on which paint to use, there’s much more to the painting process, including the tools and safety equipment as well as application procedures. But what really matters is the prep prior to dipping in the brush. 

“Tackling topside painting yourself can give you a professional-grade finish at a small fraction of what professionals charge, but only if you approach it the way the boatyard does,” says Gendreau. “About ninety percent of your focus has to be on surface prep. If the surface is super-smooth and faired before you pry open the paint can, it should be that way after the final coat has cured.” 

-by Steve Davis

Read More Southern Boating Haul-Out Guides Here.

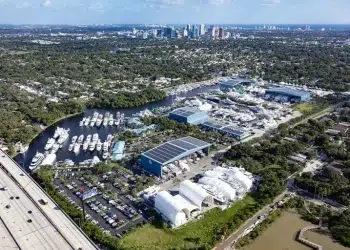
What To Look For When You Need A Boat Yard

Yard Work

What to look for in a yard when it’s time to do some serious work on the boat.

Boat owners are always tinkering on their vessels, but when the job requires some time in the yard for a more comprehensive repair, there are a few things to consider before using their facilities. Proximity to home is a big one because the chances of living aboard during the project is nil, so depending on the scope of the project, ask a few questions to make sure the yard is right for you. 

Can I Work on the Boat Myself or Hire My Own Contractors?

Many yards allow owners and/or crew to work on their boats, but some don’t, especially when it comes to bottom paint. Insurance and liability are primary concerns as is supporting the yard’s contractors and service providers, but another, believe it or not, is keeping the area clean.

“Boat owners and crews are allowed to work on their own boats while here at our facility,” says Tate Lawrence, general manager of Safe Harbor Jarrett Bay in Beaufort, North Carolina. “Owners are welcome to use outside contractors as long as they have the insurance required by our facility and pay a daily contractor fee. We do not allow spray painting to be performed or removal of anti-fouling paint by anyone but our staff. We have flexible hours and have electricity and water available for each boat we haul.”

The same is true at Safe Harbor Lauderdale Marine Center (LMC). Boat owners are allowed to work on their vessels in the yard, depending on what the work is, but all bottom painting in the yard must be completed by one of its on-site tenants that are authorized to paint bottoms. The yard reaffirms, “Painting by air sprayers, scaffolding, welding, and tank cleaning must all be completed by authorized contractors that meet special requirements.”

At smaller yards, there may not be room for do-it-yourself owners beyond what the yard can accommodate with its own boat repairs and refits. The facility at GB Marine Group in Stuart, Florida, is two acres; whereas, Jarrett Bay is 175 acres. 

“Owners may not work on their boats in our yard,” says Joel Butler, marketing director for GB Marine Group. “Work can be done by their contractors for a fee and proof of insurance, but most work is performed by our in-house technicians.”

Saunders Marine Center in Orange Beach and Saunders Yachtworks along the Gulf Intracoastal Waterway (GICW) in Gulf Shores, Alabama, don’t allow owners to work on their boats in the “traditional” do-it-yourself sense, but they do make exceptions depending on the project. Like the other yards, no painting or below waterline service or repairs are allowed by anyone other than Saunders staff or a pre-approved subcontractor. “Our customers are allowed to use their own subcontractors, depending on the services requested,” says John Fitzgerald, president and CEO. “However, the subcontractor must be pre-approved by Saunders, insured, and be in good standing with our company.”

Do You Have the Services I Need?

Most yards are full-service in that they offer a wide range of repair and refit services with skilled technicians on-site. This is convenient for owners and technicians because the shop is right there equipped with machining tools as well as parts. It’s also good to know if the yard has certified mechanics and technicians that can work on your boat’s engine, electronic, and mechanical systems. 

“At Safe Harbor Lauderdale Marine Center, we have on-site contractors who perform most every shipyard trade, including but not limited to, shaft alignment, vibration analysis, class certified welding, custom stainless steel manufacturing, carpentry and cabinetry, canvas work, class certified hull plating, and project management,” says the yard.

Over at Saunders’ yards, Fitzgerald notes, “We have highly skilled, factory-certified technicians for all areas of refit, repair, and yard work. This includes diesel and outboard engines, driveline and running gear, Seakeeper and other vessel systems, and marine crafts (paint, fiberglass, and carpentry). We have workshops with specialized tooling for each department. Both locations have fully enclosed buildings for paint and other projects needing weather protection.”

Speaking of parts, having a supply on property helps keep work moving. Yes, there are the specialty items that have to be ordered from the manufacturer, but as an example, Jarrett Bay stocks more than $1 million in inventory from zincs to fighting chairs. GB Marine Group carries basic parts and gear, but because of its location in boating-rich Stuart, items are sourced and delivered quickly through its network of suppliers. 

What are the Costs?

You probably have a general idea of what the parts cost, but don’t forget labor and yard services. They all add up quickly. Yards typically have price sheets for the services they provide, and contractors will have their own fee schedules, so it’s crucial to get estimates before any work is done. Some will quote a job as a fixed rate while others will add up time and material. Check to see what’s included, such as haul-out, the yard space, power, etc.  

“The fee structure is calculated based on the work specifications and is agreed upon before work begins,” says Fitzgerald at Saunders. “We provide turn-key quotes for certain services, such as standard bottom jobs based on the size of the boat. Other projects are billed using separate charges for all operations performed. This typically takes the form of a quoted project or one that is billed based on the actual time and materials it took to complete the project.”

LMC has fee structures for dockage and laydays based on the length of the vessel, and there is a separate charge for covered sheds. Utilities, such as power, are billed separately dependent upon requirements. 

Just as Important

There are some benefits that just might help you choose the yard for your repair or refit. 

Dock space is one if you don’t have to haul the boat, and most allow work to be done there. Water and power are usually available and some, such as Saunders Yachtworks and LMC, allow the owner or crew to live aboard while services are being performed. At LMC, the boat has to be 65 feet or longer. 

“We have 10 fixed slips and in excess of 1,000 feet of alongside and floating docks available,” says Lawrence at Jarrett Bay. “We offer water and power up to 100 amps.

Security is also a factor considering the boat’s value. All the yards included in this feature have on-site manned security along with cameras. Gate codes are also used at some locations.

Hurricane preparedness is always a concern. Every yard has procedures set in place for major storms based on intensity. LMC has an extensive detailed hurricane plan in place where actions start seven days in advance of landfall. Saunders also includes hurricane haul-out plans for its locations with prepaid customers, and Jarrett Bay works with any boat on its site to help find a place and secure it at the facility.

“Our yard is not a hurricane storage facility,” says Butler about GB Marine Group’s Stuart yard. “However, it is located in a very protected section of the St. Lucie River. Boats may stay in the yard during a named storm.”

Looking for more articles on Haul Out and Maintenance Check Out Our DIY Section  

Amenities are Always a Plus 

The quality of work done at the yard is most important, but there are amenities at most yards or in the area that can make it easier for you to decide to use the facility. A lot has to do with the size of the boat, if crew are involved, or if the distance from home is far enough that you’d need to stay a few days. GB Marine Group is currently developing accommodations for captains and clients. The Stuart yard is conveniently located near Interstate 95 and the Florida Turnpike minutes to downtown Stuart and 35 minutes north of the Palm Beach Airport. There is easy access to both the Atlantic and Gulf coasts of Florida, not to mention the array of restaurants, activities, and beaches in the Stuart area. 

“Both Saunders yard locations are close to a variety of restaurants, golf courses, shopping, accommodations, and most importantly, our world-famous sugar-sand beaches,” says Fitzgerald. “Gulf Shores and Orange Beach have quickly become two of the most popular vacation destinations on the Gulf Coast.”

Jarrett Bay offers an owner’s and crew lounge, courtesy car, and ship store. Diesel, gas, and showers are available. “We are five miles from Beaufort, North Carolina, that has a variety of very good restaurants, shopping, and hotels available.”

LMC has a full-service gym, monthly crew events, concierge, high-speed Wi-Fi, the YOT café and kitchen on-site, as well as food trucks.

One final thought: Find out about the yard’s reputation. What happens to the kind smiles after you’ve signed on the dotted line? Ask fellow boaters or non-employee contractors working in the yard their thoughts about the operations, how the management treats their employees, and the yard’s association with the local community. Get recommendations about other yards in the area and their experiences with them for comparison. You’ll feel more comfortable knowing that the yard you chose is reputable, considerate, and professional.

Stay informed with the latest from Southern Boating

-by Jeremy Peters

Exit mobile version