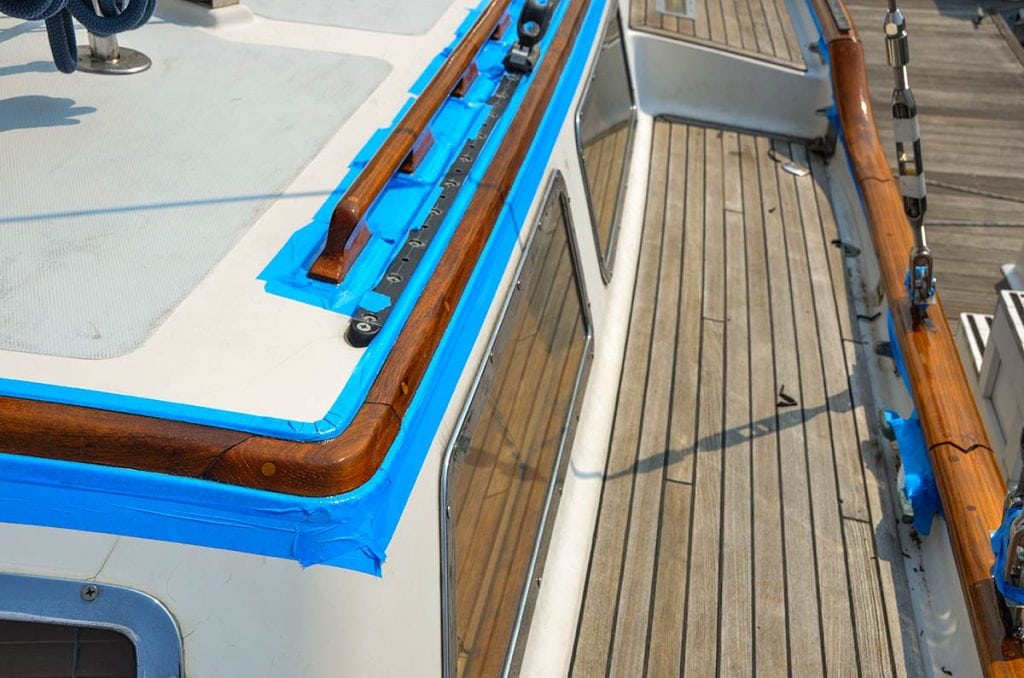
The Damaged Wood Factor

Repair cracked varnish with wood damage.

Repairing a varnished surface that has been a bit compromised and damaged the wood below requires some extra prep work.

If you’re going to take on this kind of project, you must work slowly, pay attention to the weather—work on cloudy days with low humidity and no wind—, use the best products, including green or blue painters tape, a good brush, and be ready to spend lots of time in preparation. (Varnish doesn’t have any pigment to block harmful UV rays from the sun, so make sure your product of choice is loaded with sunscreens.)

A cracked varnished surface can happen because of wear and tear—remember, your rails move and vibrate with the boat’s motion—or due to some kind of impact damage. The most important thing with this type of situation is to get on the repair as quickly as possible to prevent any water from getting in and under the varnish, which can show up as dark spots. Also make sure to avoid the sun’s ultraviolet rays that can change the color of the wood. If you can’t get on the repair right away, invest in a canvas cover to protect the particular rail section until you have time to get things done the right way.

The first thing to do is prepare the surface and that around it to either sand or remove the old coating with a heat gun. (Remember, it’s not just the crack itself but perhaps several inches outside of it as well.)

If you’ve never used a heat gun and scraper before, you might be better off with a sanding block, some heavy grit paper and working up to 220-grit, as you get closer to removing the damaged area. Be sure to use a mask and safety glasses to avoid inhaling any dust particles or irritating your eyes. Wipe the area down often as you work and use a handheld vacuum cleaner to clean up the dust. At the end of this part of the job, wipe things down with a tack cloth to make sure all the residues are removed.

Sanding takes a bit longer but you have much more control over the affected area. Don’t go overboard with what you take off if this is the first time you’ve held a heat gun. With a bit of patience and care, this is a quick way to get the job done. Heat guns work by delivering a concentrated and steady stream of electrically heated air at high temperature. They must be kept moving back and forth at a fairly rapid pace and at a 45º angle over a small portion of the work area while pushing the scraper into the now bubbling and softened varnish. If it goes according to plan, the varnish comes up in one sweep. Wear safety glasses, heat-resistant gloves and always put a tarp under the work site to catch the residues as they are removed.

Don’t scorch the now-exposed surface and be relaxed with the scraper in hand so as not to dig or poke into the wood. If the varnish doesn’t come off easily, go back and re-heat. Chemical stripping is another option, but I choose not to work with these rather harsh substances and the toxic fumes they give off.

Now that the area is exposed, sand the surface clean and fix any blemish that might be there in order to begin building the layers of varnish up to the proper height. Remember, we’ve just taken all of it off and gone right down to the bare wood.

If you have a dark spot, remove it prior to restoring the varnished surface. Before using any chemical agents, a good tip is to try and sand the spot clean first. Go easy and work slowly and you just might get a good result. Should that not work, one time-honored and homegrown fix that’s bantered about the docks is to mix up a batch of mild liquid laundry soap with some regular household chlorine bleach, in a 3/4 detergent to 1/4 bleach solution, which is then brushed on and left to soak in for a few minutes. Again, position your tarp under the work site so drops don’t hit your deck or painted surfaces. Work carefully, rinse the area well and let it dry thoroughly before sanding with 220-grit paper.

If the spot is still visible, use stronger cleaners, perhaps one containing such reactive agents as crystals of oxalic acid, or chlorine and two-part bleach. Use a test piece before using any stronger chemicals or solutions on your actual railings, and follow the products’ directions carefully. A word of caution: If you’ve never done this before and have a rather stubborn spot, ask for help. Check with your marina manager for recommendations.

Building up the varnish may require working over several days of applications and takes patience to achieve the right results. Don’t work directly from the original can. Instead, being careful not to shake it and cause bubbles, slowly pour enough into a separate container. Use a good brush and always apply the product in the direction of the wood grain, pulling it on one way—you don’t “paint” with varnish. If thinner is required for this first coat, it usually is added in a 50/50 ratio.

If you start in the morning, allow this coat to dry, tack clean, and apply a second coat later that afternoon without sanding. Continue for several days. Once you get to the third coat, begin sanding and tacking from this point on, being careful not to allow any dust or debris to adhere to a sticky coat. If that happens, let it dry and spot sand lightly, always tacking before the next coat goes on. You should get eight coats on until the repair is flat and fits in with the surrounding area.

To keep that wonderful shiny finish always looking good, it’s best to do a yearly refreshing application of the topcoat. It’s worth the effort to make your boat stand out.

— By Ken Kreisler, Southern Boating Magazine May 2016

Exit mobile version