

Maintaining your boat’s battery is crucial for performance and increased service life. Keeping it properly charged can be an issue, particularly for vessels that see limited or sporadic use. Installing a modern “smart” battery charger is a great way to monitor and promote good battery health. Here’s a look at the basics, from selection to installation.
Selecting a charger
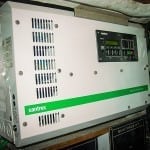
Marine grade batteries aren’t cheap and can easily be destroyed by improper charging, meaning the last place you want to skimp is when selecting a charger. Go with a good quality marine grade unit, ideally one built to American Boat and Yacht Council (ABYC) and Underwriters Laboratories (UL) standards. Look for smart chargers that provide numerous charging options and features such as the ability to select between the different types of battery technologies (i.e. wet cell, gel cell and absorbed glass mat).
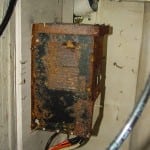
As uncontrolled combustion is not our friend, battery chargers installed on a gasoline-powered vessel must also be labeled as being ignition protected. For PWCs and other open-type craft, you’ll want to go with a sealed, waterproof charger. Regardless of what you choose, stay away from those el cheapo automotive chargers down at the local Mart. They’re not designed for marine use and can cause a multitude of problems from stray current corrosion to shock hazards.
Always consult the manufacturer’s instruction when sizing your charger, but a general rule of thumb is to choose one with an output that’s at least 10 percent of your battery (or bank) capacity. For example, if you have a 300-amp-hour battery or bank, you’d want a 30-amp charger. If you can’t find an exact match based on the above, a charger with a little more output is better than one that’s too wimpy.


Choosing a location
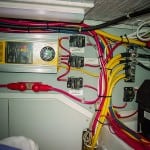
Figuring out where to mount your charger can be an exercise in compromise, so make sure you follow all manufacturer instructions when selecting a spot. The best option is a cool, dry area with adequate ventilation. Higher up is generally better due to better ventilation and protection from the corrosive humidity of the bilge. You’ll also want to avoid high-temperature locations (such as your engine compartment) if possible, although this can be difficult on smaller boats with limited options.
Many of the storage areas that battery chargers wind up in have marginal ventilation at best. If that’s the case with your installation, help your charger breathe easier by not cocooning it with lifejackets, boat covers and other air-blocking items. Adding additional locker vents to increase air flow may also be a good option.
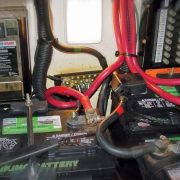
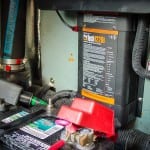
Finally, chargers should ideally be as close to the battery or bank as practical—shorter leads mean less installation cost, less voltage drop and increased charger performance over the life of the unit. That being said, they should not be mounted directly over the batteries. Batteries, particularly wet cell types, produce corrosive gases while charging, which can quickly damage a charger located above them.
Mounting the charger
Once you’ve picked a suitable spot, it’s time to mount the charger. Screws are an acceptable option to mount smaller chargers to a thick bulkhead or structure. The charger should be through-bolted, however, if it weighs more than a couple of pounds. Make sure you use marine-grade stainless steel for all mounting hardware.
Getting wired
Next up is connecting the charger, which involves installation of both AC (to power the charger) and DC wiring (between the charger and battery). DC wiring should be sized according to the manufacturer’s recommendations, which are based on the distance between the charger and battery. This measurement is “round-trip” length (i.e. the full length of both the negative and positive wires).
The longer the wire run, the larger diameter wire you’ll need to offset loss due to voltage drop (a loss of power resulting from the use of wire that’s too small for the run). Using smaller diameter wire than recommended can both decrease charge voltage seen at the battery and increase charging time.
Wires should be routed as directly as possible and provided with support and chafe protection as needed. Once the wire runs are in place, connect them to the battery charger as per the owner’s manual. Wire to wire connections should be made using marine-grade butt splices, preferably those with heat shrink tubing. Never use wire nuts or electrical tape joints—they will eventually fall off leaving energized connections exposed. If the charger DC wire terminates in spring clamps or alligator clips to make the battery connection, cut them off and replace with proper, marine-grade ring terminals.
For smaller boats or watercraft without a permanently installed AC system, hooking up the AC side can be as simple as plugging the battery charger into a suitable extension cord. For a more permanent install where the charger is the only AC-powered item on board, another option is installation of a grounded AC power inlet (such as the Marinco 15A Battery Charger Inlet), which accepts a standard extension cord plug.
If your boat already has an AC system installed, plugging the charger in a convenient outlet (if one’s nearby) may be an option. If not, you’ll want to power it from the main AC distribution panel using marine-grade, multi-stranded, three-conductor, AC wiring (no residential-type solid strand wire, please). Pick an unused circuit breaker of the amperage called for by the charger manufacturer (typically 15 to 20 amps), and connect as per the instructions.
Practice safe wiring by making sure all AC power sources (including inverters and generators) are off and disconnected before starting any work! When all connections are done (with the AC power off) make the final charger connections to the battery and verify the installation is complete. Once that’s done, all that’s left is energizing the AC circuit, powering up the charger, and basking in the seductive glow of electric success!
By Frank Lanier, Southern Boating Magazine September 2015