Sun Powered Solar Panels

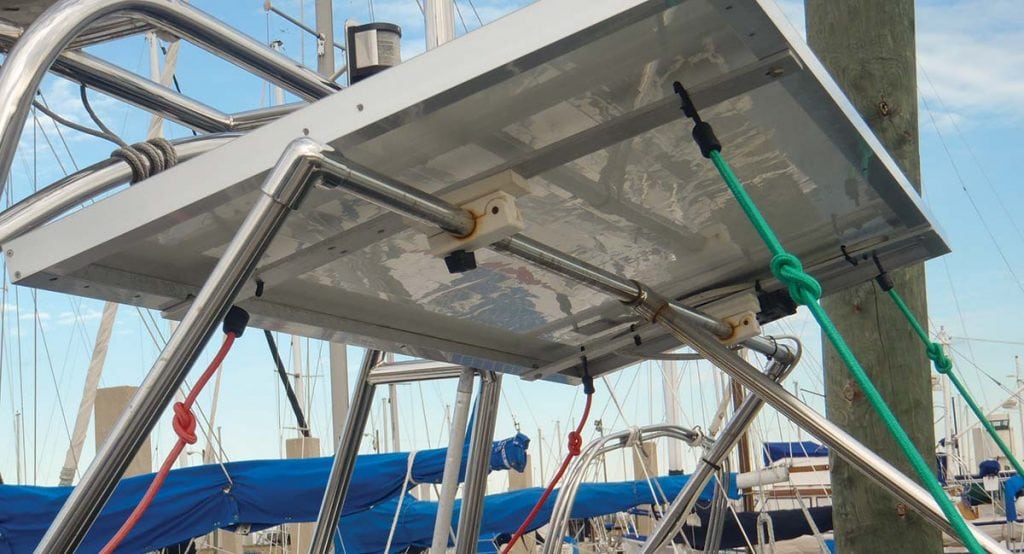
Solar panels are an excellent way to “green up” any vessel’s energy plan, so here’s the lowdown on how to install solar panels.

It’s no mystery that solar panels are a popular choice when it comes to alternative onboard energy systems; they’re noiseless, have no moving parts and provide free electricity for years with minimal maintenance.

While factors such as cost, mounting options, and output are important, a successful installation depends on what you want the panel or system to accomplish. Is the goal to float-charge a battery or supplement an overall energy plan, such as a combination of wind and solar? Or just to install solar panels for offset of your carbon footprint? Answering these questions up front will help determine the type, size and number of panels required.

The following example explains the basic steps used to determine the typical power requirements and installation considerations for a single solar panel installation. The example, while simple, mirrors the steps of more complicated installations.

Let’s pretend you need to install a solar panel to provide charging for a 12-volt, 100-amp hour, wet-cell battery used to power an automatic anchor light on a moored vessel. The first step is determining how much output you’ll need by compiling a daily power consumption estimate. To start with, the daily self-discharge rate for a wet-cell battery is roughly one percent, meaning your 100 amp-hour battery requires one amp every 24 hours just to maintain the status quo.

Assuming your anchor light operates 10 hours each night and draws 50 milliamps per hour of operation, multiply current draw (50 milliamps) by hours of daily operation (10) to reach a daily energy expense of .5 amps. This means the solar panel will have to meet a minimum daily energy tab of 1.5 amps (one amp to address the battery self-discharge rate plus the .5 amps draw of your anchor light). This method also applies to more complex power needs.

Always use marine grade connectors— those with heat shrink work best.

Once you’ve determined power requirements, the next step is figuring out panel size and the best mounting location. Solar panels should be installed where they won’t interfere with the boat’s operation. Ideally, the installation will also be adjustable, allowing you to turn the panels toward the sun periodically throughout the day, which can increase power generation by up to 40 percent. Keep in mind that panel output ratings are based on ideal conditions such as 90-degree orientation toward bright sunlight, no shadowing, optimal temperatures, and no load attached. For the real world, assume a panel will produce roughly half its advertised wattage in amp hours per day when actively aimed at the sun, or around 30 percent otherwise.

Popular mounting locations include cabin tops, stern rails, atop dinghy davits, radar arches, and Bimini tops (with some flexible panels being sewn right into the canvas). Some deck or cabin mounted panels (depending on type) may need to be raised slightly to allow air circulation beneath, as high temperatures can increase resistance and decreases cell output. Installations in warmer climates may require panels with a higher maximum voltage to compensate for decreased outputs.

For example, assume the panel will be a horizontal, fixed-mount installation. A 10-watt panel so mounted should contribute between 3 to 5 amp hours per day. You’ll need at least 13 volts to fully charge your 12-volt battery. As most solar cells generate at least 0.45 volts, you’ll want a panel with at least 33 cells, which should provide around 14.85 volts.

However, this is only the minimum requirement, which may not be enough once you factor in a few cloudy days. Most panels are designed to generate between 15 and 20 volts to overcome problems like clouds or inherent electrical resistance within the panel or installation components. While this higher voltage lets you make up for less electrically productive days, it also means you’ll want to install a charge controller (voltage regulator) to avoid battery damage due to overcharging.

To determine wire size for connecting your panel, first determine current amp requirements by multiplying its rated amp output by 1.25, which adds a 25 percent safety factor. Next, measure the length of wiring run (from panel to battery) and multiply by two (which factors in both the positive and negative sides of the run). Once you have these two numbers, refer to the American Boat and Yacht Council’s (ABYC) 3 percent voltage-drop table for wire size or use the wire chart at marinco.com/en/resources/wire-data/three-percent-voltage-drop.

Always use high-quality, marine-grade connectors and tinned, multi-stranded copper wire for your installation. The wire will run from the solar panel to the charge controller and onto the battery. The controller should be mounted below deck and as close to the battery as possible. Be sure to follow any specific manufacturer instructions for connections, but in general, the panel’s positive lead should connect to the controller’s positive input terminal, and the negative lead should connect to ground—in most cases the negative battery terminal or a ground buss bar.

Connect the controller’s positive output to the battery’s positive terminal using an appropriately sized in-line fuse or circuit breaker. ABYC recommends installation within 7 inches of connection to the battery or another point in the DC system. Finally, waterproof all connections and secure any loose wires with wire ties and cable clamps for a neat installation.

By Frank Lanier, Southern Boating Magazine August 2016

Installing a Battery Charger

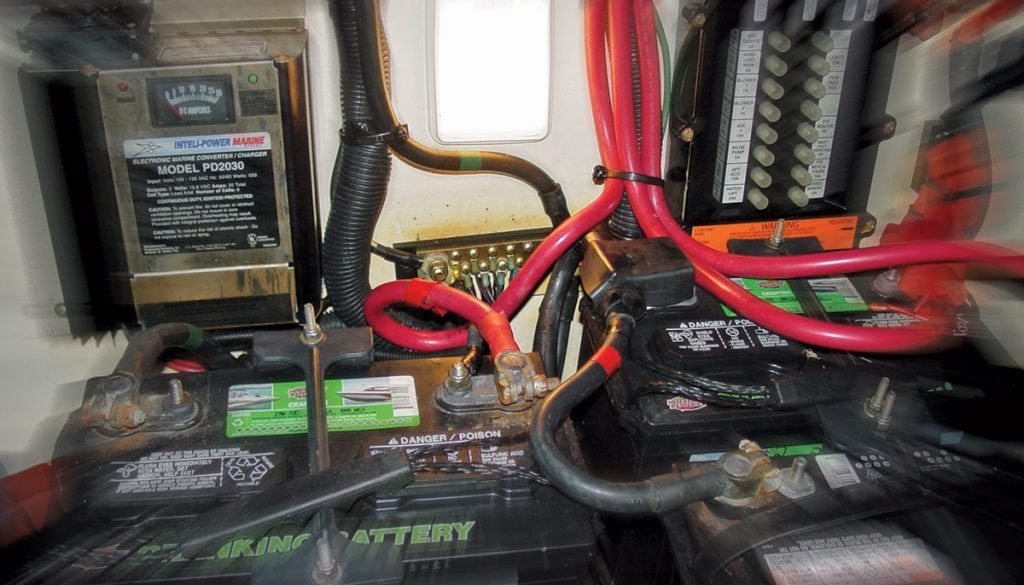
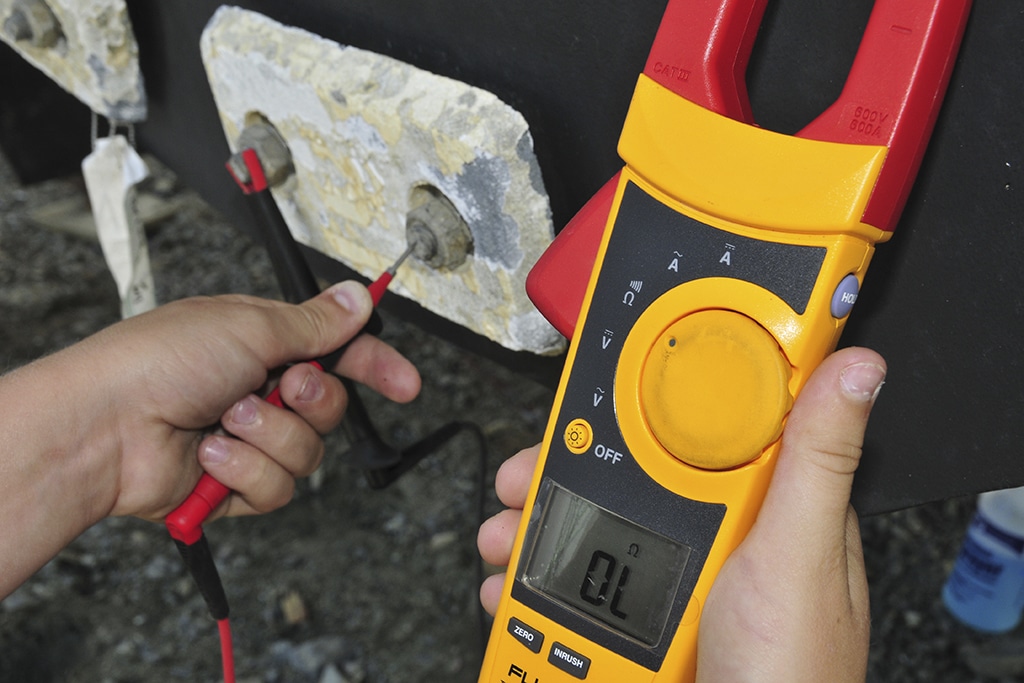
Maintaining your boat’s battery is crucial for performance and increased service life. Keeping it properly charged can be an issue, particularly for vessels that see limited or sporadic use. Installing a modern “smart” battery charger is a great way to monitor and promote good battery health. Here’s a look at the basics, from selection to installation.

Selecting a charger
Marine grade batteries aren’t cheap and can easily be destroyed by improper charging, meaning the last place you want to skimp is when selecting a charger. Go with a good quality marine grade unit, ideally one built to American Boat and Yacht Council (ABYC) and Underwriters Laboratories (UL) standards. Look for smart chargers that provide numerous charging options and features such as the ability to select between the different types of battery technologies (i.e. wet cell, gel cell and absorbed glass mat).
As uncontrolled combustion is not our friend, battery chargers installed on a gasoline-powered vessel must also be labeled as being ignition protected. For PWCs and other open-type craft, you’ll want to go with a sealed, waterproof charger. Regardless of what you choose, stay away from those el cheapo automotive chargers down at the local Mart. They’re not designed for marine use and can cause a multitude of problems from stray current corrosion to shock hazards.
Always consult the manufacturer’s instruction when sizing your charger, but a general rule of thumb is to choose one with an output that’s at least 10 percent of your battery (or bank) capacity. For example, if you have a 300-amp-hour battery or bank, you’d want a 30-amp charger. If you can’t find an exact match based on the above, a charger with a little more output is better than one that’s too wimpy.

Choosing a location
Figuring out where to mount your charger can be an exercise in compromise, so make sure you follow all manufacturer instructions when selecting a spot. The best option is a cool, dry area with adequate ventilation. Higher up is generally better due to better ventilation and protection from the corrosive humidity of the bilge. You’ll also want to avoid high-temperature locations (such as your engine compartment) if possible, although this can be difficult on smaller boats with limited options.
Many of the storage areas that battery chargers wind up in have marginal ventilation at best. If that’s the case with your installation, help your charger breathe easier by not cocooning it with lifejackets, boat covers and other air-blocking items. Adding additional locker vents to increase air flow may also be a good option.
Finally, chargers should ideally be as close to the battery or bank as practical—shorter leads mean less installation cost, less voltage drop and increased charger performance over the life of the unit. That being said, they should not be mounted directly over the batteries. Batteries, particularly wet cell types, produce corrosive gases while charging, which can quickly damage a charger located above them.

Mounting the charger
Once you’ve picked a suitable spot, it’s time to mount the charger. Screws are an acceptable option to mount smaller chargers to a thick bulkhead or structure. The charger should be through-bolted, however, if it weighs more than a couple of pounds. Make sure you use marine-grade stainless steel for all mounting hardware.
Getting wired
Next up is connecting the charger, which involves installation of both AC (to power the charger) and DC wiring (between the charger and battery). DC wiring should be sized according to the manufacturer’s recommendations, which are based on the distance between the charger and battery. This measurement is “round-trip” length (i.e. the full length of both the negative and positive wires).
The longer the wire run, the larger diameter wire you’ll need to offset loss due to voltage drop (a loss of power resulting from the use of wire that’s too small for the run). Using smaller diameter wire than recommended can both decrease charge voltage seen at the battery and increase charging time.
Wires should be routed as directly as possible and provided with support and chafe protection as needed. Once the wire runs are in place, connect them to the battery charger as per the owner’s manual. Wire to wire connections should be made using marine-grade butt splices, preferably those with heat shrink tubing. Never use wire nuts or electrical tape joints—they will eventually fall off leaving energized connections exposed. If the charger DC wire terminates in spring clamps or alligator clips to make the battery connection, cut them off and replace with proper, marine-grade ring terminals.
For smaller boats or watercraft without a permanently installed AC system, hooking up the AC side can be as simple as plugging the battery charger into a suitable extension cord. For a more permanent install where the charger is the only AC-powered item on board, another option is installation of a grounded AC power inlet (such as the Marinco 15A Battery Charger Inlet), which accepts a standard extension cord plug.
If your boat already has an AC system installed, plugging the charger in a convenient outlet (if one’s nearby) may be an option. If not, you’ll want to power it from the main AC distribution panel using marine-grade, multi-stranded, three-conductor, AC wiring (no residential-type solid strand wire, please). Pick an unused circuit breaker of the amperage called for by the charger manufacturer (typically 15 to 20 amps), and connect as per the instructions.
Practice safe wiring by making sure all AC power sources (including inverters and generators) are off and disconnected before starting any work! When all connections are done (with the AC power off) make the final charger connections to the battery and verify the installation is complete. Once that’s done, all that’s left is energizing the AC circuit, powering up the charger, and basking in the seductive glow of electric success!

By Frank Lanier, Southern Boating Magazine September 2015

Carbon Monoxide Detectors

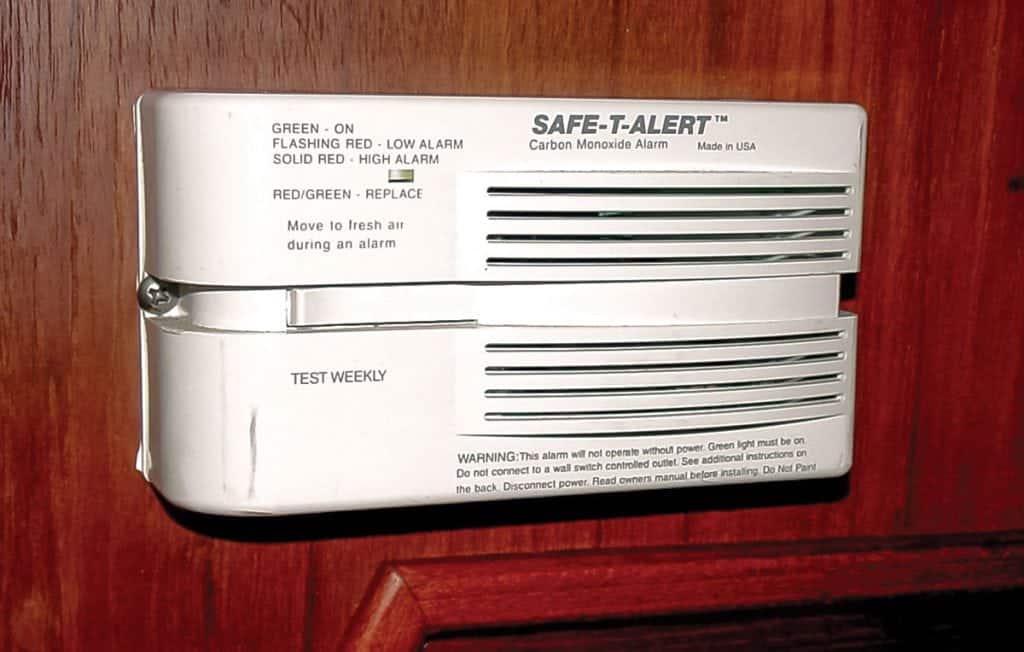
You see them in pretty much every land-based facility—those innocuous little sentinels that warn us of fire and carbon monoxide (CO). The good news for mariners is that their umbrella of protection doesn’t have to end at the water’s edge. Here’s why carbon monoxide detectors are essential for protecting you and your onboard guests.

CO is a potentially lethal gas produced when burning any carbon-based fuel (gasoline, diesel, propane, wood, etc.). While the most common source of CO is exhaust from gasoline or diesel engines, any open flame device such as a stove, heater or grill can produce it. Common signs of CO poisoning include headaches, dizziness, weakness, drowsiness, headache, and nausea—symptoms that can all too easily be attributed to seasickness, alcohol, or too much sun exposure rather than CO poisoning. Although death can occur quickly in a CO-rich environment, exposure to smaller amounts can be just as lethal. The effects of CO are cumulative and can build up gradually in a person’s bloodstream for hours or even days before reaching critical levels. How quickly this occurs is dependent on the concentration of CO being inhaled (measured in parts per million [PPM]) and the duration of exposure.

Unlike the smoke generated by a fire, carbon monoxide is colorless, tasteless and odorless, so the only reliable way to guard against it is the installation of a CO detector. The American Boat & Yacht Council (ABYC) Standard A-24 recommends the installation of carbon monoxide (CO) detectors for all boats utilizing inboard gasoline-powered engines or generators and featuring an enclosed accommodation compartment—defined as a contiguous space containing sleeping accommodations, galley area with sink and a head compartment. ABYC exempts diesel engines from this requirement and while it’s true they produce less CO than gasoline engines, my personal recommendation is that detectors be installed aboard both gasoline and diesel-powered vessels.

The National Fire Protection Association (NFPA) 302 calls for vessels 26 feet or more in length with accommodation spaces intended for sleeping to be equipped with a single-station smoke alarm listed to UL 217 (Standard for Single and Multiple Station Smoke Alarms) and suitable for use in recreational vehicles. ABYC requires that CO detectors be tested to UL 2034 standards.

CO can easily be generated by other sources on board or even introduced from nearby boats via the ventilation system. If you utilize a generator to power air conditioners and other appliances while at anchor, an even better option would be a CO alarm system designed to shut off the generator once CO is detected, such as those offered by Fireboy-Xintex (fireboy-xintex.com) or MariTech Industries (powerboatsafety.com).

Smoke and CO detectors can be purchased individually or as combination units. Another option to the traditional single unit smoke detector is Fireboy-Xintex’s FR Series Fire Detection Systems. The FR Series consists of a monitor panel that supports up to 14 remote smoke or heat detectors for a 12VDC system, or 8 detectors on a 24VDC system. Depending on the model, the FR systems support 1, 2, 4, 8, or 16 zones plus up to 2 audible alarms per zone.

The first impulse for many boat owners is to purchase residential-type units, but be aware that some may not meet construction requirements for marine-grade units (such as Underwriters Laboratories standard 1524).

CO and smoke detectors can be either battery powered (the 9-volt type) or hardwired to a vessel’s DC system. The obvious benefit of battery-powered units is that they can be installed almost anywhere without the need for wiring; however, this lack of an external power supply can also be a disadvantage from a reliability standpoint.

Like their land-based counterparts, battery-powered marine detectors “chirp” to warn users when their internal battery is low. Unlike a typical land-based home or office, boats may go weeks or even months without use. As such, even if the unit chirps for weeks before dying, it’s possible no one will be around to hear it. The best policy here is to self-test the unit weekly and replace the batteries regularly as per the manufacturer. It’s important to note that in the past, CO detectors gained a bad reputation for generating numerous false alarms. Older “single point” alarms began shrieking at the slightest hint of CO, which could be unnerving as a whiff or two of CO commonly drifts into the cabin periodically throughout the day. Modern units use “time-weighted averaging” to determine the amount of CO present over a period of a few minutes rather than at one point in time, greatly reducing the number of false alarms.

Hardwired marine units are powered by the vessel’s 12- or 24-volt DC power system. Those designed for residential or commercial installations (should you still be tempted) utilize 120VAC, which may not always be available while cruising. Power for hardwired detectors must be provided (via an appropriate fuse or circuit breaker) from the “hot” side of the battery switch to prevent them from being accidentally shut off.

Neither ABYC or NFPA states specifically where CO or smoke detectors should be located on your vessel, however they do provide some general guidelines. Primarily, they must be located to monitor the atmosphere in the main cabin and each sleeping area.

Choose a location that both protects the detector from physical damage (rain, spray, sunlight, etc.) and avoids what ABYC calls “dilution of sampled air,” which could occur near hatches, ports, or forced ventilation openings. Locations containing “dead air” spaces should also be avoided to prevent distorted readings.

Unlike LPG or gasoline vapors, which are heavier than air, CO has roughly the same weight as oxygen meaning detector placement is not limited to high or low areas of the cabin. As such, choose a location that is roughly eye level, which makes it easier to monitor detector meters or warning lights.

Finally, both CO and smoke detectors have a limited lifespan. Detectors or sensors (if part of a system) typically need to be replaced every five years, however this varies between units. Check with the manufacturer and verify the recommended replacement intervals prior to purchase and installation.


The following general safety recommendations concerning the dangers of carbon monoxide apply to all vessels and in particular to houseboats and/or similarly constructed vessels:

1. Stay out of areas where carbon monoxide can collect while the engine or generator is running and for at least an hour afterwards. The Coast Guard advises owners and operators of boats to turn off generators with transom exhaust ports when the swim platform on the stern is in use.

2. Don’t allow swimmers near exhaust portals or areas where air pockets may be located under the boat. Swimmers should avoid the area beneath transom swimming platforms or rear decks while the engine or generator is running; if exhaust vents are located on the vessel’s side, these areas should be avoided as well. Adults should keep a close watch on children at all times, particularly when they are playing or swimming in the swim platform area. As a general rule, passengers or crew should not be allowed to sit on swim platforms while the vessel’s engine(s) or generator is running.

3. Use caution when boats are tied together, as carbon      monoxide generated in one vessel can enter other nearby vessels via air conditioning intakes, open portholes, etc.

4. Know the signs of carbon monoxide poisoning and if       suspected, relocate the victim to an area of fresh air and seek medical attention immediately.

5. Read and obey all carbon monoxide warnings placed on generators and engines by the manufacturer, and never tamper with or disconnect carbon monoxide detectors or monitors.

6. Turn off generators prior to going to sleep AND turn off the main AC breaker so “demand start” generators will not start during the night.

By Frank Lanier, Southern Boating June, 2015

Exit mobile version