How to Install LED Lights on Your Boat

How to Install LED Lights on Your Boat

When you install LED lights on your boat, you’ll boost the mood and lower your bill.

Light-emitting diode (LED) lights became popular in the early 2000s. Since then, prices have dropped and efficiency has increased. Today, more boat owners are switching over to LED lighting as their old incandescent and halogen bulbs burn out. Here’s how to install LED lights on your boat.

Leave it to the pros…maybe

While it makes sense to convert to LEDs, boaters should think about whether the job is DIY or one for a marine service professional.

“As simple as lighting sounds, it really is what you cannot see powering and controlling the lights that make every boat different,” explains Bobby Stone, vice president of DRSA in Riviera Beach, Florida. “For example, a sixty- five-foot Viking is completely different than a forty-foot Marlow. In most cases, the Marlow runs off a battery bank with an inverter, and the Viking has generators plus a few DC circuits.”

An electrical professional can determine the condition and layout of the wiring, input power specifications, check if transformers are in line, and how to install new switches, dimmers, or LED power supplies.

“If simply replacing the existing halogen or incandescent bulbs to LED, end users can do this themselves without requiring a technician,” says Petro Ploumis, president of Apex Lighting in Deerfield Beach, Florida. “We can either just sell the LED lights to the customer, or we can go on the boat to make a design plan and provide the installation as well. It all depends on what the customer wants and the planned budget.”

Selecting the lights

There are multiple factors to consider when selecting LED lighting. Those include light color temperature (Kelvin), desired light output (Lumens), dimming (if the bulbs or fixtures are replaced with LED lights and require dimming, an LED dimmer is necessary). Stone adds that the most common problem many people don’t realize is the low-voltage AC power going to their lights. They assume that because the voltage is 24V, it must be 24VDC. Some older boats have toroidal transformers that step voltage down from 120VAC or 220VAC to 12VAC or 24VAC. While there are LED products on the market that are sold as 12VAC or 24VAC, most will not last long-running at low-voltage AC. The components required to allow the LEDs to operate properly (rectifiers) are usually poor quality or not able to fit the smaller G4 LED bulbs on the market.

Another factor is if the boat has a lighting control system such as Lutron or Crestron. Consider a professional review to determine if additional control components are necessary in this case.

Three ways to install LED lights

Ploumis divides a lighting installation into three categories: Starter, Midrange, and All the Way.

“For the Starter, if the existing light fixtures are not very old and in good condition, we often recommend simply swapping out the halogen bulbs to LED,” he says. “This is as simple as replacing a burned-out halogen bulb and will typically cost around fifteen to twenty dollars.

“For the Midrange, you could remove the old fixtures and replace them with the same dimension LED versions,” he says. “This involves pulling down the old lights and splicing in the new lights. Each fixture will usually cost around seventy to one hundred-and-twenty dollars each.

“To go All the Way would include underwater lights, interior, and engine room,” says Ploumis. “We would suggest changing all the interior overhead lights to LED, engine room lights to LED, exterior ceiling lights to LED, the navigation lights to LED. You could add three to four LED underwater lights, such as the Lumitec Typhoon, Bluefin LED Mako, or OceanLED Explore.”

It’s a win-win

The energy savings, lower heat output, better light output, lower maintenance costs, and desired “wow” effect help the customer determine the value of converting to LED. For a 40-foot cruising vessel, the All the Way costs range from $5,000 to $15,000. However, that depends on the lights and options. For an 80-footer, the costs could be as high as $30,000. Generally, underwater lighting installations should be done by a professional.

“Seamless automation for LED lights is getting more popular,” says Ploumis. “In the past, each brand of LED lights needed its own proprietary dimmer or controller. Slowly, companies are coming out with controllers that can control all your lights seamlessly, just like home automation or systems in modern cars.” Yes, there are apps for that.

Check yourself

But, here’s a final note of caution when purchasing LED bulbs or light fixtures for marine applications. Consumers can find a multitude of options and prices online, so be aware that not all LEDs are the same. Not all can tolerate the fluctuations in voltage with a typical marine electrical system. A marine-grade LED bulb is rated and designed to handle voltage fluctuations up to 30VDC. Electronics on the circuit board incorporate rectifiers, capacitors, and DC-to-DC converters to protect the LED diodes.

“Carefully review all specifications before you buy,” says Stone. “In addition, not all marine electricians are experienced in LED conversions. Take care in selecting a qualified  technician for your installation.”

By Doug Thompson, Southern Boating August 2019

How to Install a Transom Shower on Your Boat

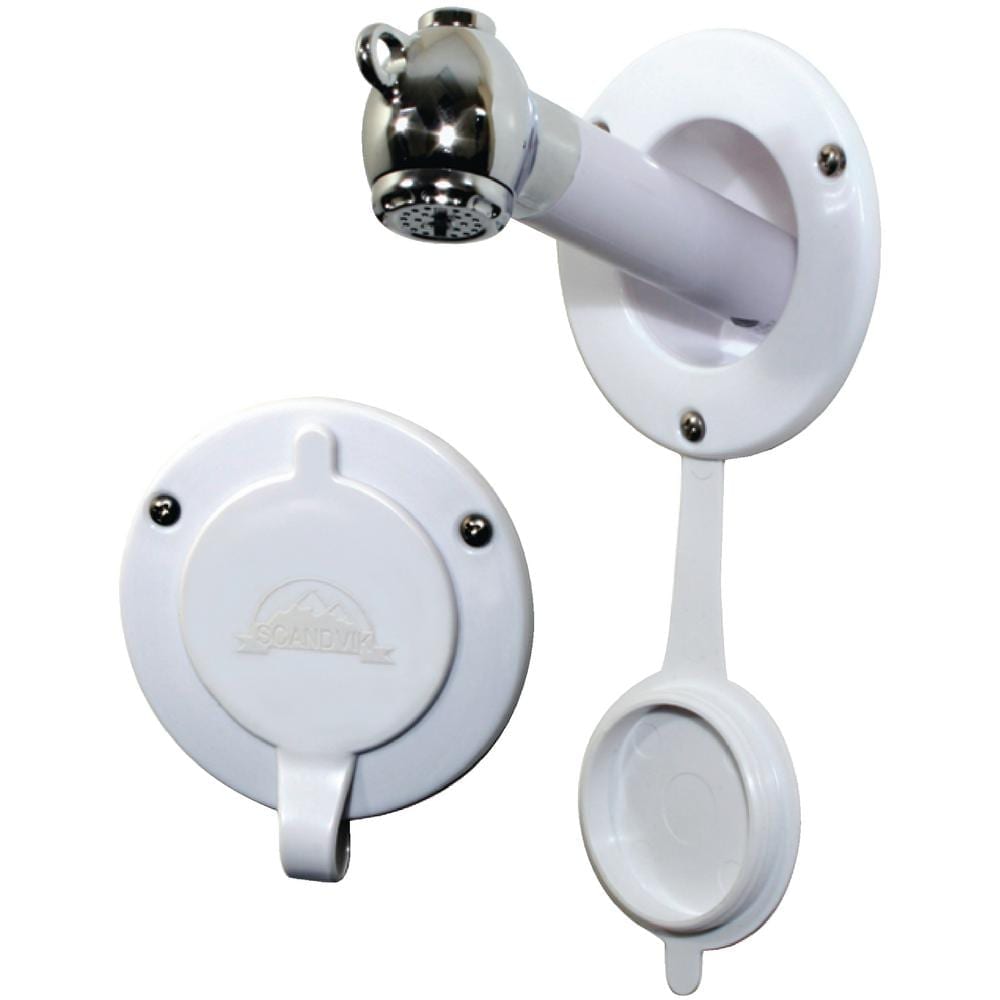
Install a transom shower to rinse away the sand, cool off from the hot sun and wash away the salt.

Boating in and of itself is a great time, but everyone knows the fun really begins after arriving at that favorite anchorage. The kids want to go kayaking, the dog wants to swim and hairy Uncle Joe visiting from Jersey wants to go snorkeling (while hopefully avoiding last year’s backward thong fiasco).The downside to all this fun is the salt, sand, and muck tracked on board at the end of the day, that is, unless you have a transom shower.

But if you don’t have one, installing a transom shower is a project that’s within the ability of the average DIYer. Here’s a look at what’s involved and the various options available.

Transom showers can use saltwater or plumb directly into an existing freshwater system as well as provide hot and cold water. Although you can cobble a system together, the simplest way to install a transom shower is by purchasing a kit. Kit parts may vary slightly but at a minimum will contain a recessed enclosure, a showerhead or nozzle (fitted with a length of retractable hose), and valves for hot and cold water control.

The Setup

The installation itself is pretty straightforward; however, as with any project, you’ll want to thoroughly plan out and visualize it prior to beginning. Start by gathering a few basic tools, such as a tape measure, pencil, drill, bits, jigsaw, wrenches, Channellock pliers, screwdrivers, and a hose cutter or sharp knife. As for parts, you’ll need two barbed hose “T” fittings, appropriate lengths of hot and cold water hose (assuming a hot and cold shower installation), stainless steel hose clamps and a tube of marine-grade adhesive sealant such as 3M 5200.

Location, Location

The first decision is to select a location for the shower. Look for a flat surface near the swim platform, transom or cockpit, one with enough depth behind it to accept the shower enclosure and enough room in front to allow the shower enclosure’s lid (if so equipped) to swing open. Double check to make sure you won’t be cutting or drilling into anything unexpected (wiring, hoses, rod holder, etc.).

Choose a location that allows the shower head to reach a convenient height for ease of use (you can verify this by using a piece of line cut the same length as the shower hose), but avoid areas above electrical equipment or other such items that could be damaged by water leaks or drips should they occur. Accessibility to the area (in order to run the hoses) is another consideration.

Mounting

Most shower kits include a template to assist with cutting the hole. You can also make your own by tracing the outline of the enclosure and marking the location of the mounting holes to assist with drilling. Place the template where you want to mount the enclosure, tape it in place and then cut the hole. When cutting and mounting in solid fiberglass, simply apply a bead of sealant around the inside flange of the enclosure to seal out water. If the area is of cored construction (balsa, plywood, etc.), you also want to seal the edges of the hole (thickened epoxy works well) to prevent water intrusion into the coring and the possibility of rot or other core related issues in the future.

Once the hole is cut, dry fit the enclosure, drill the mounting holes and install the mounting hardware to ensure everything fits properly. If adequate access exists behind the enclosure, you can mount it now and connect the water system hoses afterward. If not, you’ll need to plumb the shower prior to mounting.

For our purposes, let’s assume you have plenty of access and want to mount the enclosure first. Start by applying a liberal bead of caulk along the mounting flange. Carefully install the enclosure and tighten the mounting hardware until caulk begins to ooze out, then stop. Most folks want to crank down until whatever they are mounting is tight, but this approach squeezes out most (if not all) of the caulk. A better approach is to snug it up and let the caulk cure. This forms a gasket and provides a better seal.

As a final touch, remove the mounting bolts or screws one at a time and coat the threads liberally with sealant prior to that final tightening.

Plumbing

Once the enclosure is mounted and the shower assembled (normally involves simply connecting the shower head to the hose, which is then screwed into the enclosure), locate the nearest access to the vessel’s hot and cold water system, allowing the shortest, straightest run possible to the new shower.

Once you’ve located a promising spot, turn off and secure power to the water pressure pump. Next, cut the hoses and install the “T” fittings (securing each with stainless steel clamps). Then run the respective hoses back to the shower and support each hose with wire ties and mounts or cushioned stainless-steel clamps every 12 to 16 inches or so. Once everything is connected, power up the water pressure pump and inspect the system for leaks. Now you’re ready to hose down the kids, dog and Uncle Joe with your new transom shower.

By Frank Lanier, Southern Boating August 2018

Exit mobile version