If you can’t tie a knot, is it better to just tie a lot?
Proper boat knots are not difficult to learn, but we see custom knots that don’t always do the job intended. More knots aren’t always the answer. Just take a walk down the marina docks to see what exciting variations are out there. Once you learn how to tie a proper knot, docking will be a joy.
Why Two Knots Beat “Tying a Lot”
Right Knot for the Right Job
An old salt with a gray beard like me can confidently tie more knots than you can probably name. But there are two common knots that every boater can learn and use for most situations. These two are the bowline and clove hitch. They each have a specific purpose aboard. And while it’s easy to learn how to tie these knots, a proper nautical knot should be both easy to tie and easy to untie quickly.
Franck Bauguil wears many hats. But the Senior VP of Yacht Ownership and Product Development for Leopard Catamarans, The Moorings...
The Cleat Knot (a.k.a. Cleat Hitch): Step-by-Step
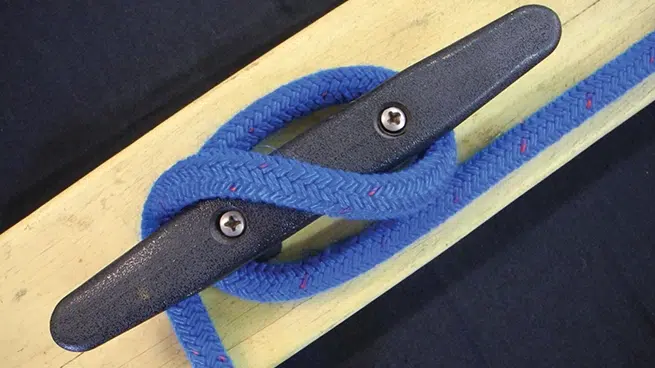
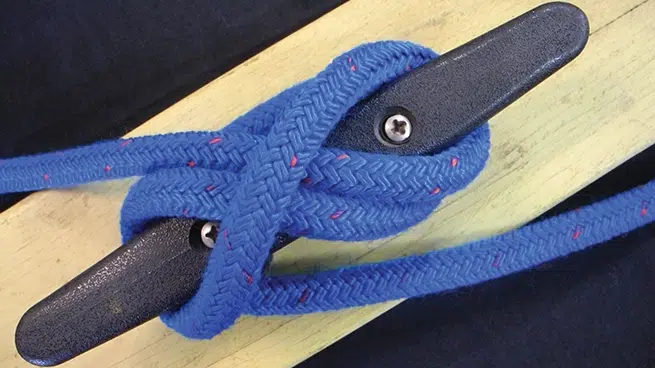
The most useful knot for a fledgling deckhand is the cleat knot. Whether the cleat is on your boat or on the dock, we prefer to tie a cleat knot rather than loop the dock line around the cleat. With a cleat knot, you are more in control when the time comes to adjust your lines.
Most cleats have a supporting base that is fixed to the dock or through-bolted into the boat deck. Coming out of the base of the cleat are two horns that are important to creating your knot.
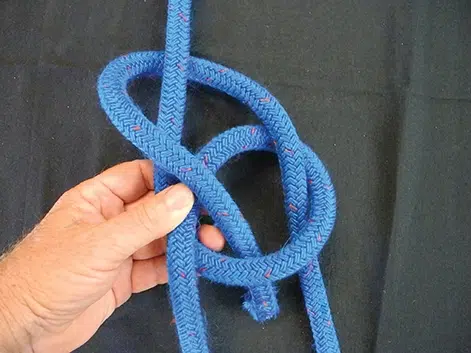
Start with wrapping the line a full 360 degrees around the base for a mechanical advantage while providing line friction. This friction will help secure the knot when completed. Then cross your line over one of the cleat horns, then around the base and back, as if you are making a figure 8. Before running the line around the second horn to complete the figure 8, STOP! Invert your line at the second crossing. This may also be termed an under flip. A gentle tug and you are done.
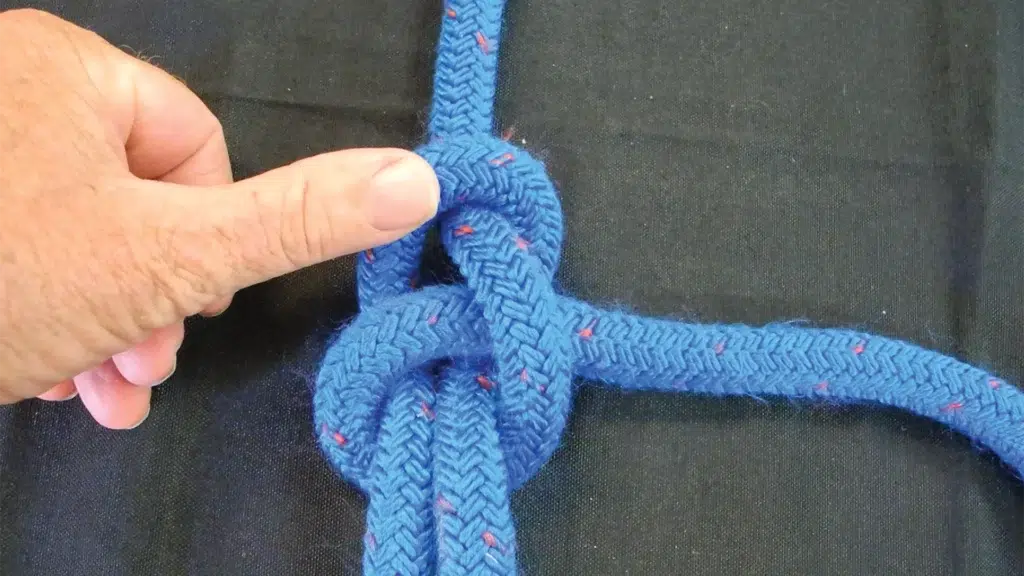
A correctly secured cleat knot will look like two rivers under a bridge. We see many custom knots, but the most common incorrect version looks like a pretzel knot. The pretzel will never securely lock the line to the cleat. So, learn the proper cleat knot and be confident your knot will hold.
Remember, a proper nautical knot is easy to untie. Simply put your foot or hand over the bridge and roll it back and forth. This will loosen the knot allowing it to slide apart and away from the cleat.
Clean Knot How to - Quick Steps
Wrap the line once around the cleat’s base (full 360°) for friction.
Cross over the first horn, then around into a figure-8 to the second horn.
Before finishing, invert the last crossing (under-flip) to lock.
Tug to snug; it should look like two rivers under a bridge.
To untie: press on the “bridge,” roll it, and lift free.
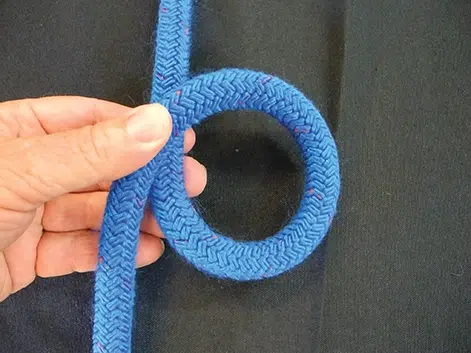
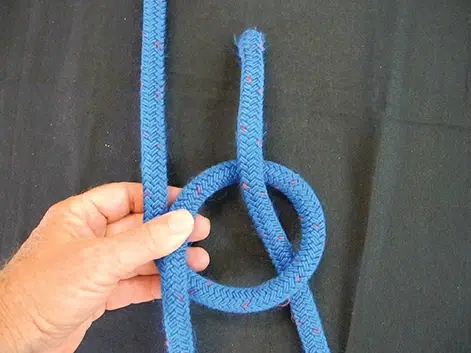
Tying to a Piling: Make a Bowline Loop
Some docks offer a combination of cleats and pilings to secure your boat. Many dock lines have a small factory-made loop already spliced into one end. Unfortunately, this small loop will not fit over most marina pilings. To compensate, you might invert the small loop, pulling line through the loop to choke the piling. This works while arriving but when trying to cast off it can be difficult to remove the choked line. Additionally, a neighboring boat may also choke their bow line on top of your line.
Bow Line For a Piling - Quick Steps
Make a small loop (the “rabbit hole”) in the standing part.
2. Pass the working end up through the hole (the rabbit comes out),
3. Around the standing part (around the tree),
4. And back down the hole (back into the burrow).
5. Dress and tighten; you now have a fixed loop sized to drop over the piling.
Fast Cast-Offs: How to Untie Cleanly
A bowline knot can create the perfect-size fixed loop with a diameter to easily go over the piling. Using a bowline knot also allows easy line removal from the piling when casting off. If a neighbor has choked their line with inverted loop over your bow dock line, simply pull the boat or use a bow thruster to easily reach and untie the bowline knot at the piling.
While there are many more nautical knots, learn how to tie these first two basic knots and you’ll dock with confidence every time.
Boat Knots - Key Facts
Essential knots: Cleat knot (cleat hitch) and bowline
Rule of thumb: Right knot, right job; easy to tie, easy to untie
Cleat knot basics: Wrap base once for friction → figure-8 across horns → invert (under-flip) the final tuck
Bad example: “Pretzel” wrap won’t lock—redo with proper under-flip
Piling tip: Tie a bowline to create a loop that slides over the piling; cast off fast even if another line sits on top
Untying hack: “Two rivers under a bridge”—roll the bridge loop to loosen, then lift free
People Also Ask:
What two knots should every boater learn first? The cleat knot (cleat hitch) and the bowline. They cover most docking and piling situations and are easy to tie and untie.
How do I tie a proper cleat knot? Wrap the line once around the cleat base (360°) for friction, make a figure-8 over the horns, then invert the final crossing (under-flip) to lock. It should look like two rivers under a bridge.
Why does my cleat knot slip or jam? Skipping the base wrap or missing the under-flip causes a “pretzel” that won’t lock and can jam. Add the base wrap and finish with an under-flip.
What’s the fastest way to cast off from a piling? Use a bowline to make a fixed loop sized to drop over the piling. You can lift it free even if another boat’s line sits on top.
Is choking a piling with a small spliced eye OK? It works in a pinch but can be hard to remove and may trap your line under others. A bowline loop is the better, cleaner solution.
Any tips to untie a tight cleat knot? Press your hand or foot on the bridge, roll it, then lift the line free. A proper cleat knot should release easily.


