Cool Running

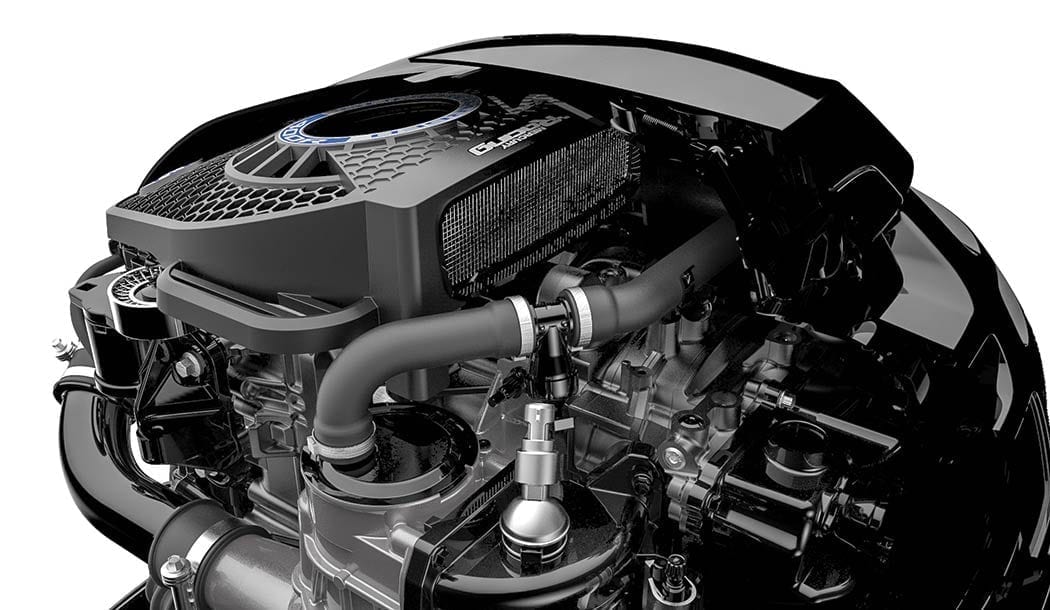
Keep an eye on your engine’s cooling system.

Recently I had both inboard diesel engines of the boat I was delivering dialed in at 2200 rpm and moving along at a comfortable speed. My feet were up, my back was settled into the pedestal chair, and I was enjoying the ride as I made my way to the marina at a slow bell when the starboard engine alarm went off. The rpms on the state-of-the-art, electronically controlled engine quickly went from 2200 to 1500 and then to complete shut down. Bringing both throttles back to neutral, I noted a spike on the digital temp gauge and instantly wondered what could have gone wrong from intake to exhaust and everything in between.

I checked the expansion tank’s coolant cap, water pump, the various hoses, clamps, and exhaust riser before taking a look at the raw water sea strainer. After unscrewing the lid, I detected bits and pieces of thin plastic.

I got away lucky on this one. The source of the problem was a small plastic bag. I shut off the thru-hull intake, removed the hose, checked the impeller, and cleared the residue. Problem solved—a much better outcome than a catastrophic engine failure. To keep your system running cool, let’s first look at the operation of an outboard engine.

“The cooling system is quite simple,” said Mike Nimmer, Mercury Marine’s product service manager. “Powered by an impeller in a water pump, raw water—whether it is salt, brackish, or fresh—comes in through the lower unit, is forced around the powerhead and then leaves the engine via the exhaust. No water coming out of the tell tale is a sure sign something is wrong.”

Much like my experience, the protocol on an outboard is first, when noticeable change in operating temperature comes into play, to shut down the engine. (With multiple engine configurations, when possible, get back to the dock before checking things out.) Lift the lower unit out of the water and check the intake port. If it is clogged or shows signs of debris, clear it. Lowering the engine back down and a quick start will confirm if that was the problem. “If not,” says Nimmer, “it’s time to have a look at the water pump and impeller.”

Be familiar with your engine manual and know the correct procedure for doing this kind of maintenance. “If you pull that impeller out, you’re most likely going to need to put in a new one so always carry the right spares,” Nimmer said. While impellers are quite robust, if you operate your engine(s) in areas of shallow water, this can often result in sand or other debris entering the system, so check yours on a regular basis. “If you store your engine over a season, put in a new one before you launch again,” suggests Nimmer. This is also a good time to check the seal on the water pump.

A problem with the engine’s thermostat and relief or bypass valve can also cause overheating. Pre-set to a factory determined setting, this device regulates water temperature to cool the engine, while keeping the proper pressure in the system for proper transfer of generated heat.

If any debris or corrosion is present, the thermostate should be swapped out. Your engine owner’s manual will detail this simple operation. “Never run your engine without its thermostat,” warns Nimmer. “It’s designed to protect and without it, severe damage can occur.” And regardless of what kind of water you boat in, Nimmer recommends you freshwater flush your engine after each use.

Inboard diesel or gasoline boats both have closed, expansion tank systems and raw water cooling with important maintenance items to be observed.

Know the proper operating temperatures of your coolant levels and manifold at various rpms. A difference of a few degrees can indicate trouble. Check with your owner’s manual for this information as well as your own daily maintenance log. (If you don’t keep one, now is a good time to start.)

Knowing the flow amount of your exhaust water is also key to confirm problems with your cooling system—as a boat operator, you should know this by sight. Should you see any restricted flow, shut the engine down and starting at the thru-hull, work your way through the system. A ruined impeller—a major cause in many cooling system problems—can send rubber pieces into the heat exchanger. If you run gasoline engines, you most likely have cast iron risers. As these are quite prone to corrosion in salt water, make checking them part of a seasonal inspection.

Besides the usual suspects such as the water pump, seal, belt, and impeller, follow the hoses, look at the clamps, and make sure the expansion tank cap is on properly. If this hasn’t been done in a while, take the fittings off the heat exchanger and check for clogs and marine growth. If any are present, clear things out with a thin wire brush. It is also a good idea to use an engine flushing product such as Barnacle Buster at least once a season. And use the correct antifreeze as per your engine manufacturer’s recommendations.

With cooling problems the heat generated can ultimately ruin an engine. Carry spare impellers, pre-cut hoses, clamps, the correct antifreeze, and the proper gaskets, grease, and tools aboard before setting out. I also like to have a full roll of self-fusing silicone tape in my toolbox—it can provide a great quick fix for a leaking hose until you get back to the dock. And don’t forget that all-important owner’s manual.

If you suspect something is wrong it’s time to shut it down. And if you’re not up to the task, get your marina manager on the phone or seek out a reputable mechanic to get the job done


By Ken Kreisler, Southern Boating Magazine December 2015

Fuel Storage

Don’t Fuel Around.

Oil is the result of decaying matter of once-living organisms compacted over untold tens of millions of years. As layer upon layer of sediment settled one on top of the other, the increasing pressure and the ensuing rising temperatures produced a chemical change whereby the remains—way too complex to discuss here—were transformed into the raw material that would eventually lead to petroleum. Most boat owners are savvy enough to chart their necessary fuel-ups with plenty of reserve built in. But if you enjoy covering long distances and do not have the proper tankage—or do not trust the quality of the fuel in a certain port of call—you might consider carrying bladder tanks to store your extra fuel.

“Not all fuel bladders are created equal,” says David Dack, VP of sales for Aero Tec Laboratories (ATL), a company specializing in flexible containment technology. “First off, always look for the best quality possible. Money should be no object with this equipment. The one thing you do not want to deal with when carrying volatile diesel fuel or gasoline is an inferior product.” ATL manufacturers bladders constructed from rugged, military-spec, rubberized fabric equipped with such built-in safety features as pressure relief and anti-backflow valves. “The former prevents any pressure build-up as the fuel expands, for example, with the bladder sitting in the sun in the cockpit. The latter prevents any back-spill while taking on fuel.” Ease of use is a primary concern as well. Make sure you position the tank(s) so the weight is evenly distributed as not to throw your boat off. “The bladder must be firmly fastened to the deck with a tie-down kit that is secured over the stand pipe and then ratcheted down. We suggest using a cargo net as an added security measure in case of rough seas,” Dack recommends. “Bladders are most stable when completely full and can be easily rolled up or folded and tucked away within a vented compartment.”

ATL manufacturers bladders constructed from rugged, military-spec, rubberized fabric equipped with such built-in safety features as pressure relief and anti-backflow valves

With ATL equipment, a half-inch brass ball valve assembly with a composite hose barb fitting is standard, with an optional one-inch ball valve for those who are looking for faster fuel transfer. Reinforced hose is then slipped over the barbed fitting on the outlet while the other end is run into the vessel’s main tank. A siphon or gravity feed is then initiated to start the flow of fuel from the bladder to the main tank. Alternatively, an explosion-proof pump may be used to transfer the contents of the bladder to the boat’s main tank. “We also offer our space-saving FueLocker™ design not only for those whose deck space is limited but also to maximize those areas where traditional pillow type of tanks can take up lots more real estate,” Dack suggests.

If you boat seasonally you will want to pay special attention to the fuel in your tanks when preparing for winter lay up. “For inboard gasoline or diesel boats, and with all the issues concerning ethanol, we add a fuel stabilizer and top off the tanks to minimize the chance of any water condensation from happening, which stimulates biological growth and corrosion.” says Dan Cordano, Service Manager for the Suntex Liberty Landing Marina in Jersey City, New Jersey. For outboards with small portable fuel tanks, Cordano suggests running the engine until it stalls out before putting it away. With those portable tanks, he suggests making sure you use the familiar red plastic for gasoline and yellow for diesel to avoid any confusion.

“Besides the inherent nature of fuel degrading over time, boats have a vented system and the possibility of introducing water, whether during seasonal storage or not, is always a problem. You want to do whatever you can to avoid that situation,” says Janis Grundman, National Sales Manager for Technol, a company specializing in fuel stabilizers. “Make sure of your fuel source, keep your tanks topped off whenever possible, and use a stabilizer during those lay-up times. Using an additive during regular operating times will help to prevent any engine problems. And always follow the manufacturers’ recommendations for the amount to use per gallon.”

Until we figure out a better way to power our boats, perhaps with solar, wind, electric, another energy source, or a combination thereof, taking the proper precautions and getting the best out of our fuel systems will keep your boat running smoothly and safely.

By Ken Kreisler, Southern Boating July 2014

Shaft Seal Maintenance

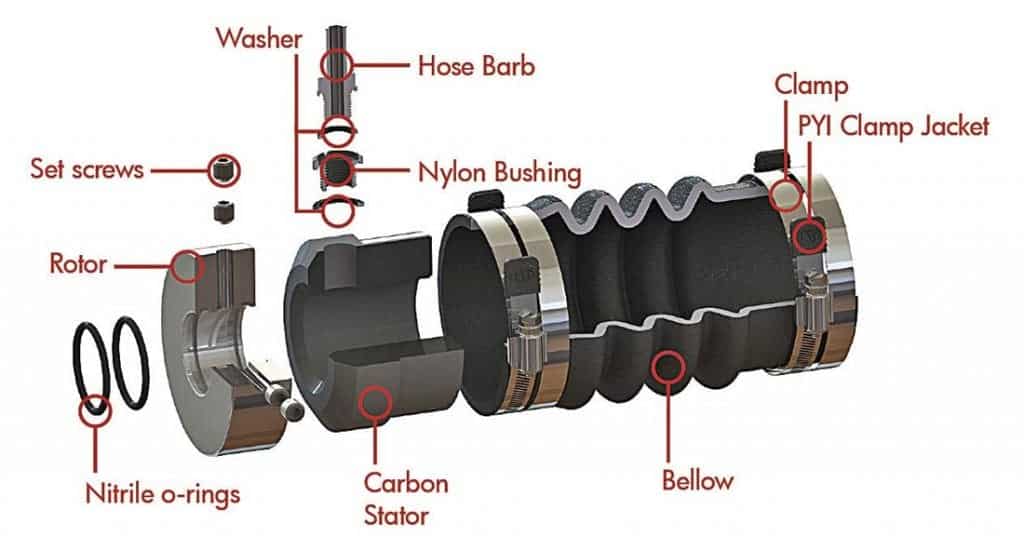
Shaft seal maintenance should be part of your boat’s regular check-up.

Ever since the first prop was connected to the first shaft being turned by the first internal combustion engine, there has always been the dilemma of how to keep water from entering a boat through that all-important hole in the hull while also protecting the rapidly spinning shaft from the ravages of friction.

If your boating years go back as long as mine, you are familiar with the steady dripping of the practical, always carefully attended-to stuffing box. This most important piece of gear housed a series of packing rings—numbering three to five and often made of braided flax rope—coated with a waterproof material, and allowed the shaft to pass through the hull and keep turning while under power. It also prevented the water from getting in and flooding the bilges. Once properly tightened down by a collar, the rings were compressed enough to allow a few drops of water every minute or so to “leak” in, permitting the shaft and the packing to be cooled enough to prevent scoring the metal surface or “burning” the packing.

But as with all things in the marine industry, a change was due. Enter the dripless shaft system. Utilizing highly machine-polished, mechanical mating surfaces held together by pressurized tension on a rubber bellows surrounding them and a hose connection between the intake side of the engine’s raw water pump and the device, they have become the familiar norm in most applications.

One of the big downstream concerns associated with the old stuffing boxes was one created when there was a more than acceptable raw water flow. Sprayed outward by the spinning shaft, the ensuing salty mist would, of course, hasten corrosion to any metal it landed on. With a fully encased design, shaft seals alleviate this problem.

[photomosaic type=”rectangular” ids=”4969,4970″]

“We were most likely the first to use a rubber lip seal lubricated by raw water from the engine, replacing the traditional packing,” says Tides Marine engineering and quality control manager Skip Lookabaugh.

Overheating the housing can be trouble. In most cases, this is caused when air is allowed to accumulate inside due to most inboard engine drive shafts being installed on an angle, thus creating bubbles that can travel up the shaft. Dripless systems use the pressurized lubrication water to force any air out.

Dirt and grit can get sucked up if you run aground or operate in shallow, sandy bottom areas. And watch out for fishing line as well. “As with all devices with moving parts, if you notice a slight leak that steadily increases over time, you might want to check inside,” Lookabaugh adds. Prevention includes examining the lubrication system, hoses, clamps, and pump on a semiannual basis. Lookabaugh also recommends changing the lip seals on Tides’ equipment every five or six years.

Lou Foster, Duramax’s vice president of sales, also offers some maintenance insight and highly recommends regular visual inspections, especially if you have had any work done in the shaft area where someone could have stepped on the seal. With boats that have been sitting idle, there could be scale, sea growth or some other debris present. “Also, and while it should never happen, a noticeable bulge in the outer yellow bellows indicates something is causing the inner one to leak and should be taken care of,” Foster recommends.

“While we do have tolerances built in to allow for some misalignment and vibration, the main problem most boat owners would face occurs when something hits the running gear and really throws things out of whack,” explains Justin Romesburg, director of international sales for PSS. Therefore, should there be any alignment or vibration question, it is highly recommended that you have your shaft seal checked as well.

The shaft seal systems on the market today are rather robust and will have a fairly extended longevity with regular and diligent preventive maintenance. Should you have any questions about your particular dripless shaft seal, it’s best to get in touch with the manufacturer and have it serviced. Keeping your boat on top of the water depends on it.

By Ken Kreisler, Southern Boating March 2014

Exit mobile version