
Solar panels are an excellent way to “green up” any vessel’s energy plan, so here’s the lowdown on how to install solar panels.
It’s no mystery that solar panels are a popular choice when it comes to alternative onboard energy systems; they’re noiseless, have no moving parts and provide free electricity for years with minimal maintenance.
While factors such as cost, mounting options, and output are important, a successful installation depends on what you want the panel or system to accomplish. Is the goal to float-charge a battery or supplement an overall energy plan, such as a combination of wind and solar? Or just to install solar panels for offset of your carbon footprint? Answering these questions up front will help determine the type, size and number of panels required.
The following example explains the basic steps used to determine the typical power requirements and installation considerations for a single solar panel installation. The example, while simple, mirrors the steps of more complicated installations.
Let’s pretend you need to install a solar panel to provide charging for a 12-volt, 100-amp hour, wet-cell battery used to power an automatic anchor light on a moored vessel. The first step is determining how much output you’ll need by compiling a daily power consumption estimate. To start with, the daily self-discharge rate for a wet-cell battery is roughly one percent, meaning your 100 amp-hour battery requires one amp every 24 hours just to maintain the status quo.
Assuming your anchor light operates 10 hours each night and draws 50 milliamps per hour of operation, multiply current draw (50 milliamps) by hours of daily operation (10) to reach a daily energy expense of .5 amps. This means the solar panel will have to meet a minimum daily energy tab of 1.5 amps (one amp to address the battery self-discharge rate plus the .5 amps draw of your anchor light). This method also applies to more complex power needs.

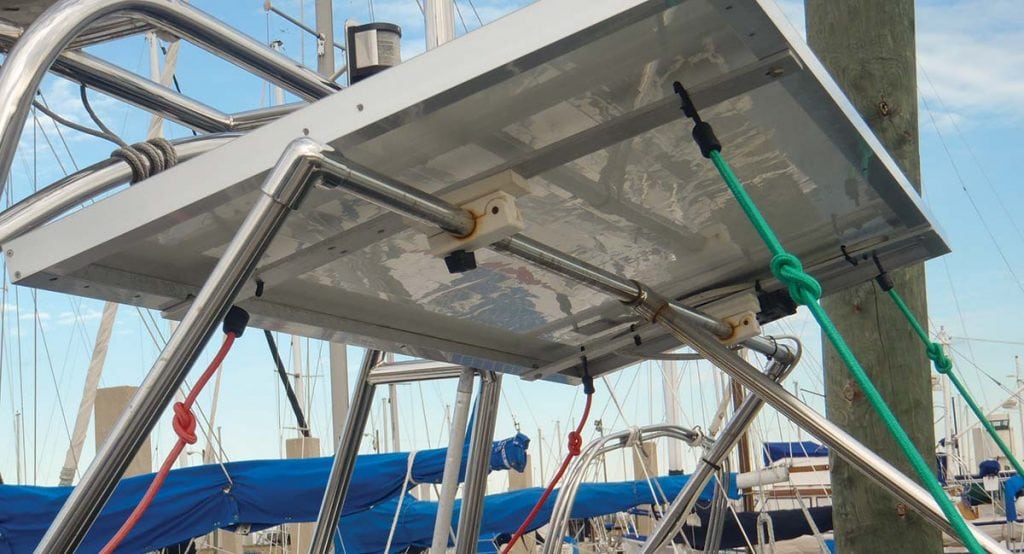
Once you’ve determined power requirements, the next step is figuring out panel size and the best mounting location. Solar panels should be installed where they won’t interfere with the boat’s operation. Ideally, the installation will also be adjustable, allowing you to turn the panels toward the sun periodically throughout the day, which can increase power generation by up to 40 percent. Keep in mind that panel output ratings are based on ideal conditions such as 90-degree orientation toward bright sunlight, no shadowing, optimal temperatures, and no load attached. For the real world, assume a panel will produce roughly half its advertised wattage in amp hours per day when actively aimed at the sun, or around 30 percent otherwise.
Popular mounting locations include cabin tops, stern rails, atop dinghy davits, radar arches, and Bimini tops (with some flexible panels being sewn right into the canvas). Some deck or cabin mounted panels (depending on type) may need to be raised slightly to allow air circulation beneath, as high temperatures can increase resistance and decreases cell output. Installations in warmer climates may require panels with a higher maximum voltage to compensate for decreased outputs.
For example, assume the panel will be a horizontal, fixed-mount installation. A 10-watt panel so mounted should contribute between 3 to 5 amp hours per day. You’ll need at least 13 volts to fully charge your 12-volt battery. As most solar cells generate at least 0.45 volts, you’ll want a panel with at least 33 cells, which should provide around 14.85 volts.
However, this is only the minimum requirement, which may not be enough once you factor in a few cloudy days. Most panels are designed to generate between 15 and 20 volts to overcome problems like clouds or inherent electrical resistance within the panel or installation components. While this higher voltage lets you make up for less electrically productive days, it also means you’ll want to install a charge controller (voltage regulator) to avoid battery damage due to overcharging.
To determine wire size for connecting your panel, first determine current amp requirements by multiplying its rated amp output by 1.25, which adds a 25 percent safety factor. Next, measure the length of wiring run (from panel to battery) and multiply by two (which factors in both the positive and negative sides of the run). Once you have these two numbers, refer to the American Boat and Yacht Council’s (ABYC) 3 percent voltage-drop table for wire size or use the wire chart at marinco.com/en/resources/wire-data/three-percent-voltage-drop.
Always use high-quality, marine-grade connectors and tinned, multi-stranded copper wire for your installation. The wire will run from the solar panel to the charge controller and onto the battery. The controller should be mounted below deck and as close to the battery as possible. Be sure to follow any specific manufacturer instructions for connections, but in general, the panel’s positive lead should connect to the controller’s positive input terminal, and the negative lead should connect to ground—in most cases the negative battery terminal or a ground buss bar.
Connect the controller’s positive output to the battery’s positive terminal using an appropriately sized in-line fuse or circuit breaker. ABYC recommends installation within 7 inches of connection to the battery or another point in the DC system. Finally, waterproof all connections and secure any loose wires with wire ties and cable clamps for a neat installation.
By Frank Lanier, Southern Boating Magazine


