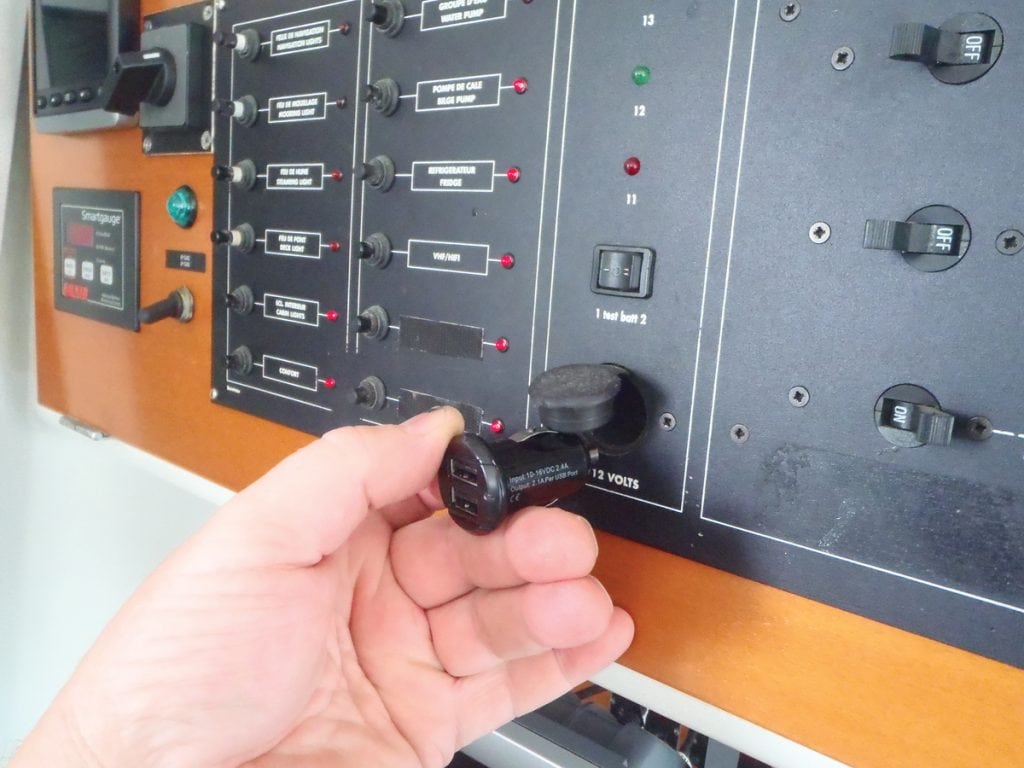
How to install a USB charger

We’ve got all the tips on how to install a USB charger.

You’d be hard-pressed to find a boat owner that couldn’t use a new or additional USB charger outlet, particularly in light of the increased use of smartphones and tablets for navigation. Most boats have a standard 12 VDC outlet (allowing you to insert a USB charge adapter), however, the contacts can be unreliable aboard a bouncing boat, and the protruding adapter is prone to snagging. A dedicated USB socket is a much better alternative. Here’s how to enjoy a few hours on your boat while adding a convenience that everyone can appreciate.

The first step is selecting a USB outlet, but searching online results in seemingly limitless options. Narrow your search by selecting only water-resistant units constructed of marine-grade components such as those from Marinco, Mastervolt, Blue Sea, etc. Those are the ones you’ll typically see at most any marine chandlery or online distributor. Other features to look for include a water-resistant cover, dual USB ports and a power indicator light or backlighting. Some units even incorporate a 12 VDC power meter providing a quick, convenient way to monitor battery voltage.

Next, take a moment to step back and visualize the installation as a whole. Mentally walk through it in an effort to head off any potential problems: You’ve chosen an ideal location, but is there a path to run the power wires? This also provides a good opportunity to make a list of tools and materials needed to complete the job preventing those extra trips back to the chandlery for forgotten items.

Once you’ve chosen a USB outlet, planned the installation and assembled all of the necessary tools and materials, it’s time to get down to business. These tips will help you along the path to USB charger nirvana.

  • Select an area for the outlet that’s convenient for charging but is protected to the extent possible from weather, spray, etc. While the outlet may be water resistant with the cover in place, that won’t be the case while in use.
  • Be doubly sure of what’s on the other side of the selected mount location. Drilling into hoses or electrical cables is never conducive to a good install.
  • Turn off all power prior to drilling. Place battery switches to off or better yet, disconnect the batteries completely. If there are AC circuits on board, turn off all breakers, inverters,
    etc., and unplug shore power plugs. Leave all power off until the project is completed and you’re ready to test.
  • You can use a spade bit to drill the mounting hole for the outlet, but a hole saw will produce a much cleaner cut. Cover the mounting area with masking tape to protect the
    gelcoat from scratches and help prevent chipping while drilling. For this article, we’ll assume the hole is being drilled through a solid fiberglass panel. Drilling through
    cored panels will involve additional steps (sealing the exposed coring, etc.) to prevent water entry issues.
  • Use good quality marine-grade wire with two conductors, a red (positive) wire and black or yellow negative one. Support the wire run every 18 inches and provide chafe protection (grommets, etc.) where necessary.
  • Begin the wire run at the plug end by feeding it through the outlet hole and working toward the DC power panel. Leave about a foot of wire hanging out at the plug end to make installation of the outlet easier once the wire run is completed.
  • Use marine-grade connectors for all power connections, preferably heat shrink-style, crimp-on connectors to prevent corrosion.
  • Connect the wire at the rear of the breaker panel. This will typically involve a positive connection on the switched side of the main breaker and a negative connection to the
    negative bus bar. Ensure all crimp on ring terminals are of the correct size for the studs or screws they’re attached to.
  • Ensure the installation is protected by an appropriately sized fuse as per the manufacturer’s instructions. This may involve installation of a fuse holder in the positive wire between the panel and outlet.
  • Connect the wire to the back of the outlet plug. This will typically be done using female spade connectors.
  • Drill the holes and mount the outlet flange. Place a small amount of marine-grade silicone beneath the flange to prevent water entry.
  • Once the installation is complete, turn the power back on and test the outlet by plugging in a phone, tablet or other suitable devices into the USB charger.

By Frank Lanier, Southern Boating December 2017

Photo: USCG

Exit mobile version