Know Your Exhaust System

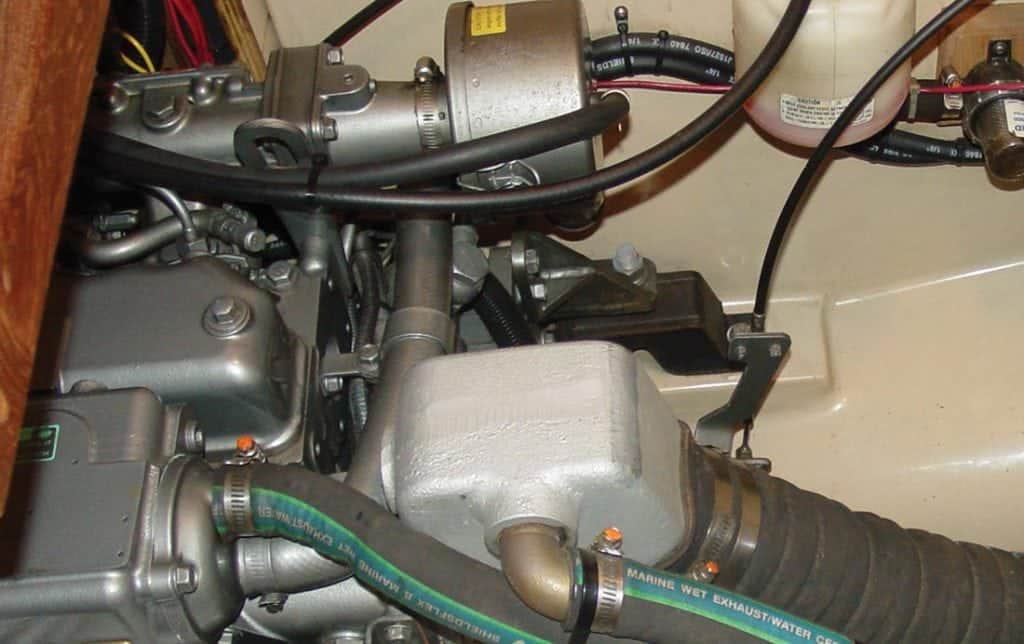
Marine exhaust systems for inboard engines can be divided into two basic types—dry and wet exhausts. Dry exhaust systems have been around the longest but are now found primarily on commercial vessels or other specialty applications (high-performance craft, etc.). The basic job of a dry exhaust system is to carry hot exhaust gases overboard through a series of metal pipes. These pipes typically extend vertically from the engine and into a protective stack, where exhaust gases are then expelled above the decks and well away from the vessel.

Wet exhaust systems are more popular with recreational boats and are the focus of this article. They use water to cool the exhaust gases—and quiet engine noise—prior to discharging it overboard. Another benefit of this approach is the additional installation options it provides builders, as the cooled gases allow the system to now be routed horizontally to the exhaust outlet. Reduced temperatures also mean other materials (rubber, fiberglass, etc.) can be used in the system.

How they work

Water-cooled exhaust systems inject cooling water into the exhaust via an exhaust riser or mixing elbow, where the exhaust then pushes the water out of the exhaust outlet. Exhaust cooling water is typically provided by the engine’s raw water pump although a second pump may also be used (depending on the system).
Most installations will also include a muffler located between the riser and the discharge outlet. This not only reduces engine noise but also gives errant water entering the exhaust outlet a place to collect.

Maintenance tips

A great familiarization (and maintenance) strategy is to conduct an inspection of your exhaust system now and at regular intervals in the future, ideally as part of your fall layup and spring commissioning routine. Ideally, all materials used in your exhaust system should be labeled as to their suitability. Hoses, for example, should be labeled “marine wet exhaust” and be able to withstand heat, water weight, pressure, oil, and acids. Anything other than short hose runs (i.e. four times the inside diameter of the hose) should feature wire-reinforced hose, while all hose connections should be made to a ridged component (pipe, muffler, exhaust outlet, etc.). Hose to hose connections (i.e. a larger hose fitted over a smaller hose and then clamped) are not acceptable.

Vessels with a transom exit exhaust should also have an exhaust valve, which is simply a rubber flapper that attaches to the outside of the exhaust creating a one-way check valve to help prevent water from entering the exhaust (and possibly the engine).

During your exhaust system inspection check hoses for leaks, kinks, chafe, bulging (at hose clamps), and other signs of deterioration. Verify each hose is double clamped where possible (see sidebar) and that hose clamps are tight and free from corrosion. Keep a lookout for leaks at other system components as well, paying special attention to engine manifold and exhaust elbow joints (prime places for both leaks and corrosion). Heat-resistant lagging (insulation) covering dry or “hot” sections of the exhaust should also be removed periodically to allow a full inspection of the components underneath. Check the exhaust system with the engine both off and on as some leaks will only occur with the engine running.

Finally, finding and correcting exhaust leaks are also extremely important from a safety standpoint as these can introduce carbon monoxide (CO) into the vessel’s interior with deadly results.

Helpful Tips

Double hose clamp installation
While double hose clamps are often recommended for many cooling system hoses (particularly on seacocks), they should only be installed where there is sufficient length of barb/nipple available and hose end overlap to allow it. Hose clamps should be installed no closer than 1/4″ to the end of the hose and must fully engage the barb to prevent damage to the hose from occurring.

Engine manifold and exhaust riser checks
Engine manifolds and exhaust risers should be periodically removed, pressure tested and inspected for internal corrosion and clogging, any of which can lead to catastrophic engine failure. This should be considered routine maintenance particularly with systems operating in salt water. How often depends on vessel location (fresh or salt water) and the amount of use. However, at a minimum they should be removed and inspected every four to five years and more frequently for older units.

By Frank Lanier, Southern Boating Magazine September, 2015

Negative Effects of Corrosion

The Devil is in the Details

“Great floods have flown from simple sources,” said William Shakespeare, which is a fitting opening for the subject of the potential negative effects of corrosion aboard your boat and the possibility of big troubles because of it. How big? Great floods, indeed.

Here are a few facts. Steering clear of any chemistry lesson, electrolysis involves only one metal and a major change occurring in an electrolyte with chemical properties that make it capable of conducting an electrical current. A good example is when a lead-acid battery discharges and produces a significant alteration in the concentration of the battery acid. So when one of my dock mates called me on the VHF asking for a tow, he was wrong when he stated, “Electrolysis caused that blade on my prop to weaken and finally break off.” No, shipmates, his problem was most likely brought about by galvanic corrosion or, in part and sometimes in collusion with, its equally evil relative, stray current.

With galvanic corrosion the deterioration occurs between the dissimilar metals as they react while immersed in salt water. This is caused by the current—the movement of an electric charge—that flows between the two, each acting as anode or cathode, depending on its place on the galvanic chart of metals in sea water, and as a result of either being physically or electrically connected.

[photomosaic ids=”5693,5692,5691,5690,5689″ orderby=”rand”]

The long and short of it here is not so much with the why of the process but more of preventing the result. For example, my buddy’s bronze propeller blade gave up more of itself, corroded as it were, and also the stainless steel shaft it was attached to because it is a less noble (or more reactive) metal than that of the shaft’s material.

While the effects of galvanic corrosion will more than likely occur over a protracted period of time, the serious effects of stray current can be seen in as little as several days. Should you have, for example, some faulty wiring lying in the bilge or a damaged float switch sending current into the water—or the same condition existing on another vessel in your marina—or even issues from the dockside shore power, regardless of whether you have a galvanic isolator in use, your boat is in serious danger. A shaft, rudders, props, outdrives, lower units, and bronze through-hull fittings are all at risk. If you even suspect this may be the case, and unless you are an ABYC certified marine electrician, the best advice is to take a big step back and get the experts in posthaste. (abycinc.org/educationprograms/certificationDirSearch.cfm).

Protection against galvanic corrosion is a bit simpler and yet comes with its own set of rules. “With fiberglass boats, Mil Spec A-18001K Zinc alloy sacrificial anodes are most suitable for the saltwater environment if the underwater metal you are trying to protect is bronze, stainless, and Nibral,” says Bob Olsen, President of BoatZincs.com. “With brackish water, aluminum anodes (Mil Spec A-24779)––which also provide saltwater protection as well––work best. If you use your boat only in fresh water, magnesium anodes (Mil Spec A-21412) are what you will need.”

If you run a stern drive or outboard boat, use aluminum protection. It’s best to check with your manufacturer for any special needs. In addition, with inboard engines, always make sure to check your pencil zincs twice a year.

The size of the anode is a function of how many square feet of metal are being protected, and if you are re-zincing make sure you confer with your yard or marina service manager. “Except for a few situations, you cannot over-protect your boat,” Olsen advises. He adds that boat owners should feel free to collar their boat shafts as well, as long as the boat is properly bonded. As always, call in the right technician to have a look if questions arise.

Making sure your boat’s metal fittings are properly protected against both galvanic and stray current corrosion is one of the most important preventive maintenance regimens aboard your boat.

By Ken Kreisler, Southern Boating March 2014

Exit mobile version